


Need to figure out how to stabilise video in Premiere Pro? Handheld footage can make your scene more immediate, giving the impression to the viewer that they’re part of the action. But there’s a big downside to it as well, which is often referred to as “shaky-cam”. Now there definitely is a place in the filmic art form for a clip that is more blurry and shaking than expected - it can lead to a greater feeling of reality, immersion, and even unease and nervousness. But there are some limits: in all of the mayhem, your audience should still be able to follow what’s going on.
Sometimes, you might just want to get as smooth a moving shot as possible, without having to resort to the added expense of stabilising gear. So what are you to do when you’ve uploaded your footage into Adobe Premiere Pro, only to realise that what you had hoped was a steady shot, turns out to be anything but? Thankfully, it’s one of the best video editing software for a reason - one top feature is a video stabilisation tool. Here’s how it all works.
- Best video editing software for beginners: Tested, reviewed, and rated
How to add transitions in Premiere Pro: Basic steps
What to do
- Shoot some shaky-cam
- Add the clip(s) onto your Timeline
- Apply the ‘Warp Stabiliser’ effect, and alter the parameters to suit
What you'll need
- Adobe Premiere Pro
- Some clips shot handheld
- A project already underway
- Skill level: Beginner
Step 1: Add media

If you haven’t yet added your handheld camera footage to your project, you can do so in multiple ways. We’ll describe two simple methods here.
The first one is locating it on your computer. Drill down your folders until you’ve found the clip you’re after, then simply drag it from there onto your project’s Media Tab, lower right of the interface.
Another option would be to right-click on an empty spot in that panel, and choose ‘Import…’ from the contextual menu. You then navigate through your local hard drives once more, find the file you want, and click on Import.
Once in your Project, drag that clip onto your Timeline.
Step 2: Stabiliser effect

Stabilising footage is done through the use of an effect. You’ll find the specific one you’re after in the Media panel’s ‘Effects’ tab. Drill down the Video Effects folder, and open Distort to find ‘Warp Stabiliser’.
Alternatively, there’s a handy search field at the top of that tab. Type in ‘Warp’ to narrow down the available options. You should end up with ‘Warp Stabiliser' and 'Wave Warp'. Drag the former onto your clip in the timeline.
Be prepared to wait a while for the analysis to be done as it will greatly depend on your computer’s processing power, as well as the length of the clip. For that reason, it’s best to only use the effect on just the part you wish to use, rather than the whole clip. On the plus side, Premiere Pro is fully capable of doing the analysis in the background while you work on another part of the edit.
Step 3: Effect Controls

If you check the clip in the Timeline, you’ll notice a pink ‘fx’ icon top left of it. Right-click on it to see various info about the clip, including values for the warp stabiliser you just added. You can't change them from here though. Any alteration is to be done from the ‘Effect Controls’ panel, top left of the interface. Make sure the clip in question is selected, for all of its parameters to be populated in there.
The ‘Effect Controls’ panel allows you to have access to every changeable aspect of your clip, and even alter those values over time. If you no longer need an effect you've added, just select it from the list and hit the ‘Delete’ key. As you likely suspect, you can’t actually delete effects that are integral to every clip, such as Motion and Opacity, but any you’ve added yourself are fair game.
You can also toggle an effect on and off without deleting it - a highly convenient tool to see how a clip looks with or without a specific effect. To do this, click on its ‘fx’ tag, to the left of the effect’s name. A crossed out tag means it’s disabled.
Step 4: Smooth Motion slider

Some of these parameters need to be explored in greater detail. The easiest one is the ‘Smoothness’ slider. The lower the value, the closer to the original footage’s shakiness you're getting, and the higher the value the 'smoother' the clip potentially becomes. Despite the fact the slider limits you to numbers between 0 and 100, you can actually type in higher ones - although this will result in additional cropping of your clip.
Above that is the Result menu. By default ‘Smooth Motion’ is selected, and you should keep to that for all moving shots. If however you’re trying to replicate the look of a stationary camera attached to a tripod, select ‘No Motion’ instead. Do note however that if you use that option on a moving shot, weird unwanted artefacts may appear on the video.
Step 5: Method menu
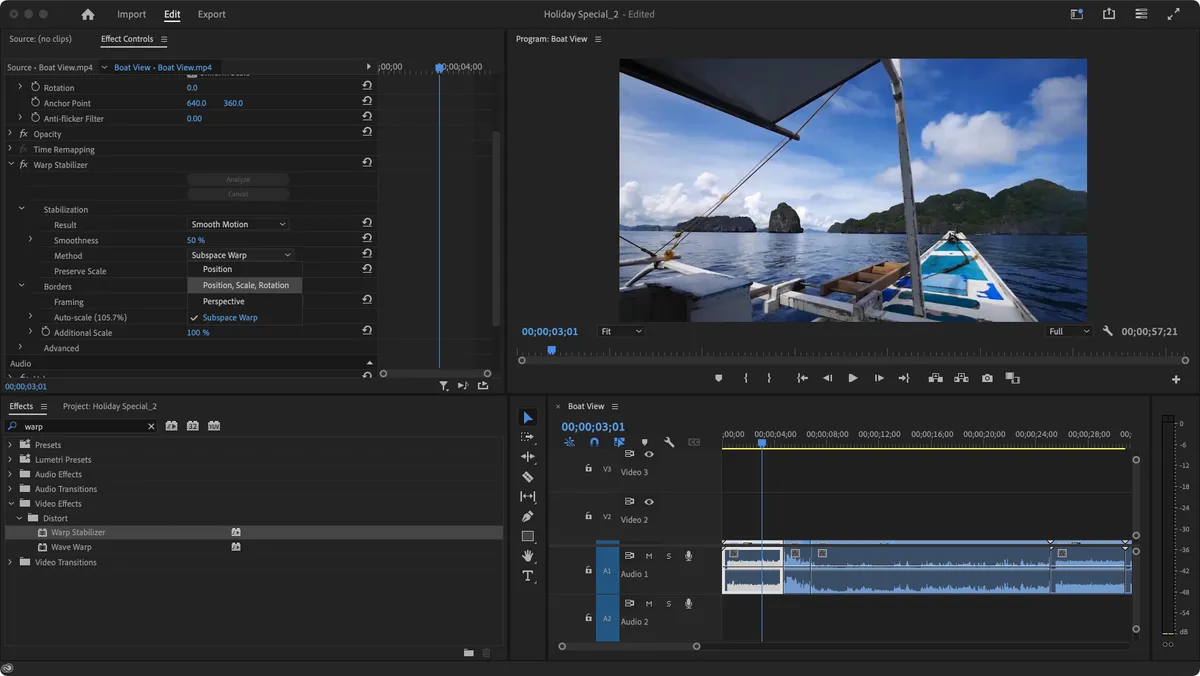
The Method menu allows you to apply various different types of stabilisation, based on the complexity of the calculation used. By default, the process will attempt the most complex one first, and scale down to the next ones should the result not be to the algorithm’s expectations.
‘Subspace Warp' tries to distort various parts of the frame to achieve a stable clip. However if there are not enough areas in the frame for it to track over time, it will try ‘Perspective’ instead.
The next option has the software trying to corner-pin the frame in order to stabilise the footage. If it can’t do that, it will throttle down to ‘Position, scale, and rotation’, which as its name implies, attempts to alter the frame's position, scale and rotation to achieve a stable image. Failing that, we’re down to just ‘Position’, which is the simplest stabilisation option.
However, whichever one the algorithm ends up choosing, you’re not bound by that decision, and can select another to see how the effect looks and if it’s acceptable to you.
Final thoughts
Digitally stabilising footage can work wonders, especially with the modern algorithms churning away in the background doing all the magic. But it should not be seen as the solution to fix all wobbly shots - always try to use a tripod or gimbal on the shoot. Because however good they are, even with the best video editing apps and software, there’s really only so much you can fix in post, while still preserving image quality.
For more help with Adobe’s prime video editor, we’ve also explored How to add titles in Adobe Premiere Pro and How to add transitions in Premiere Pro.
- Best video editing laptops: Tested, reviewed, rated by us
