How to use speech to text in Microsoft Word
Speech to text in Microsoft Word is a hidden gem that is powerful and easy to use. We show you how to do it in five quick and simple steps

Master the skill of speech to text in Microsoft Word and you'll be dictating documents with ease before you know it. Developed and refined over many years, Microsoft's speech recognition and voice typing technology is an efficient way to get your thoughts out, create drafts and make notes.
Just like the best speech to text apps that make life easier for us when we're using our phones, Microsoft's offering is ideal for those of us who spend a lot of time using Word and don't want to wear out our fingers or the keyboard with all that typing. While speech to text in Microsoft Word used to be prone to errors which you'd then have to go back and correct, the technology has come a long way in recent years and is now amongst the best text-to-speech software.
Regardless of whether you have the best computer or the best Windows laptop, speech to text in Microsoft Word is easy to access and a breeze to use. From connecting your microphone to inserting punctuation, you'll find everything you need to know right here in this guide. Let's take a look...
How to use speech to text in Microsoft Word: Preparation
The most important thing to check is whether you have a valid Microsoft 365 subscription, as voice typing is only available to paying customers. If you’re reading this article, it’s likely your business already has a Microsoft 365 enterprise subscription. If you don’t, however, find out more about Microsoft 365 for business via this link.
The second thing you’ll need before you start voice typing is a stable internet connection. This is because Microsoft Word’s dictation software processes your speech on external servers. These huge servers and lighting-fast processors use vast amounts of speech data to transcribe your text. In fact, they make use of advanced neural networks and deep learning technology, which enables the software to learn about human speech and continuously improve its accuracy.
These two technologies are the key reason why voice typing technology has improved so much in recent years, and why you should be happy that Microsoft dictation software requires an internet connection.
Once you’ve got a valid Microsoft 365 subscription and an internet connection, you’re ready to go!
Sign up to the TechRadar Pro newsletter to get all the top news, opinion, features and guidance your business needs to succeed!
Step 1: Open Microsoft Word
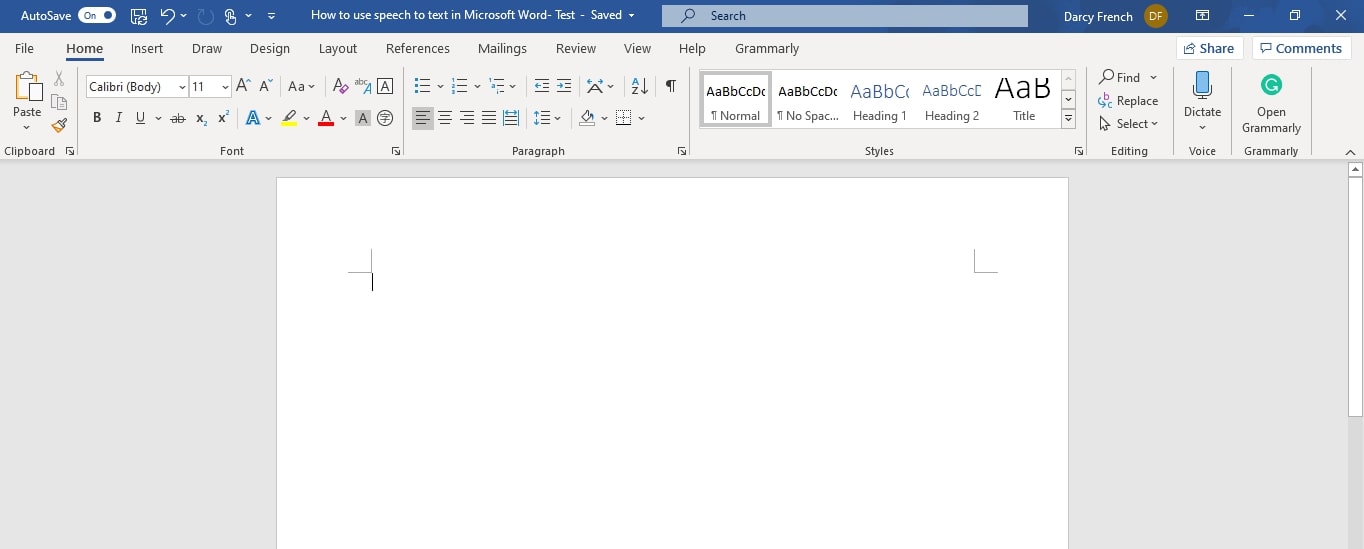
Simple but crucial. Open the Microsoft Word application on your device and create a new, blank document. We named our test document “How to use speech to text in Microsoft Word - Test” and saved it to the desktop so we could easily find it later.
Step 2: Click on the Dictate button
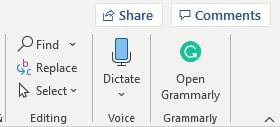
Once you’ve created a blank document, you’ll see a Dictate button and drop-down menu on the top right-hand corner of the Home menu. It has a microphone symbol above it. From here, open the drop-down menu and double-check that the language is set to English.
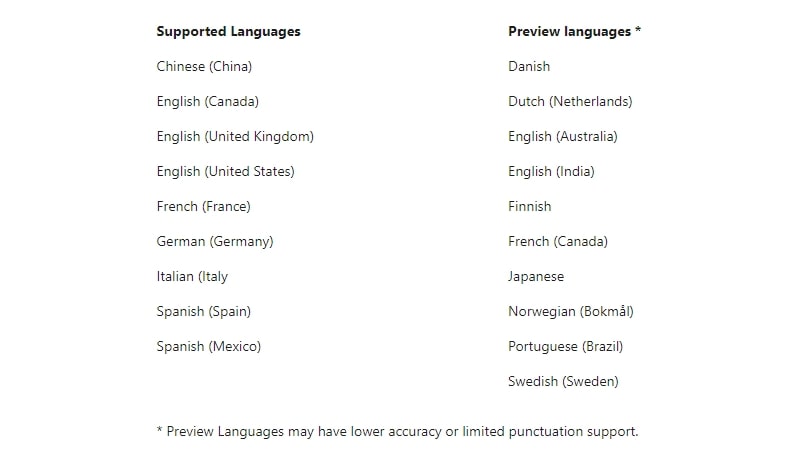
One of the best parts of Microsoft Word’s speech to text software is its support for multiple languages. At the time of writing, nine languages were supported, with several others listed as preview languages. Preview languages have lower accuracy and limited punctuation support.
Step 3: Allow Microsoft Word access to the Microphone
If you haven’t used Microsoft Word’s speech to text software before, you’ll need to grant the application access to your microphone. This can be done at the click of a button when prompted.
It’s worth considering using an external microphone for your dictation, particularly if you plan on regularly using voice to text software within your organization. While built-in microphones will suffice for most general purposes, an external microphone can improve accuracy due to higher quality components and optimized placement of the microphone itself.
Step 4: Begin voice typing
Now we get to the fun stuff. After completing all of the above steps, click once again on the dictate button. The blue symbol will change to white, and a red recording symbol will appear. This means Microsoft Word has begun listening for your voice. If you have your sound turned up, a chime will also indicate that transcription has started.
Using voice typing is as simple as saying aloud the words you would like Microsoft to transcribe. It might seem a little strange at first, but you’ll soon develop a bit of flow, and everyone finds their strategies and style for getting the most out of the software.
These four steps alone will allow you to begin transcribing your voice to text. However, if you want to elevate your speech to text software skills, our fifth step is for you.
Step 5: Incorporate punctuation commands
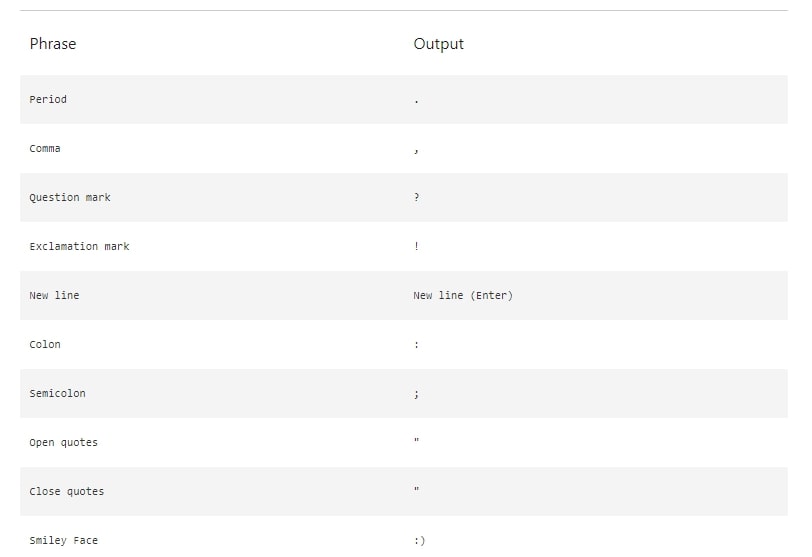
Microsoft Word’s speech to text software goes well beyond simply converting spoken words to text. With the introduction and improvement of artificial neural networks, Microsoft’s voice typing technology listens not only to single words but to the phrase as a whole. This has enabled the company to introduce an extensive list of voice commands that allow you to insert punctuation marks and other formatting effects while speaking.
We can’t mention all of the punctuation commands here, but we’ll name some of the most useful. Saying the command “period” will insert a period, while the command “comma” will insert, unsurprisingly, a comma. The same rule applies for exclamation marks, colons, and quotations. If you’d like to finish a paragraph and leave a line break, you can say the command “new line.”
These tools are easy to use. In our testing, the software was consistently accurate in discerning words versus punctuation commands.
Summary
Microsoft’s speech to text software is powerful. Having tested most of the major platforms, we can say that Microsoft offers arguably the best product when balancing cost versus performance. This is because the software is built directly into Microsoft 365, which many businesses already use. If this applies to your business, you can begin using Microsoft’s voice typing technology straight away, with no additional costs.
We hope this article has taught you how to use speech to text software in Microsoft Word, and that you’ll now be able to apply these skills within your organization.


