How to get started with Minecraft on Raspberry Pi
World of Pi
Here's some advanced things you can do with the Raspberry Pi version of Minecraft to turn the worlds you build into games in their own right.

1. Build the platforms
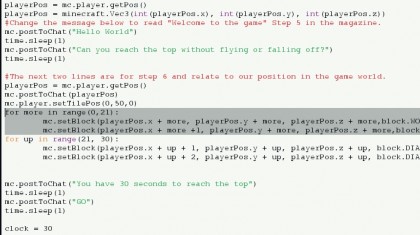
Now we build our platforms. To make it easier for ourselves, we used a for loop, which loops round a set number of times.
for more in range(0,21):
In this case, it loops round 20 times and repeats this code:
mc.setBlock(playerPos.x + more, playerPos.y + more, playerPos.z +
more, block.WOOD_PLANKS)
This code uses the player's position as a starting point, then builds blocks of wood, one block ahead, above and to the side each loop, creating a sweeping staircase.
Sign up to the TechRadar Pro newsletter to get all the top news, opinion, features and guidance your business needs to succeed!

2. Choose your material
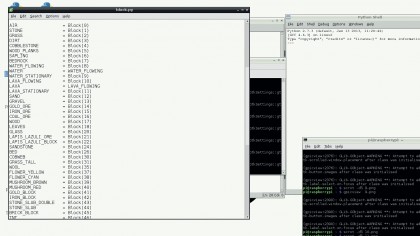
After the blocks of wood have been built, we want to use a different block. We chose diamond, but there are lots to choose from. Open a terminal and go to /home/pi/minecraft-api/minecraft – you will find block.py.
Open this in a text editor and you see all the blocks you can use. Why not change block.DIAMOND_BLOCK for deadly LAVA?

3. Make a clock
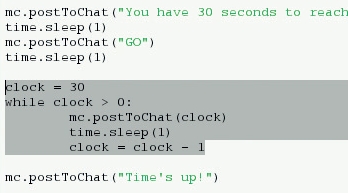
We wanted to make this a challenge, so we decided to introduce a countdown clock. To set the clock, we created a variable called clock and gave it the value of 30; this is an integer value.
We then created a while loop, that has the condition of
while clock > 0:
This compares the value of clock and if it is greater than 0, it runs some code.

4. Start the countdown
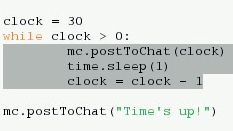
The code that is run is only three lines long, but it repeats until clock is equal to 0:
mc.posttoChat(clock)
time.sleep(1)
clock = clock – 1
Firstly, it posts the contents of the variable clock on the screen, then waits for one second. If we didn't do this, the countdown would be really fast.
Lastly, we change the value of our variable clock by instructing it to take the current value of the variable and then subtract 1 from it.
- Find out what else you can do with the tiny PC with our collection of Raspberry Pi Projects