How to add text in Apple iMovie
Add, preview and customise titles with ease

Sign up to the TechRadar Pro newsletter to get all the top news, opinion, features and guidance your business needs to succeed!
You are now subscribed
Your newsletter sign-up was successful
Join the club
Get full access to premium articles, exclusive features and a growing list of member rewards.
You can’t really go wrong with Apple iMovie if you’re looking for some of the best video editing software for beginners - so long as you own a video editing Mac or iOS device. For one thing, it comes bundled with your Mac, and any subsequent updates, large or small, will be free via the Mac App Store. It's designed to make it easy for you to create a short film, whether it be to fashion lasting memories of your latest holiday, to help you along with a presentation, or anything else.
Despite being free, it still comes with a fair amount of features, including some not so obvious ones. While it may not compare with the advanced tools found in the best video editing software, there’s plenty here to help bring professional post-production polish to your content.
You’ll find many features crammed into its friendly interface, and one of these is ‘Titles’. Whenever you need to put information on the screen, text is usually the best and quickest way to do it, and iMovie comes with a series of titling options which we’ll be looking at in detail in this tutorial. So, if you’ve been wondering how to add text to iMovie videos, this tutorial will steer you right.
Article continues belowHow to add text in iMovie: Basic steps
What to do
- Go to Window > Content Library > Titles
- Drag a title to your project’s timeline
- Select it in the Preview section and customize it
What you'll need
- A Mac with the latest version of iMovie installed
- A video project
- Skill Level - Beginner
Step 1: Locate the menu
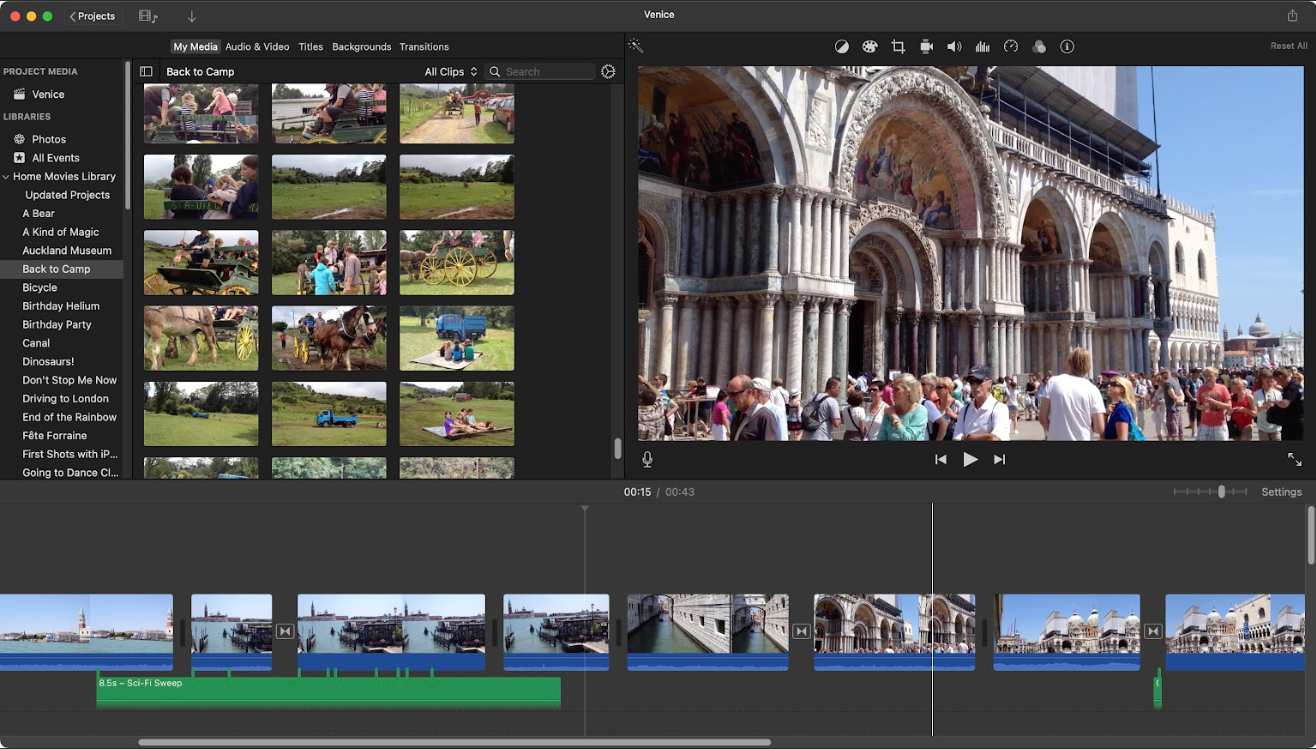
By default, once you’ve launched iMovie, you’ll be graced with all the projects you’ve created. Click on one to open it, and your interface will be divided into 3 sections. At the bottom is your timeline, where you assemble your video, top right is a large preview of whatever you’re mousing over, or hit the spacebar to play your project from the playhead’s location, and top left is all your available media.
If you look at the top of that last section, you’ll see a small menu. Click on any of them to be taken to different section. You’re also able to access them via the menubar (Window > Content Library) or by using various keyboard shortcuts. We want to get to the Titles so click on that, or do Command-3.
Step 2: Titles
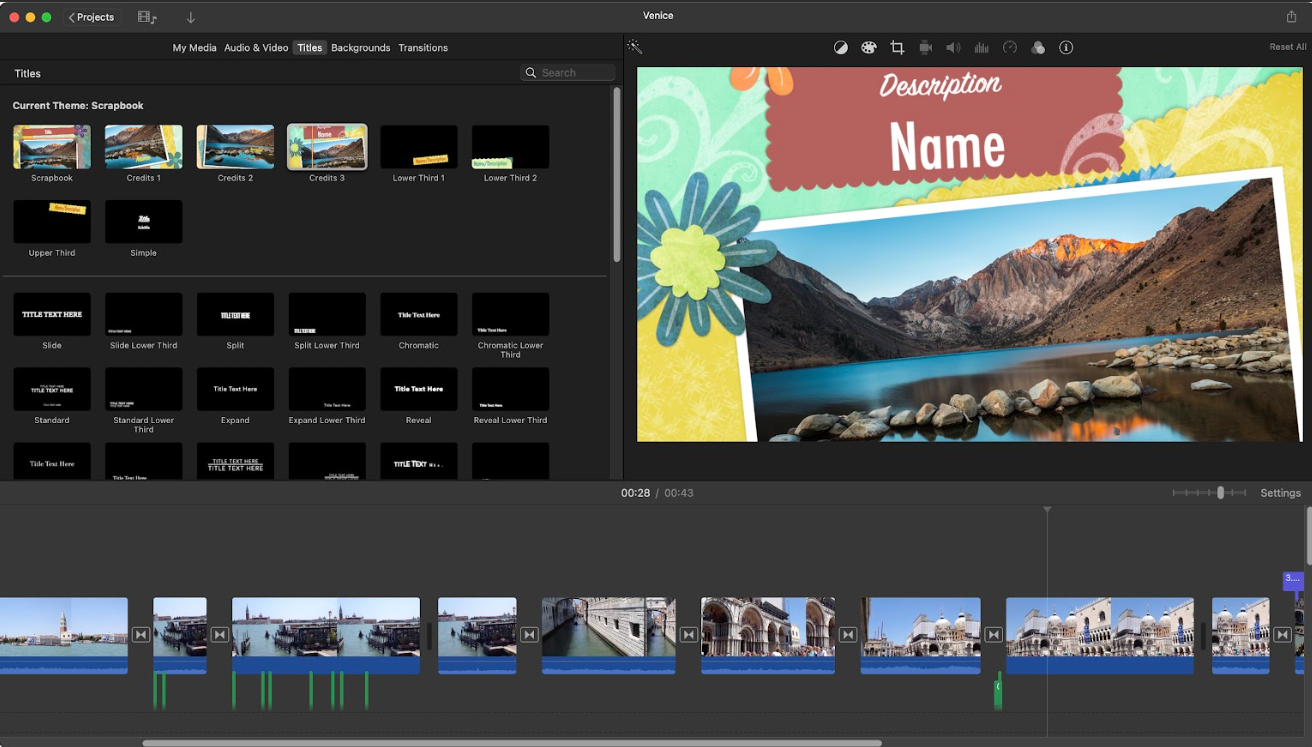
You’ll find yourself graced with at least 54 titles to choose from. These range from standard titles, lower thirds (where you put information in the lower third of the screen - which is where they got their name), and end credits.
In order to see them in action, simply mouse over them slowly from left to right (or right to left if you want to see their animation in reverse).
Sign up to the TechRadar Pro newsletter to get all the top news, opinion, features and guidance your business needs to succeed!
You’ll notice that we said “at least 54”. That’s because you also have access to theme-specific titles. Themes are a series of unified effects, from titles to transitions, which can give your project a more cohesive whole. You can choose one of them for your project by going to Window > Theme Chooser. As you select one, a handful of new titles will appear. Do note that you can change themes at any time during the creation process.
Step 3: Add to project
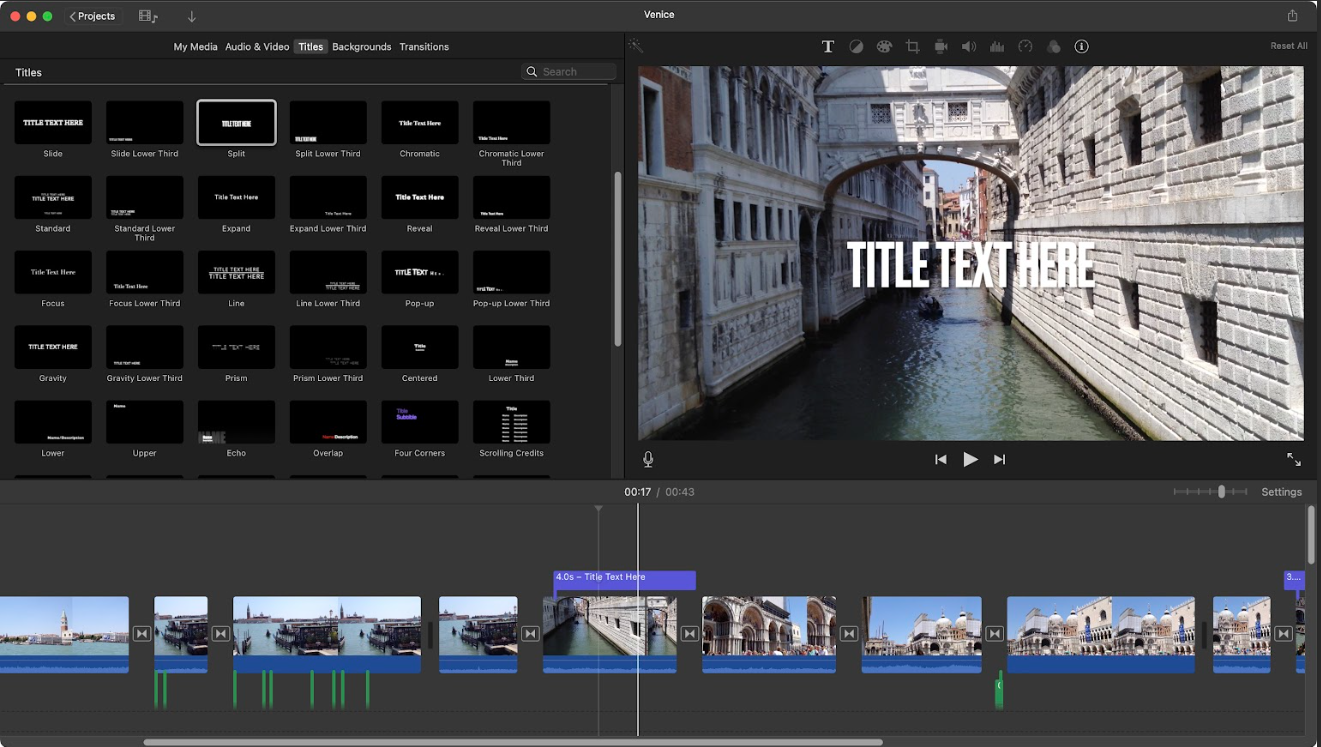
Once you’ve found the title you’re interested in, adding it to your project is easy: click and drag it from the Titles Section, onto your Timeline.
By default, it will be dropped above your clips, so it can overlay any image you have. Drag it left and right until you’re happy with its position. Do note that your title can be over multiple clips and even over transitions.
If you want to alter its duration, move the mouse to one of its edges, until the cursor changes into two horizontal arrows going in opposite directions. Once that happens, click and drag left or right to change the title’s length.
It’s worth noting that the theme-specific titles aren’t bound to their theme: if you add a ‘Scrapbook’ title to a project, then change the theme to ‘Modern’, that ‘Scrapbook’ title will not be altered or removed by said action. This means you can, should you want to, add as many different theme titles as you like. You just have to switch from theme to theme to do so.
Finally, if you want a title to not be over any video, just drag into the main section of the timeline. Existing clips will move to make room for it.
Step 4: Customize theme
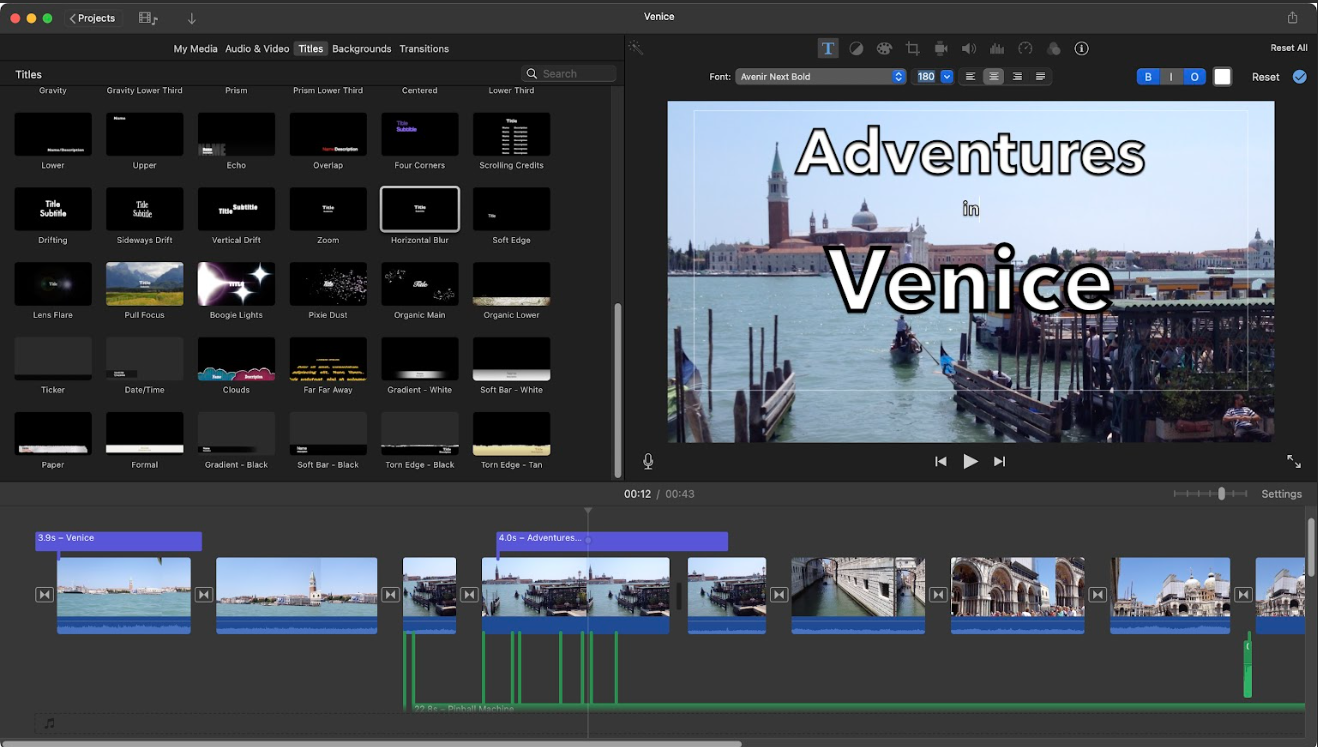
Once a title is inserted into your project, you need to customize it. After all, no one wants to see ‘title text here’ on your latest video. To do so, make sure the playhead is over the title you wish to change, so you can see it in the main preview section.
Double click on it in that preview area to type in any information you like. As you do so, notice a new row of tools have appeared above. These are a selection of standard text tools you’ll find in any word processor. You’re able to change the font from a selected list, but if that’s not enough for you, at the bottom of that list is the ‘Show Fonts…’ command which will grant you access to all the fonts installed on your computer.
Most allow you to also change the size. When that’s available, you’re given a select list of values, but again, if you need more customizability, simply type in any number in the field. Next you have the traditional alignments, and styles (bold, italics and outlined), followed by a coloured square. You use that one to change your text’s color.
Step 5: Extreme customization
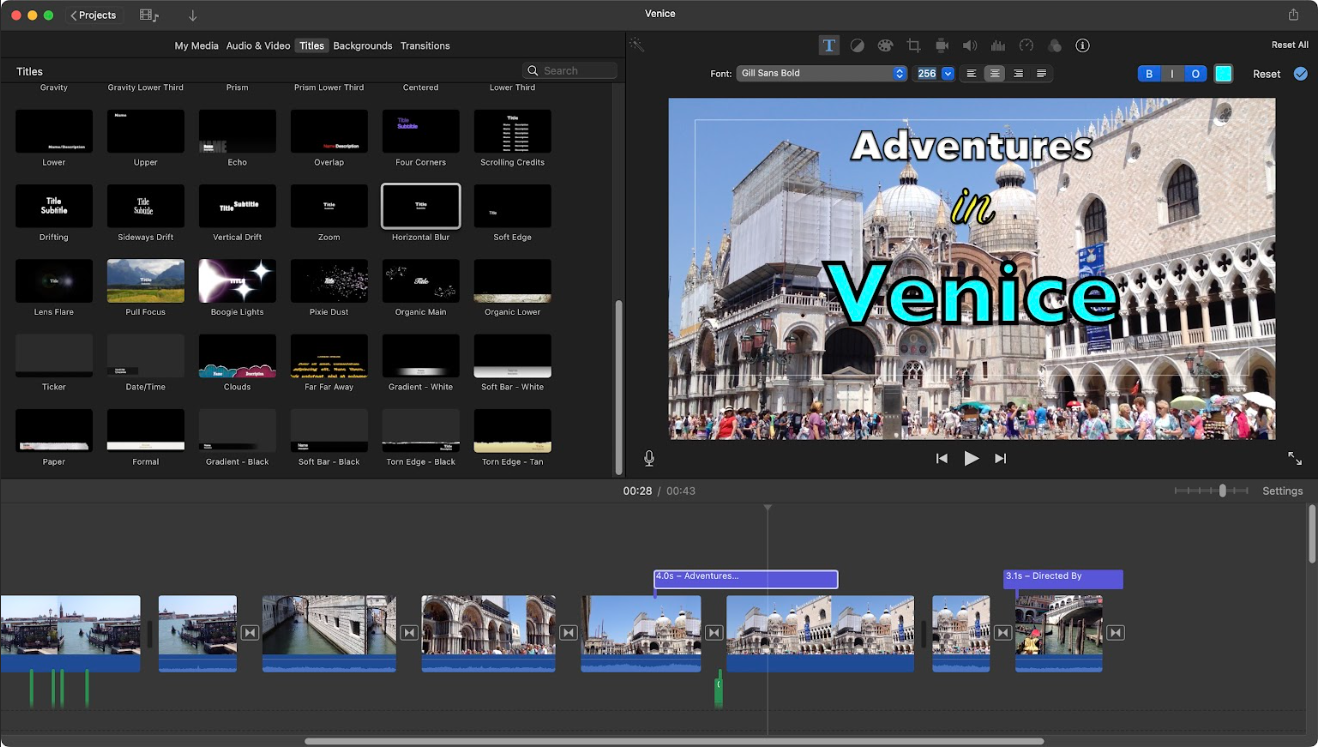
You may think that such customisation is designed to affect the entire title, and in some way, you would be correct: when no text is selected, any change will affect the whole. But start selection some portion of text, and things get interesting.
Want one word to be bolded and not the others? Select it, then click on the ‘B’ style. Nothing to fancy, right? But we’re just getting started.
Did you know, every word, every letter in fact, can be a different font, size, style and color? Now of course, if you were to go overboard with this, it could end up being way too unsightly, but such customisation gives you great freedom to experiment and have fun with your titles.
One thing though: the titles you get from specific themes cannot be customized in any way. You can change their wording of course, but that’s the extent of it. In other words, iMovie’s titling tool offers you both complete freedom, and extreme restriction.
Final thoughts
Apple iMovie’s titles are easy to use and pretty flexible. The only thing you can’t do is alter their position on the screen. Everything else is pretty much up for grabs. You are also limited to what iMovie comes with: there are no options to add additional titles, through third parties, or even Apple themselves.
Still, as with many of the best video editing apps, iMovie is aimed at novices and as such what’s on offer reflects that. Bearing that in mind, it is a very flexible and fun tool to use - and getting those tools to work for you is delightfully straightforward.
Steve has been writing about technology since 2003. Starting with Digital Creative Arts, he's since added his tech expertise at titles such as iCreate, MacFormat, MacWorld, MacLife, and TechRadar. His focus is on the creative arts, like website builders, image manipulation, and filmmaking software, but he hasn’t shied away from more business-oriented software either. He uses many of the apps he writes about in his personal and professional life. Steve loves how computers have enabled everyone to delve into creative possibilities, and is always delighted to share his knowledge, expertise, and experience with readers.

 Become a TechRadar Insider


