How to host your own learning management software with Moodle LMS
Install the learning platform used by hundreds of thousands of learning environments globally

Moodle LMS provides you with a platform to create personalized learning environments. You will get a strong set of learner-centric tools that empower teaching and learning.
As open-source software, Moodle can be used for free on both commercial and non-commercial projects. Even better, we’ve partnered with web hosting provider Hostinger to offer a free hosting plan for our readers, so you can install and use Moodle at no cost to you.
How to host your own learning management software with Moodle LMS: Preparation
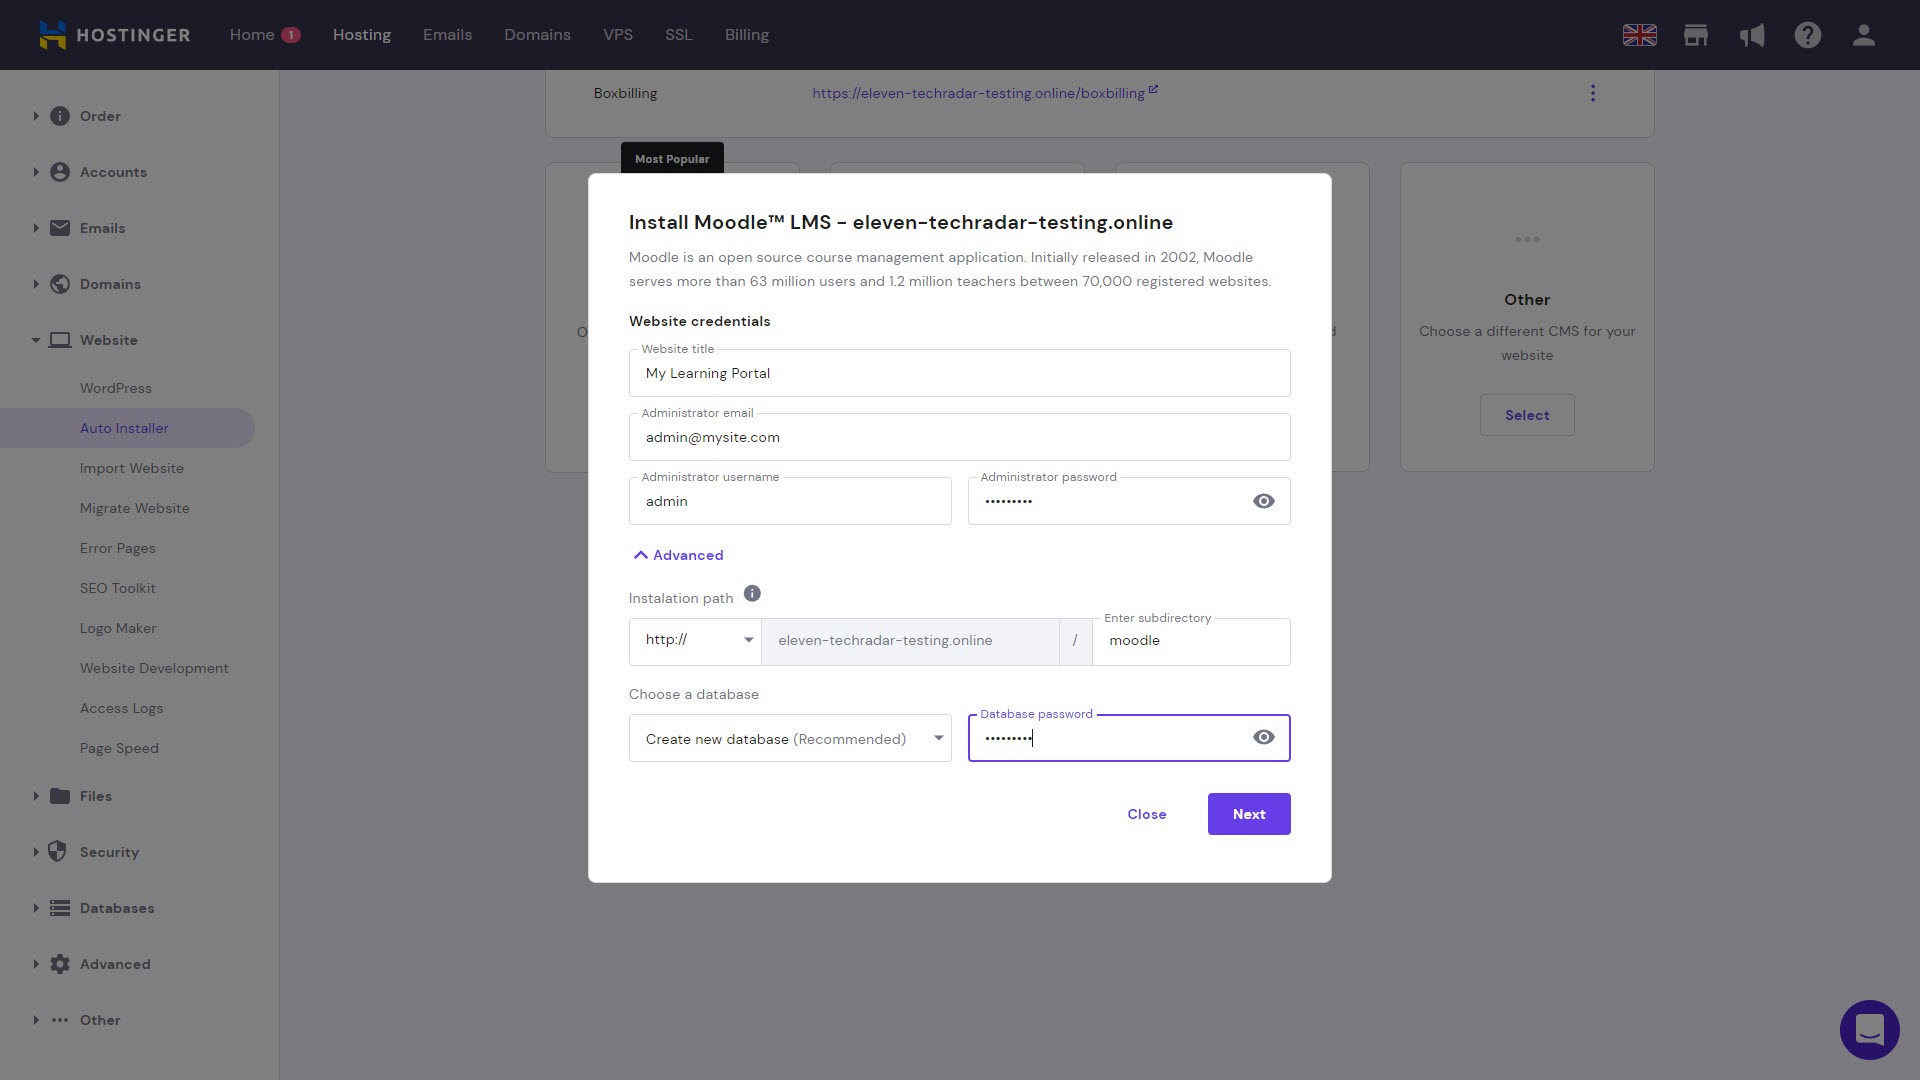
Installation of Moodle on Hostinger is straightforward. Navigate to the Auto Installer page in the Hostinger website administration panel. Choose Other and select Moodle LMS from the drop-down list.
First, you’re asked for the title of your new Moodle website and to create an administrator username and password. You can specify for Moodle to be installed in a subdirectory, use an existing database, or create a new MySQL database.
The second page of the installer asks which version of Moodle you want to install and whether you want to enable automatic updates. Click Install to complete the Auto Installer wizard.
Step 1: Log in to your Moodle website as an administrator
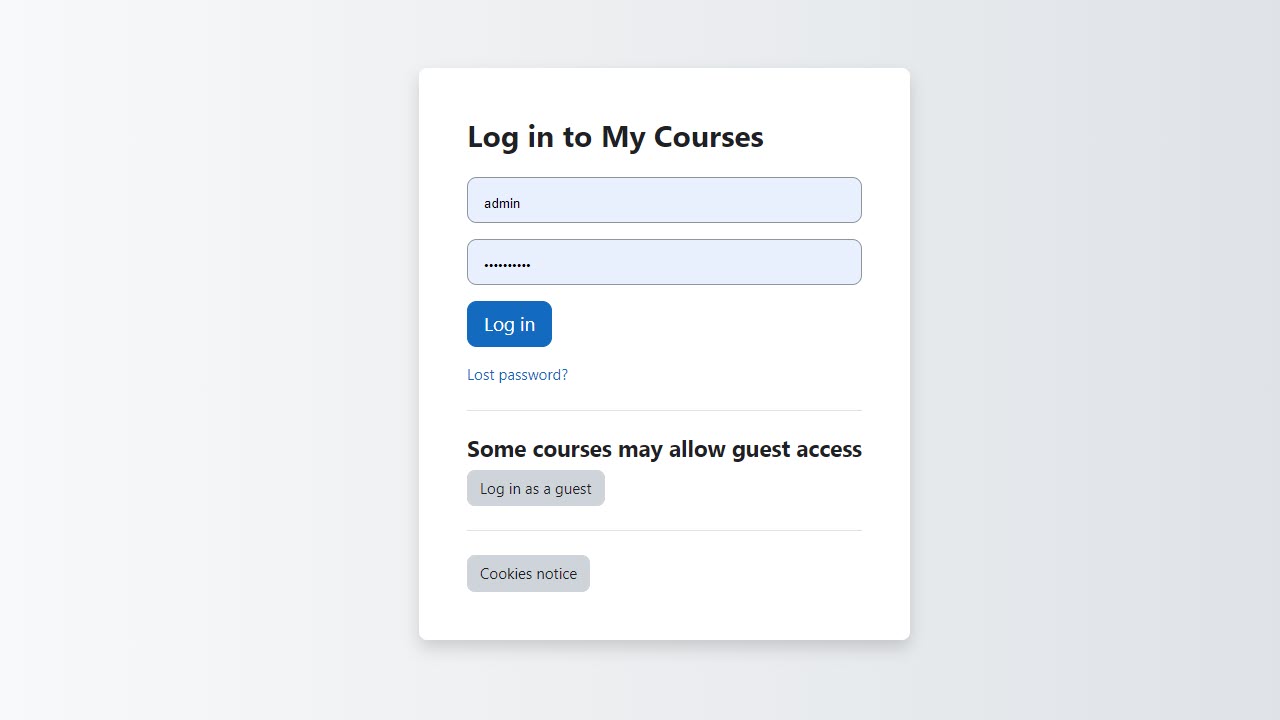
On the Auto Installer page, right-click on Moodle and choose Manage. This will open the Moodle login page in a separate tab.
Enter the administration login credentials you created in step one. You’ll be brought to the Site administration page for your new Moodle site.
Sign up to the TechRadar Pro newsletter to get all the top news, opinion, features and guidance your business needs to succeed!
Step 2: Set up your Moodle home page
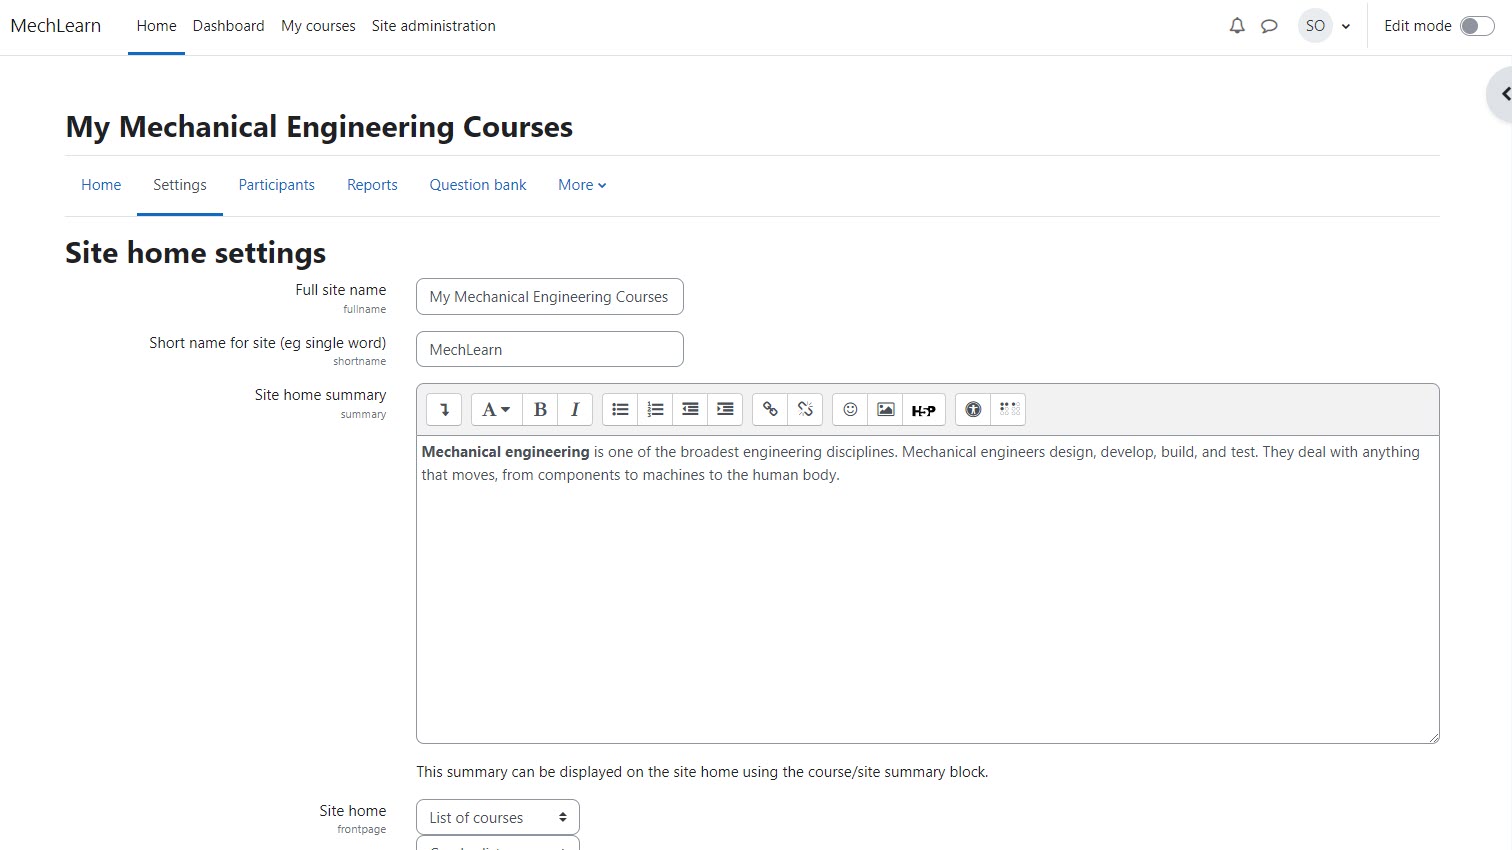
Click on Site Administrator, General, and then Site home settings. These settings govern some basic details of your site such as its name and what people first see when they log in.
For example, you can set whether to show a list of courses, site announcements, or a list of enrolled courses on the front page. Click Save changes when you’re happy with your choices.
Step 3: Adjust your Moodle site appearance
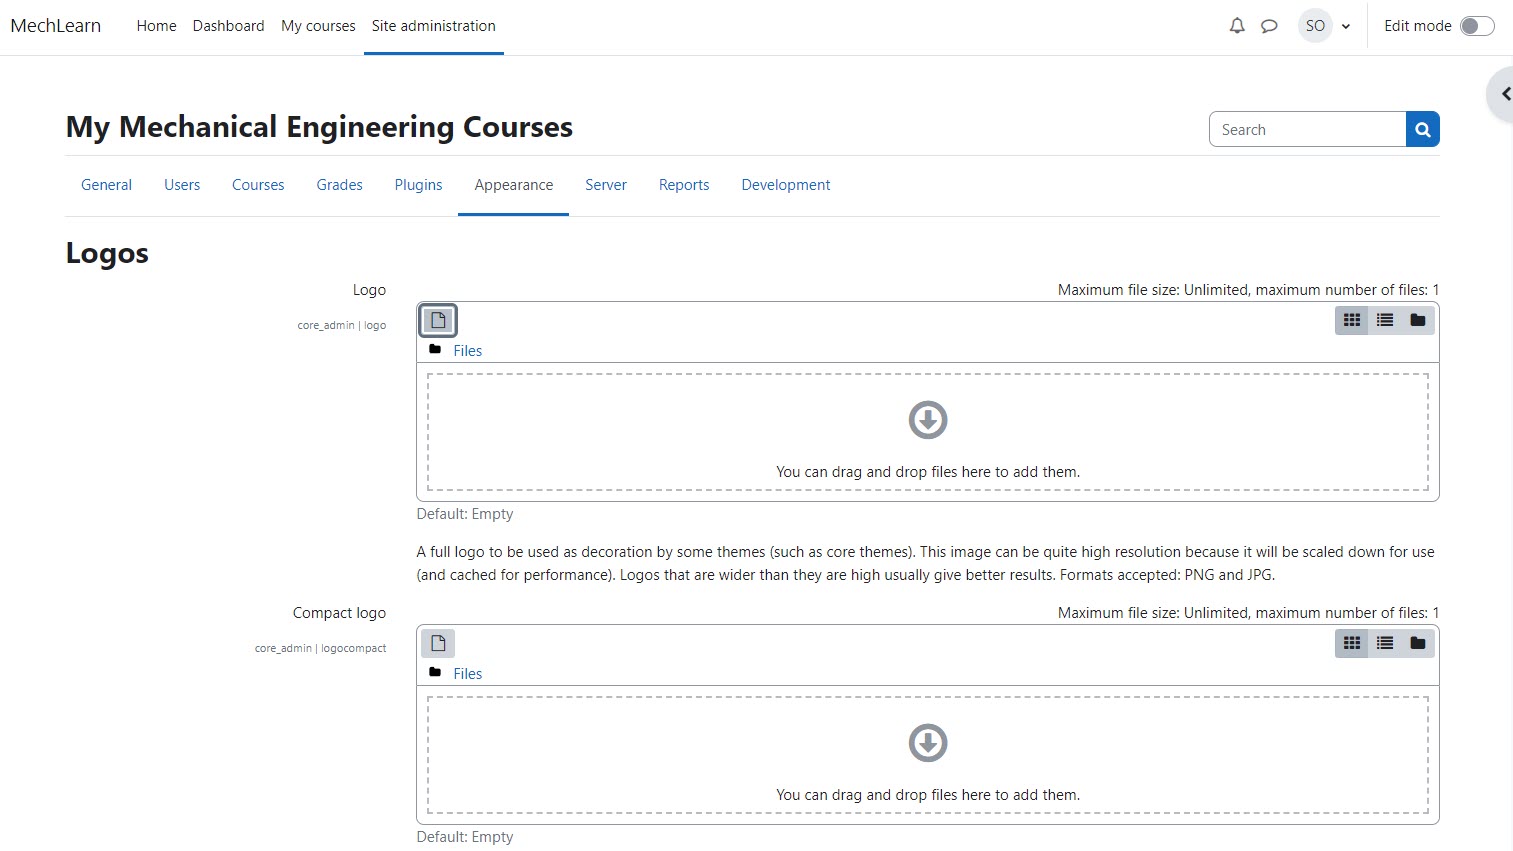
Moodle has a wealth of options for altering how your learning site appears to learners. To access these, click on Site administration and choose Appearance.
Here, you can change your site logos, colors, and site navigation options, among other settings. Moodle comes with two built-in themes—Classic and Boost—but you’re free to install an alternative theme here, too.
Step 4: Create a course category
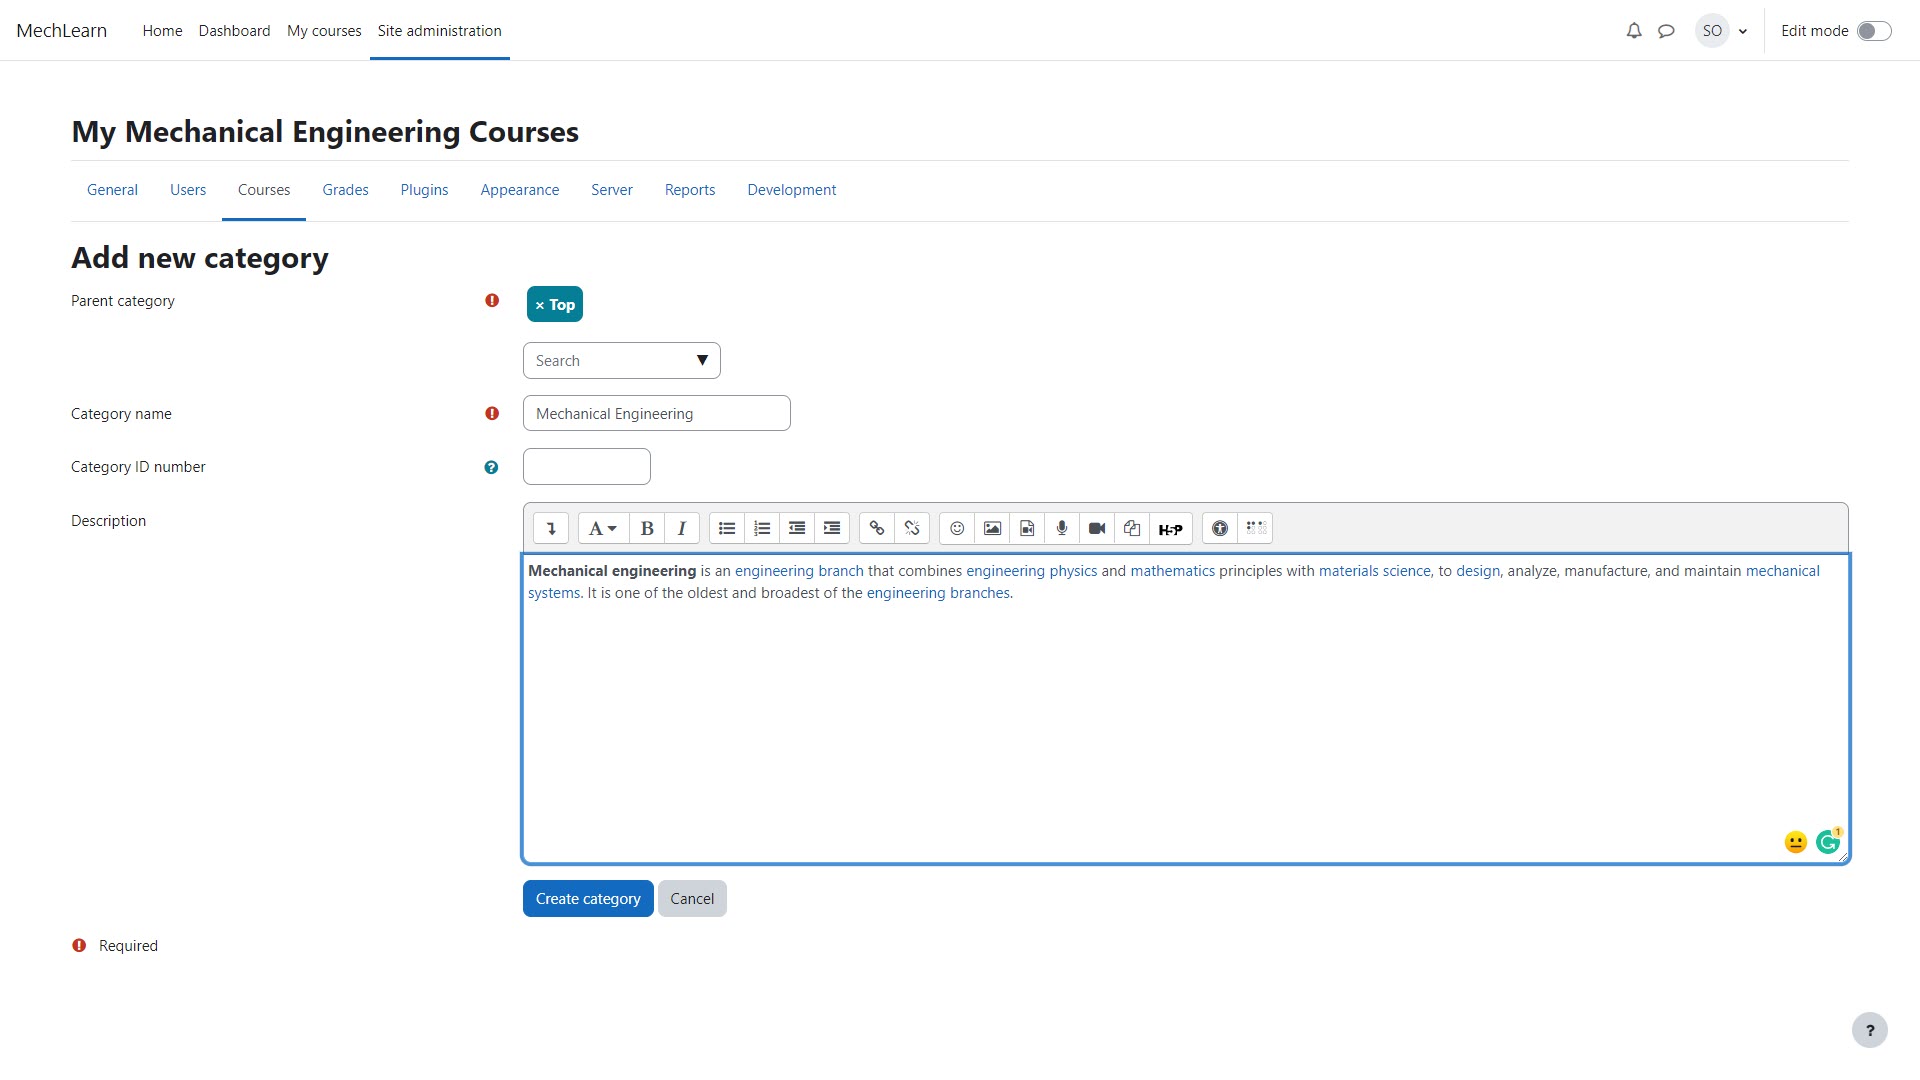
All Moodle courses are organized into categories. Click on Site administration, Courses, and then Add new category to begin adding categories.
You can set a name, description, and ID number for each of your categories. They can also be nested within each other, so you can create a complex tree of course categories if you wish.
Step 5: Add a course
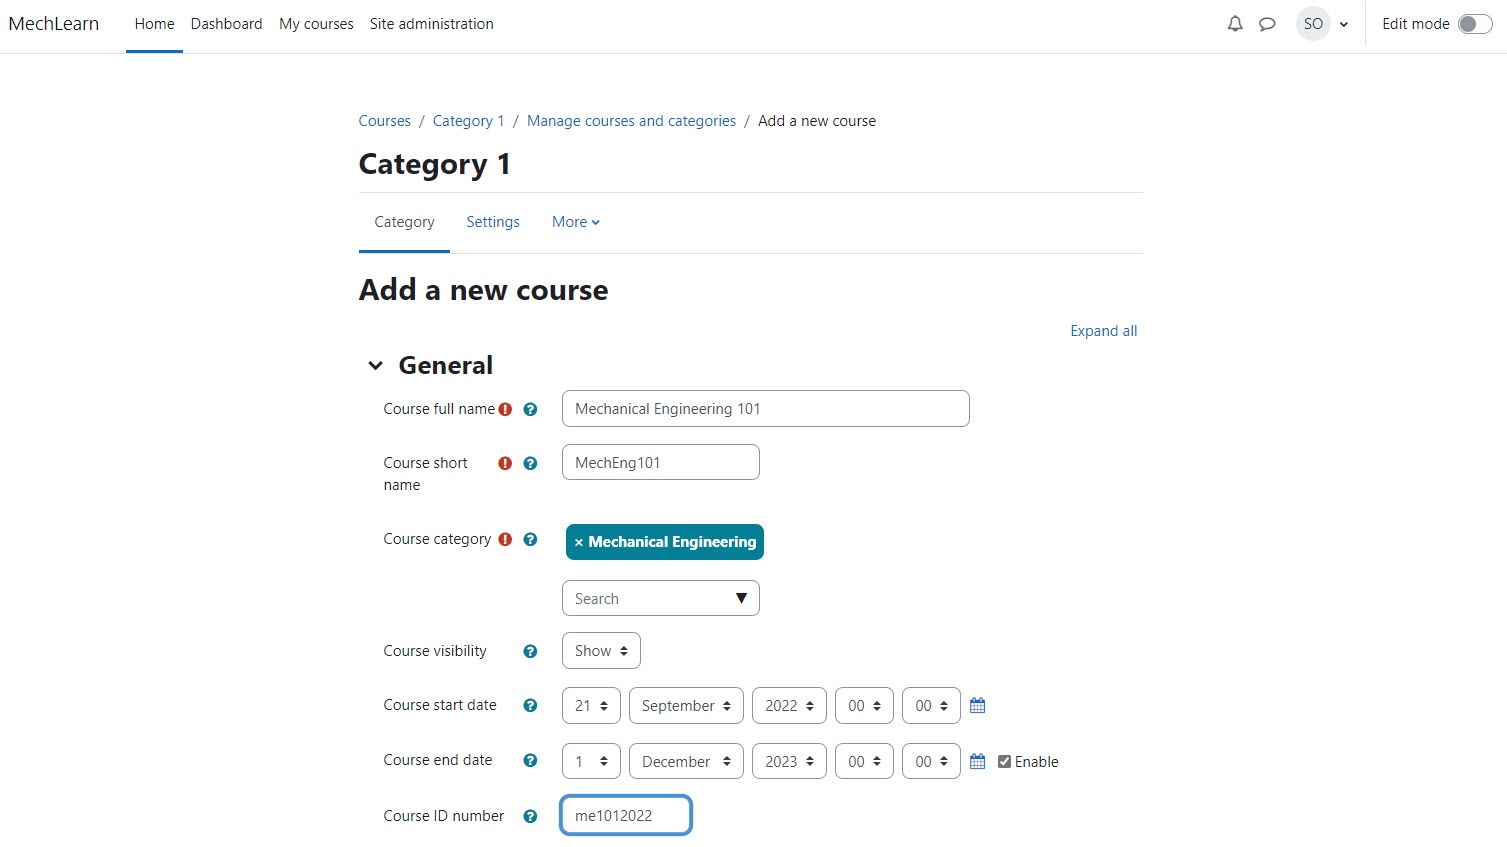
Add courses to your learning site by clicking on Courses and selecting Add new course. You will be presented with a long list of options.
There are general options such as course name and dates, followed by options for the course format and appearance. You can set whether course participants will be arranged into groups and whether course activity completion will be tracked.
When you’re happy with your course setup, click Save and display.
Step 6: Edit your course
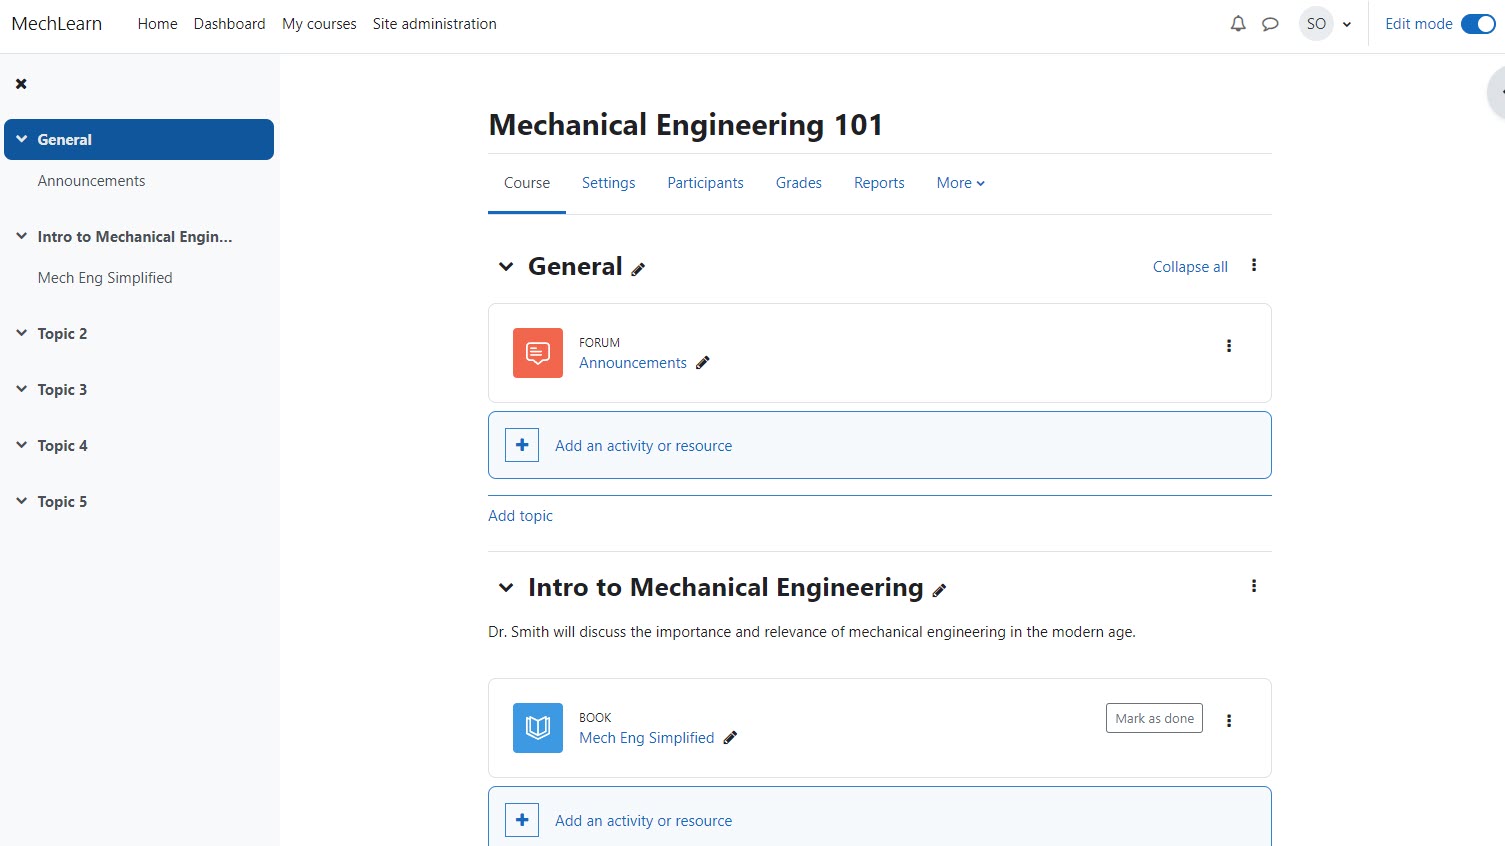
Click on the Edit mode button at the top-right of the web page. This allows you to make changes to the content of your courses.
You can add several topics, each with its own set of activities, resources, and deliverables. Each topic can be complemented with assignments, chats, quizzes, and lessons. You can assign books, text, and important URLs for each topic.
Step 7: Add users
Moodle offers many ways learners can join your site and participate in courses. You may prefer to allow anyone to sign up and self-assign themselves to courses or only allow new users by email invitation only.
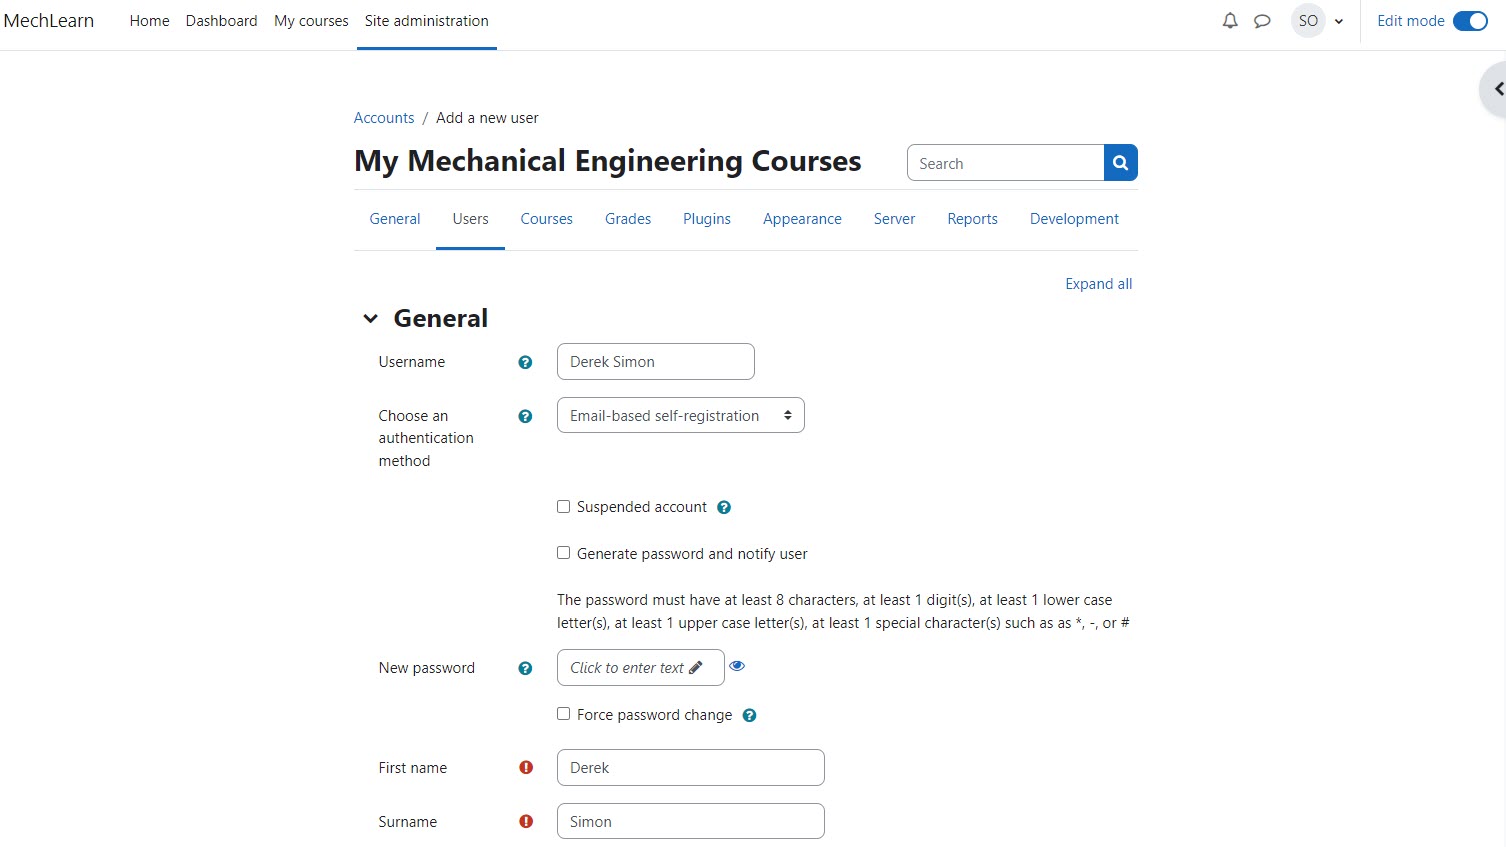
You can add users manually by clicking on Site administration, then Users, and choosing Add a new user. Fill in their details such as their name and email address. It’s also possible to add users in bulk, or use an external database to manage users.
Summary
In this guide, you’ve learned how to install the excellent Moodle LMS on Hostinger web hosting. We listed Moodle as the best online learning platform available today, closely followed by Adobe Captivate and Acorn LMS.
Moodle is one of the best open-source software projects for educational use, with outstanding tools and features that rival expensive commercial solutions.
For more online learning resources, check out the best online courses and online class sites available today. And if you need a laptop to go with your learning, we’ve rundown the best student laptops you can buy.
Read more in this series:
- How to start a blog with Joomla
- Build your own CRM using SugarCRM
- How to host your files online using Nextcloud Hub
- How to start your own help desk with Hesk
- How to build an HR System using OrangeHRM
- How to generate your own invoices using Invoice Ninja
- How to install live chat software with Sales Syntax
- Run your own ecommerce platform with PrestaShop
- How to create your own website with Soholaunch
- How to launch your own website with WebsiteBaker
- How to learn search engine optimization with SEO Panel
- How to kickstart your own Ancestry.com alternative with webtrees
- How to install a free ERP software called Dolibarr
- Demand gen vs lead gen: What's the difference?
- Host your own private forum with MyBB
- Build your own calendar application with WebCalendar
- Set up your own groupware service with Tiki Wiki CMS
- How to build your own email marketing service with phpList
- A Google Photos alternative: Store your photos online with Piwigo
- How to start with project management using The Bug Genie
- Make your own poll platform with LimeSurvey
- Roll out your own Wikipedia clone with MediaWiki
- Set up an accounting system with FrontAccounting
- Produce your own bills with BoxBilling
Richard brings over 20 years of website development, SEO, and marketing to the table. A graduate in Computer Science, Richard has lectured in Java programming and has built software for companies including Samsung and ASDA. Now, he writes for TechRadar, Tom's Guide, PC Gamer, and Creative Bloq.
