


TechRadar Verdict
The Bambu Labs A1 has emerged from the compact A1 Mini's shadow and looks set to make a huge impact on the 3D printing world with its blend of high-speed, versatile multi-filament options, and affordability. Boasting exceptional build quality and advanced features, it strikes a perfect balance, catering to a wide range of users from beginners to professionals.
Pros
- +
Ultra-fast printing
- +
Multi-filament versatility
- +
Exceptional build quality
Cons
- -
Complex software
- -
No enclosure
- -
80ºC heated platform limit
Why you can trust TechRadar We spend hours testing every product or service we review, so you can be sure you're buying the best. Find out more about how we test.
Bambu Labs has built a reputation as a disruptor in the 3D print world. Their Core XY machines arrived on the scene with speeds and accuracy that were hard to beat; if the speed and accuracy weren't enough, the AMS multi-filament system took the machines to another level.
A short while ago, we saw a departure from their Core XY machines with the arrival of the Bambu Labs A1 Mini, one of the best 3D printers we've reviewed. It boasted a speed and accuracy that was hard to beat, only matched by the recent updates to the excellent Official Prusa Mini.

Now, the Bambu Labs A1 Mini has arrived and is available as either a single filament machine or, once again, sold as a combo that includes the AMS Lite. While that system does take up quite a bit of desk space, it's nothing compared with some other systems that are emerging, but what really makes it stand out is the simplicity.

The setup is straightforward, and in true Bambu style, an alternative AMS Lite mount was sent through as a print file, just in case I want to pop the AMS system on top of the printer rather than on the desk to the side. After trying both, my personal preference is for the AMS to sit next to, not on top of, the machine, but there's that option. That flexibility is another big feature of the Bambu Labs kit. Like the P1P, there's the ability to adapt.
Once again, Bambu has done what they have built a name around: listening and innovating, and the A1, from the outset, looks set to impress.
Bambu Labs A1: Design

Print Technology: Fused Filament Fabrication (FFF)
Build Area: 256 x 256 x 256 mm³
Minimum Layer Resolution:
Maximum Layer Resolution:
Dimensions: 386 x 389 x 458 mm
Weight: 9.65 kg
Bed: up to 80ºC
Print Surface: Textured
Software: Bambu Studio (Supports third-party software)
Materials: PLA, ABS, PETG, ASA, etc.
Print Speed: Up to 500 mm/s, with top acceleration at 10000 mm/s²
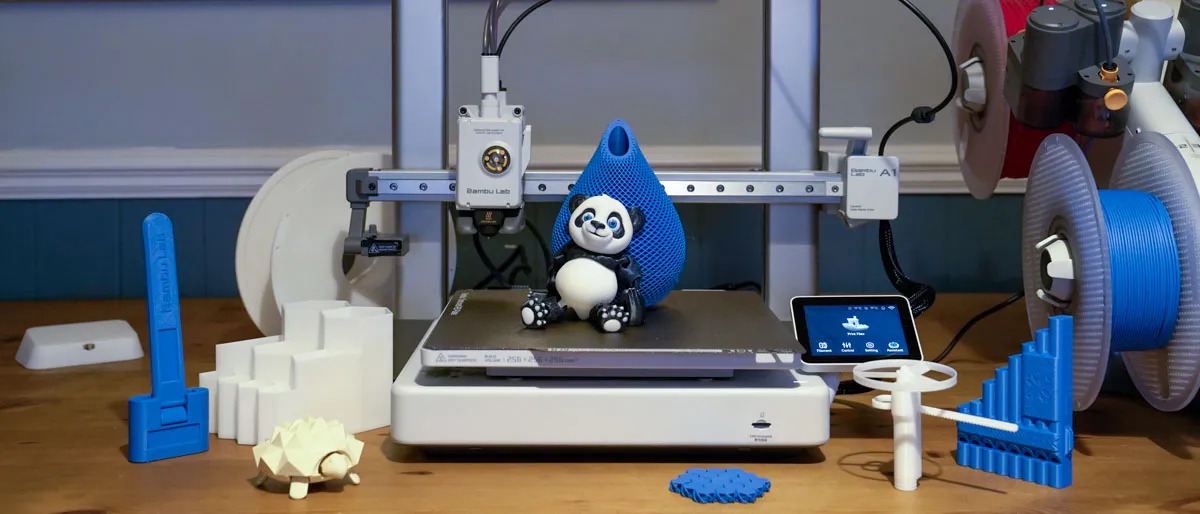
Bambu Labs doesn't so much break the mould as rework it, and that's exactly what has happened with the A1. On the surface, a cursory first look would highlight the typical Cartesian design, nothing out of the ordinary aside from the very slick-looking LCD touchscreen and beautifully designed tool head.
As is now common with these printers, the A1 comes almost completely assembled, so it's just a few screws and wires plugged in, and you'll be up and running. The setup process took less than half an hour, and there's really nothing that would confuse the entire process. I also liked the fact that the manual is a little more specific about the printer position during the setup process, giving you tips about using a table to ensure easy mounting of the vertical section.
While you get to see some of the construction as you bolt in the verticle, it's only when you start to look closer that you start to see the Bambu in the design. Details such as the horizontal bar that features an intricate metal mount that attaches to the vertical, and then there's the base, which is that slight futuristic off-white that we saw used on the A1 Mini and AMS lite. The overall finish, although familiar in design, looks futuristic.

Even the single filament reel holder and filament run-out sensor have something of the future about them. Then there's the slightly crazy AMS Lite design with the four reels mounted two aside. This design is inspired as the reels are clearly labelled, and when it comes to printing, it's incredibly easy to allocate filaments to the different parts of the model if you've set that up in the software.
As with the A1 Mini, the AMS Lite sits to the side, although there is the option to top mount this with a 3D printed part if you want. This means that if you do go multi-filament, then it takes up a little extra room on the desktop, but it is worth it for this printer's abilities.
One point on the design. What is well worth going into is the fast switch nozzles; these literally release and enable you to insert new or alternative nozzles, with the system recognising them as soon as they're inserted.
When it comes to the design, the machine looks outwardly simple, but look closely, and the quality and details are well beyond that of many printers that are around the same price or only marginally cheaper.
Bambu Labs A1: Features

Positioned as a user-friendly, entry-level device, the Bambu Lab A1 integrates several innovative features. Key highlights include its intuitive 3.5-inch IPS touchscreen, offering a smartphone-like user experience, and the Health Management System (HMS), which's for the machine, not you, that assists through all operational steps and troubleshooting.
The printer, if brought as the combo, features the AMS Lite system for multi-material printing, supporting up to four colours. Bambu Lab's machines are known for speed, and here, the A1 offers a top printing rate of 500mm/s and a 10000 mm/s² acceleration, made possible by performing vibration calibration for both X and Y axes at each print's start. This calibration accounts for the printer's tension and environmental temperature, enhancing accuracy. There is the option to skip this when you load files, but for the couple of minutes that it takes, it's worth leaving it to do its thing.
Additionally, the Eddy Current sensor in the hotend actively compensates the extrusion flow rate, ensuring stable extrusion throughout the printing process; as the machine primes, you can see this system suck in and out the filament as it measures the properties before starting the print.

The A1's design features all-metal rails and linear bearings for extra rigidity and accuracy, with minimal maintenance requirements. Its advanced filament monitoring system goes beyond filament presence detection, measuring various aspects like filament speed, tension, and pressure.
The HMS system can pause prints upon detecting problems and aids diagnosis, such as giving you some suggestions as to what has gone amiss.
One of the big features is the Quick Swap Hotends for easy maintenance and swapping for different diameter nozzles. It's all very user-friendly, but at the same time, there's a lot here for a beginner to get to grips with.
Bambu Labs A1: Performance

Dimensional accuracy - score of 5
Target 25 = X: 24.90mm / 0.10mm Error | Y: 24.83mm / 0.17mm Error
Target 20 = X: 19.94mm / 0.06mm Error | Y: 19.85mm / 0.15mm Error
Target 15 = X: 14.92mm / 0.08mm Error | Y: 14.91mm / 0.09mm Error
Target 10 = X: 9.92mm / 0.08mm Error | Y: 9.88mm / 0.12mm Error
Target 5 = X: 4.95mm / 0.05mm Error | Y: 4.91xmm / 0.09mm Error
X Error Average = 0.074mm
Y Error Average = 0.124mm
X&Y Error Average = 0.099mm
Fine Flow Control - score of 5
Fine Negative Features - score of 5
Overhangs - score of 4
Bridging - score of 5
XY resonance - score of 2.5
Z-axis alignment - score of 2.5
Adding up the totals gives a final score of 29 out of 30.
The Bambu Labs A1's print quality test results reveal its high accuracy in precision and detailing, with an overall score of 29 out of 30. The dimensional accuracy score of 5, with X and Y error averages of 0.074mm and 0.124mm, respectively, indicates exceptional precision in reproducing model dimensions. This makes it ideal for applications requiring fine details and accuracy; ensuring you have a good support material in place will enable you to print highly detailed models that are closer to what you could expect to print with a resin printer.
The printer excels in fine flow control and fine negative features, both scoring 5, demonstrating its ability to handle intricate details and complex geometries. It also performs well in bridging (score of 5) and overhangs (score of 4), further emphasising its capability to print challenging designs.
Overall, these results position the A1 as a versatile printer suitable for a range of applications, from detailed models to robust prototypes.
Second Opinion by Mark Pickavance
The A1 is the first Bambu Lab 3D printer I've seen, and given the fervent hype surrounding their products, I was keen to find out what the fuss was about for myself.
Compared to other printers that come in pieces, the re-assembly of the A1 is remarkably straightforward, and within 15 minutes, mine was assembled. And after another 15 minutes of self-calibration, mine was ready to print.
3D printing, by definition, isn't the most straightforward technology for everyone to grasp, but Bambu has gone much further than others to hand-hold new users. While most of this process was nothing new to me, what was outside my comfort zone was the AMS and the multi-colour (or multi-material) printing process.

Once I'd completed a simple single-colour print under my belt, I began to explore what the AMS Lite was capable of and how it might alter my print processes from now on.
What's critical to understand about the AMS on the A1 is that it requires some adaptation since you only have four colours, and how you use them dramatically impacts the amount of waste each print will generate.
My first experiment involved simple layer changes of colour. These are remarkably easy to achieve in the Bambu Studio, and with only one change between each transition, the amount of filament lost is almost negligible.
Alternatively, you can print entire objects in different colours on the same plate if they are sufficiently spaced, where they can be printed in a by-object mode.


But most people will dive right into painting their models directly in Bambu Studio, and depending on how many colours are on each layer, doing this can be a big mistake.
Thankfully, Bambu Studio does provide a breakdown of how much filament will be used and the print times, so it is not a total shock that a 200g model uses 1kg of filament and takes many hours more to complete than the same model in a single colour.
The best way to offset this is to print multiples of the same item as the overhead for the changes is the same. There are a few other clever twists, like adjusting the purge amounts, hiding the purge in the infill, and even having a purge object rather than a purge block.
That last solution is good if you print many clips or other items where the colour doesn't matter.
Alternatively, segmenting the model into one colour parts can also harvest a significant reduction in colour changes and associated filament use. If you want to save material, there are ways to make colour printing less wasteful.

Another use of the AMS is that you can use it to load the same filament on more than one reel and then automatically switch when it runs out. For those running a print farm, that facility is easily worth the asking price of the A1 Combo.
My first print to use these features was a model by FAB365 of Razor Crest from the TV show The Mandalorian. It's a complicated model, and the A1 impressed me with how rapidly it printed and the precise transitions between colours. I used a combination of eSUN and Bambu Lab PLA filaments, and the whole print process took around 15 hours with a layer height of 0.16mm.
That was about a quarter of what the maker quoted, although I noted that his version seemed much bigger than the one I produced. Mine was about 25cm long, an exact 1:100 ratio, but I suspect the one assembled by the maker on YouTube is probably 1:75 or bigger.
The only print issues the A1 encountered were with the smallest window components. The first layer speed of 50mm seemed implausibly high for such tiny items, and I was forced to reduce the speed just for the plates with those items on. Everything else printed flawlessly and with a level of detail I've never seen from an FDM printer before.
If I were producing these models often, I'd print the body parts on the A1 and make all the tiny features on a resin printer.
That said, it's possible to generate one on the A1 completely, an accomplishment that many filament printers couldn't match, nor the printing speed.
The fully assembled Razor Crest looked great, even if I'd limited my colours to preserve filament. As you will see in my pictures, I experimented with some designs for multi-colour models and tinkered with multi-material. Most of it worked flawlessly, and the AMS Lite is something I'd find hard not to have going forward. Even for simple filament changes, it is so much easier than manual loads and unloads, even if it does eject some filament after every change.
Using PLA and PETG in the same model might seem like a poor plan, and in many respects, it is. These two plastics have very different requirements and typically won't stick together. But that second limitation can be beneficial if you print an object requiring complex supports.
But again, the issue here is waste. Invariably, each print will have object and support on most layers, necessitating at least two changes per layer. However, it's worth considering that all the support will be binned anyway, so any model heavy with supports is likely to consume more filament than just that used in the model.
So, what do I think of the Bambu Lab A1? This design is a country mile beyond any filament printer I've previously experienced and makes many cheaper alternatives look a bit silly in comparison.
It lacks the material flexibility of the X and P Series printers. But with a reel of PLA or PETG, it is just as effective as its more expensive stable mates. If anyone wants to start 3D printing, this is the printer I'd undoubtedly recommend. And not another Creality Ender clone from a brand with imaginary customer support and the need to re-level between prints.
What's critical to understand is that the A1 is meant for people who print, not those who like to tweak and tinker with their printers. If you are one of those, build yourself a Voron or a RatRig machine and tweak it to your heart's content.
The AI is designed specifically for the it-just-works crowd. They want a workhorse that can efficiently generate high-quality parts without needing an MA in fluid dynamics or electrical engineering to succeed. Those wanting ABS, PC or other exotic materials will need an enclosed printer, like the Bambu Lab X1 Carbon, X1 or P1S.
If you only want to print PLA, PETG or TPU, then the A1 is ideal. It has enough print volume for larger objects, like cosplay helmets and masks, it's speedy, and the AMS Lite can inject some colour into your projects.
Which begs the question, how could it be better? The only issue holding back the A1 from being even better is the amount of vibration that moving at this rate creates due to the moving mass of the bed and the print head. Core X/Y can go faster because the bed doesn't move, but this could be solved by using a counterweight solution, where a mass inside the printer travels opposite to the bed.
I mention this because if Bambu Lab intends to make an even larger format bed-slinger, then some technology like counter-masses might need to be employed.
At this point, the A1, or more likely the A1 Combo, will probably be the 3D printing upgrade that people want most until Bambu Lab comes up with something even more amazing.
Bambu Labs A1: Verdict

The Bambu Labs A1 3D printer is a notable entrant in the 3D printing arena, presenting itself as a disruptor. Known for their Core XY machines, Bambu Labs' A1 Mini was a departure from the company's usual style of machine as far as it was a compact bed slinger; however, the speed, while not Core XY, was still beyond anything else at the time, now the A1 with it's larger build area and more robust build is set to take on the middle ground.
The A1, available as a single or multi-filament machine with the AMS Lite, stands out for its simplicity and versatility. The A1's design is both futuristic and practical, offering a fast-switch nozzle system and a user-friendly experience.
However, if you're a beginner, while this is a great machine and really difficult to fault, the complexity beneath the surface can require some knowledge, and the software, even in its simplest form, can take some getting used to.
OK, so the A1 offers more than anything else in its class and takes on the best of the Cartesian, including the Original Prusa MK4, but is this all too much? It's rare to say, but for the price, I feel it's just too cheap and doesn't leave any room at the lower and now mid-range of the market. The A1 takes a tried and tested design and essentially turbo charges it so that there really is little to fault, as was seen by the print quality. My only reservation is the open design, which restricts where it can be used.
- Best 3D modeling software: Testing tools for bringing creations to life