Get VPN on Android devices in a few steps
How to set up and use a VPN service on your smartphone.

How to use a VPN on Android

What with the introduction of mandatory metadata retention laws for ISPs in Australia, it's fast becoming common practice for digital citizens to employ VPNs – that is, virtual private networks – to conceal their online tracks from Big Brandis and Uncle Sam.
It's not that I or other concerned citizens have anything to hide, it's just that other people don't have the right to log, view, and make judgement on every single thing I do online.
Even if you don't think that the government will have any interest in what you're doing online, if you use your phone at internet cafes or wifi hotspots, a VPN is a great way to protect you from users on the same network that may have intentions that are less than pure.
Further, if you're connecting to an open wifi network (that is, one that you don't type in a password to initially connect to), almost all of your data is out there floating on the airwaves, ready to be snapped up by any machine nearby.
With financial incentives for unsavoury characters to run packet-sniffing apps, you'd be foolish to think that any free wifi network available to you while travelling is just as safe as your network at home.
Thankfully, setting up a VPN connection on Android is an easy task, but there are still a few considerations that you need to make when doing so, which I will guide you through now.
Before I get ahead of myself, though, I'll quickly walk you through just what a VPN is, and how it protects your privacy online.
- Check out the best VPN and find out the best VPN for Android
A VP wut?

A VPN allows you to create a private connection over a public one. This sounds like nothing too special, but what it does is actually allow you to route everything you send over your network through to a trusted server via a secret, encrypted tunnel – keeping it away from prying eyes.
Additionally, you can use VPNs to access the 'net as if you're located somewhere that you're not to bypass any website blockages or other filtering mandated by your local totalitarian regime.
Not all VPN connections are the same quality, however, and when looking for providers you'll see connections available using many technologies, including PPTP, L2TP, IPsec, OpenVPN, and more.
Above all others, I recommend OpenVPN, as it has stood up to the most scrutiny, and is easier to implement than some of the others. It's also open source, which always makes me happy.
Choosing a VPN provider

So, now that I've convinced you of the merits of a VPN, you will need to choose one to connect to. You can peruse a list of VPN providers that take your privacy seriously.
I hesitate to recommend any one provider in the above list over any other, as I haven't tried them all, but I do recommend looking for one that includes either their own Android client, or that provides config files for the official OpenVPN client for Android, as it will save you a lot of fiddlin'.
Of course, you're not going to use the VPN exclusively on your Android phone, either, so make sure they have access for multiple devices, and provide clients for every platform you're interested in.
For this guide, I'll show you how to set up a VPN for your chosen service provider using the official OpenVPN client rather than the native VPN support introduced in Ice Cream Sandwich, which doesn't support OpenVPN, the gold standard for VPN connections.
You can connect to other VPN types (PPTP, L2TP, and IPSec) under Android Settings > Wireless and Networks ( > More) > VPN.
Only partly anonymous

Keep in mind that VPNs only encrypt your traffic up to their endpoint – the server that you chose in the connection process. Your internet activity can be monitored from this point onwards, so don't think that you no longer have to rely on SSL for banking or online shopping etc.
Additionally, all your online activity will be tied to the IP address assigned by this server. Most VPN providers share IP addresses, so there's no way to definitively single you out for any criminal activity undertaken by your assigned IP address, but don't think that a VPN is a free pass to Illicitown.
Setting up a VPN

So, first things first, visit the Play Store and download the official (and free) 'OpenVPN Connect' client (that's the one published by OpenVPN).
You'll next need the OpenVPN config files available from your VPN provider. If these are provided as a zip file, you'll have to extract it so that you have files with the extension '.ovpn'.
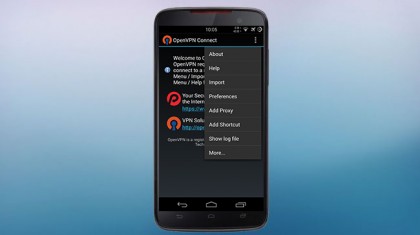
Place those files into a folder on your phone's storage, then, from the OpenVPN app's three-dot menu, choose 'Import Profile from SD card', and navigate to the folder that you placed those config files in, finally selecting the server that you wish to connect to.
So, which one should you choose? It's up to you – are you looking to access content blocked in your country? Then choose a country that does have access to that content. If you're not interested in location spoofs, then for the sake of access speed, choose the server closest to your current location.
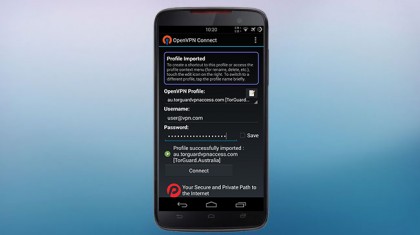
Once you've imported a profile, you'll need to enter the username and password given to you by your VPN provider. I'd tick the 'save' box, so that the next time you connect, it will be a faster process. Connecting – both now and next time – is just a matter of tapping the 'Connect' button from the main screen, and telling Android that you trust OpenVPN to make a VPN connection for you.
If you've imported multiple OpenVPN server connections, then you can quickly choose between them from the drop-down menu up the top of the main screen, making it a breeze to switch between countries.
To make accessing the VPNs even faster, you can add shortcuts to your Android homescreen. To do so, choose 'Add Shortcut' > 'Add Connect Shortcut' from the three dot menu, then select from the drop-down menu which connection you want as a shortcut, give it a name – et voilà; you're just one press away from more secure browsing.
Sign up to the TechRadar Pro newsletter to get all the top news, opinion, features and guidance your business needs to succeed!