How to recover lost or deleted files
Not all is lost
While the built-in tools found in Windows can do a good job of helping you recover lost or deleted files, as we mentioned earlier, there are also a range of great third party tools that can go even further in retrieving accidentally deleted files.
One of the best is DMDE – Free Edition. This is a powerful tool that does more than simply recover deleted files – it can also enable you to access hard drives that are still physically working but are no longer visible to Windows.
If DMDE can see the drive, it enables you to copy your files and folders from it, often without losing any data at all. In this tutorial I'll show you how to use the program to access your drive, find lost files and – hopefully – recover working copies of them.
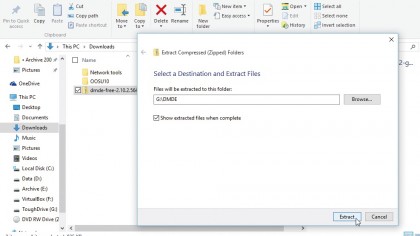
1. Download and extract
DMDE is a portable tool, which means you can run it from any drive. Open your browser and navigate to the download page and click the 'Download DMDE for Windows' link.
Save the zip file to any drive other than the one you're trying to recover data from. Right-click the downloaded zip file and choose 'Extract All' to extract its contents.
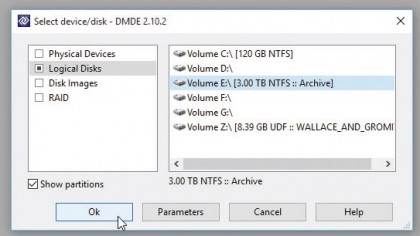
2. Launch DMDE
Open the extracted folder and double-click dmde.exe to launch the program, clicking 'Yes' when prompted. Leave 'English' selected and click 'OK'.
Accept the license agreement and you'll be asked to select the drive you wish to recover data from. If the drive is visible in Windows, select 'Logical Disks' followed by the drive letter and click 'OK'.
Sign up to the TechRadar Pro newsletter to get all the top news, opinion, features and guidance your business needs to succeed!
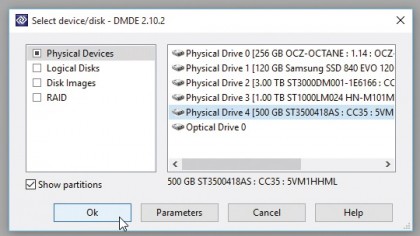
3. Select physical drive
If the drive appears in Device Manager, but doesn't show up in Windows and can't be assigned a drive letter using Disk Management, then leave 'Physical Disks' selected.
Click each Physical Drive entry in turn and DMDE will display information about its type and size, helping you identify the missing drive. Select it and click 'OK'.
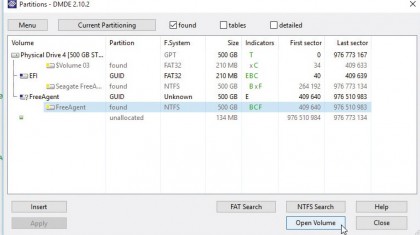
4. Select partition
DMDE will scan the drive for partitions. Don't be surprised if errors appear (click 'OK' to clear them) and then a number of possible matches – some similar or seemingly identical – should appear.
Select the partition you're looking for using the volume name (and drive letter if applicable), partition status, f.system and size to identify it.
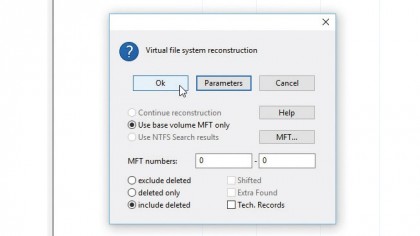
5. Construct virtual file system
Click 'Open Volume'. After a second scan, a dual-paned window will open. On the left are three entries – to view all recoverable data from the drive (including deleted files), double-click All Found + Reconstruction.
In most cases clicking 'OK' at this point is sufficient, but advanced users can click 'Parameters' to tweak settings if necessary.
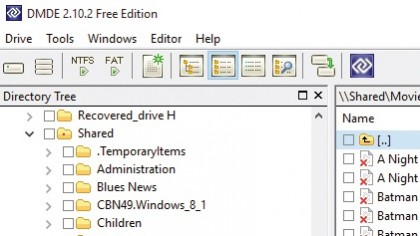
6. Browse for recoverable items
You can now explore your drive's contents via the expanded $Root directory. Click the arrow next to a folder to expand it, or double-click the folder to view its contents (including files) in the right-hand pane.
Look out for folders with red dots – these contain deleted files, so double-click to explore. Deleted files are clearly marked by a red 'x'.
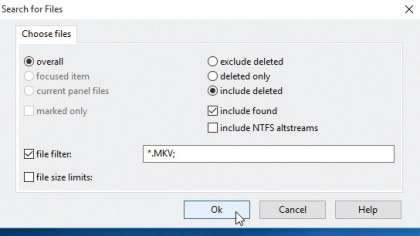
7. Search for specific items
Alternatively, click the 'Search Panel' button (with the magnifying glass) to open a Search window. Use the file filter to define your search – use wildcards if you're not sure about a file's exact name, or to search by file type (such as *.doc).
Use the annotation to help refine your search further, then click 'OK' to let DMDE scan for matches.
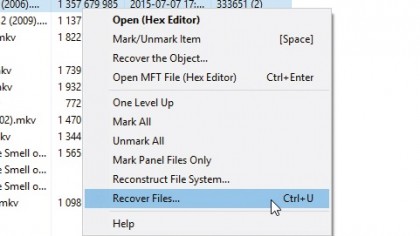
8. Select what to recover
The Free Edition allows you to recover files one of two ways: you can select up to 4,000 files from a single folder by opening it in the right-hand pane, selecting the files you want to recover and choosing 'Tools > Recover'.
If recovering files from a search, you must recover each file individually by right-clicking it and choosing 'Recover the Object…'
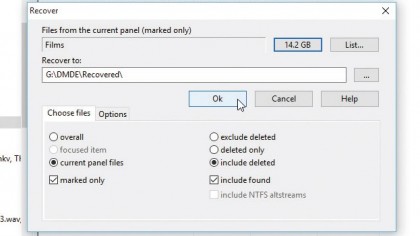
9. Recover your data
Click the 'Size' button to get an estimate of how much space your recovered items will require, then click '…' to select a different drive with enough space to recover them to (never recover files to the same drive).
Make sure 'include deleted' is selected if applicable and finally click 'OK' to attempt file recovery. Wait while the files are copied.
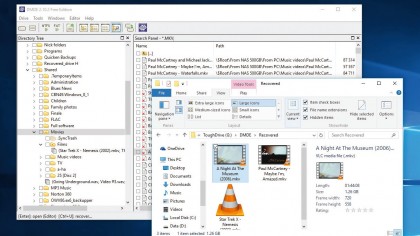
10. Your data, restored
Once complete, a dialogue box will display the results of your recovery. Browse to the folder where your recovered files are and see if you can open them – not all files can be recovered sadly, but if the file was only recently deleted then your chances of success are greater.
Return to DMDE to continue recovering other files and hopefully save the day!
Current page: Recover deleted files with DMDE
Prev Page How to recover lost or deleted files in Windows Next Page The best free apps to recover deleted filesBryan M. Wolfe is a staff writer at TechRadar, iMore, and wherever Future can use him. Though his passion is Apple-based products, he doesn't have a problem using Windows and Android. Bryan's a single father of a 15-year-old daughter and a puppy, Isabelle. Thanks for reading!
