In this article, we’re going to take you through the process of setting up Norton antivirus on your PC, and also your smartphone.
We’ll be using Norton 360 Deluxe for our step-by-step demonstration, as that’s the internet security suite you’re most likely to pick if installing on multiple devices like your computer(s), phone(s) or tablet(s). This version of Norton supports up to five devices in total.

How to set up Norton on your PC
1. Purchase and download
Yes, we know it goes without saying, but the first thing you need to do is buy the product you want from Norton’s range. Head to the Norton product page and find the one you want – as mentioned we’re plumping for Norton 360 Deluxe for the benefit of this guide.
Click on ‘Subscribe Now’ and fill in all the relevant details (choosing a password for your Norton account, entering payment information).
After you’ve paid, on the order confirmation screen, click the ‘Get Started’ button to download the Norton installer, and follow the on-screen instructions to click on this EXE file at the bottom of your browser window after it has downloaded.
The downloader will initialize and download the rest of the files required for the application to be installed. The program will then request permission for Norton to make changes to your system, so click on ‘Yes’.
Not 100% sure which of Norton's range to go for? We'll help you make the choice with our dedicated guide to Norton's antivirus plans.

2. Install Norton
Click on the ‘Install’ button to start the installation process. You can choose to join Norton Community Watch to share your data to help block new threats as they emerge, or decline if you prefer to keep your data to yourself – click ‘Maybe Later’ if you want to pass on this.
Norton will then install; the process takes a little while, so you can wait and watch that spinning circle, or perhaps go and make a cup of your preferred beverage!
3. Activation
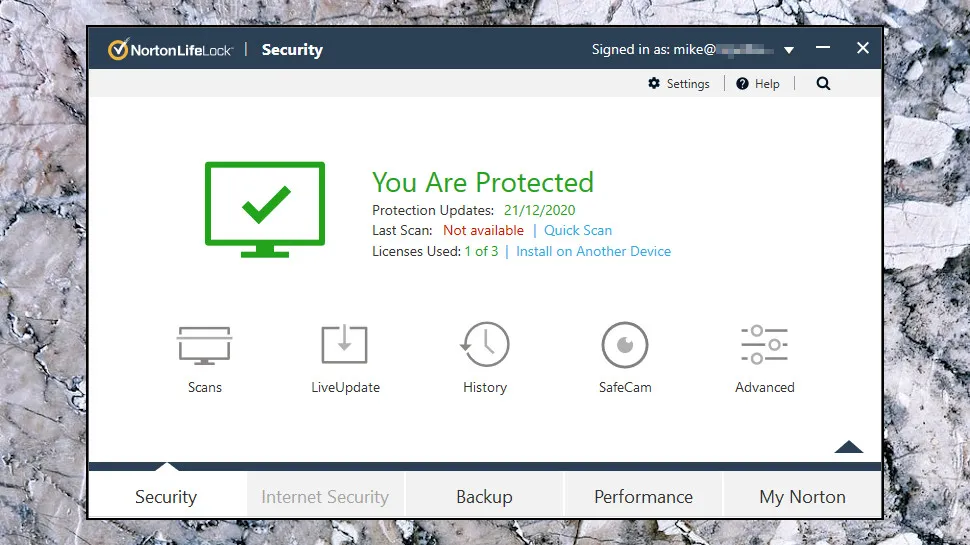
Once installation is done, Norton will activate itself, communicating briefly with the company’s servers, and then you should see the main menu pop up, informing you that one of five licenses has been used (if you’ve installed Norton 360 Deluxe), and that the device you’ve just installed the app on is now fully protected.

4. Browsing Protection
At this point, if you minimize the Norton main menu window and head back to your browser, you’ll notice that a new tab has opened offering Norton extensions for the browser (we used Chrome as you can see above – we’ll assume the same for you for the purposes of this walkthrough, as it’s the most widely used browser). You can click ‘Enable All Norton Extensions’ to switch on Safe Web (the core web browsing protection), along with Safe Search, and Norton’s Password Manager (as well as making Norton your home page).
If you don’t want all of this, and only need Safe Web for example, just click on the blue ‘Install’ option for whatever extensions you wish to grab. After clicking on ‘Install’, you’ll be taken to the Chrome Web Store (or the source of extensions for whatever browser you’re using) where you can opt to ‘Add to Chrome’ for the appropriate extensions. After doing this, you get to see the permissions you’re granting the Norton extension, and need to click ‘Add Extension’ to confirm that you wish to use it.

5. Patch up
After picking your extensions – assuming you want any, though Safe Web is probably a good idea – go back to Norton’s main menu, as you’ll want to update the application now. To do this, at the top of the main menu, where it says Device Security, click on ‘LiveUpdate’ just underneath.
Norton LiveUpdate will check for updates, likely finding one, which it will then download. You’ll have to confirm that you wish to apply the downloaded patch: just click on ‘Apply Now’. Now wait while Norton restarts itself and installs the patch.

6. Scan your system
Shortly after installation, Norton will fire up an initial quick scan to check over the contents of your PC for malware or anything else suspicious. But if it doesn’t, or you miss this, you can always start a scan yourself for an initial check-up. Again, at the top, where it says Device Security in the main menu, click on ‘Quick Scan’.
Alternatively, for the sake of thoroughness, it’s a good idea to run an initial full scan on your system. Do this by clicking on the ‘Open’ button next to Device Security, just across from ‘Quick Scan’, and then click on the arrow pointing down on the right, which reveals the ‘Scans’ option that you should click on. At the next dialog box, select ‘Full System Scan’ and then click ‘Go’. A full scan will run, which checks over all your files with a fine-tooth comb (more closely than a quick scan – but it also takes longer).

7. Don’t forget to sign in
If you’ve subscribed to one of the higher-tier packages, such as Norton 360 Deluxe as in our example here, you’ll be asked to sign into your account before all features (such as parental controls, or dark web monitoring) are enabled. Just click where it says ‘Sign In’ towards the bottom of the main menu, and enter the password for your Norton account when prompted. After that’s done, those extra features will show up in the main menu, and you can set them up or manage them.
That’s it – you’ve now set up the fundamentals of your Norton suite. The next thing you can do is choose which of those aforementioned extra features you want to run, and configure them following the instructions you’re given when you click to set them up or turn them on.
How to set up Norton on your mobile phone
1. Purchase and download
In the case of putting Norton on a phone, naturally you still need to buy the suite online just as you would when installing on a desktop PC (see above). Don’t just download the app and purchase in-line during the installation process, for reasons we’ll discuss in the next step. Buy the suite beforehand from the Norton site or your preferred third-party retailer (but make sure it’s a trusted one).
Once you’ve bought the package, instead of downloading on the PC – or as well as installing on PC, if you’re putting Norton on multiple devices – you need to head to the Google Play Store on your Android phone. Open the Play Store app, and in the search bar at the top, type in and search for “Norton 360”. The Norton 360 app will appear, so press the green ‘Install’ button.

2. Sign in
The app will download and install. Now press the ‘Open’ button, and select ‘Sign in’, then fill in your email address (username) and password before hitting ‘Sign in’ again.
As you’ll see, another option is to pick ‘Choose Your Plan’ instead and sign up for Norton 360 Deluxe (or another plan) right here, if you didn’t already. However, it’s very important to note that we were offered a full-price subscription here, whereas on the Norton website there is usually a substantial discount running. (58% off at the time of writing – that’s a big saving for the first year of the plan, so always take out your subscription on the website, not in the mobile app, for this reason).
3. Initializing…
Once you’ve signed in, the app will initialize for a short period of time, and then conduct a quick scan, before you arrive at the main menu. That’s it – you’re done – it’s a short and sweet process. However, you may find, as we did here, that there are security-related issues highlighted for your attention in this menu. Press on the ‘Security’ box to view these.

4. Check out flagged security issues
In this Security category, you’ll find any app, internet, Wi-Fi and device security issues listed; touch them and you’ll see Norton’s recommendations for fixing them. These are, by default, to turn on Safe Web, and real-time protection for policing apps (with any risky applications handily flagged by Norton).
The main element here is to switch on Safe Web, which you do by pressing ‘Set Up’ – that takes you to your phone’s Accessibility menu, where you scroll down to and press ‘Norton 360 Service’, then set the slider to ‘On’ and you’re done.
- Read more: How to choose the best antivirus for you
- Our definitive list of today's best antivirus software
- More protection for not much more money - grab the best cheap VPN