


 Become a TechRadar Insider


TechRadar Verdict
The Tronxy X1 requires you to build the device itself but the build process is fairly straight forward. The resulting machine is decent although it lacks many features that have become standard on mainstream 3D printers.
Pros
- +
Incredibly cheap
- +
Produces average prints
- +
Fun to assemble
Cons
- -
Instructions need to be downloaded
- -
No spool holder
- -
Very basic features
Why you can trust TechRadar We spend hours testing every product or service we review, so you can be sure you're buying the best. Find out more about how we test.
Cheap 3D printers are common and come in all shapes and sizes. Some are good, and some are far from it, so I was interested to see how the Tronxy X1 would fare.
The printer arrives in the smallest box I have seen for a 3D printer, and the contents were relatively light. Opening up the box showed all the components carefully laid out inside, ready for assembly.
Gearbest sent us the Tronxy X1 sample and sells it for $99.99 at the time of writing when you use the coupon code V3C5D1885661D000 at checkout. Note that, while this price includes delivery, it is exclusive of any taxes that may be levied by HMRC or the courier companies on behalf of the vendor. Want to buy tech from online Chinese retailers? Read this first.
The first catch is that there are no visible instructions, a quick route through the boxes sections and you find a small USB Key containing the software, manual and build instructions.
I've built quite a few 3D printers over the years, and as I laid out the parts, I could see that the overall design was well thought out and looked relatively simple to assemble.
It's hard to believe a 3D printer could be bought at this price, even when you have to assemble it yourself. Only a build and test will show if the compact Tronxy X1 is worth the money as a 3D printer or it's merely a cheap way to buy some parts.

Design
From the pictures online, it's instantly apparent that the Tronxy X1 has taken a slightly different approach to the standard 3D printer design. Like the much anticipated Original Prusa Mini, Tronxy has created a printer with an X-axis arm that's only supported at one end.
This X-axis arm holds the print head and is where the majority of the 3D print action is centred.
We know that Prusa's skill and expertise at building 3D printers will ensure that the Original Prusa Mini will be first-rate when it comes to build quality, even if you assemble it yourself, but what of the Tronxy X1.
The main construction of the printer itself is extruded aluminium tube, and it's solid. The base and other structural parts are made from thick acrylic or metal which promises excellent rigidity and strength.

The arm design, in this case, seems like a good option. It keeps things compact, and with all the braces and supports that are included once built, it did prove to be rock solid.
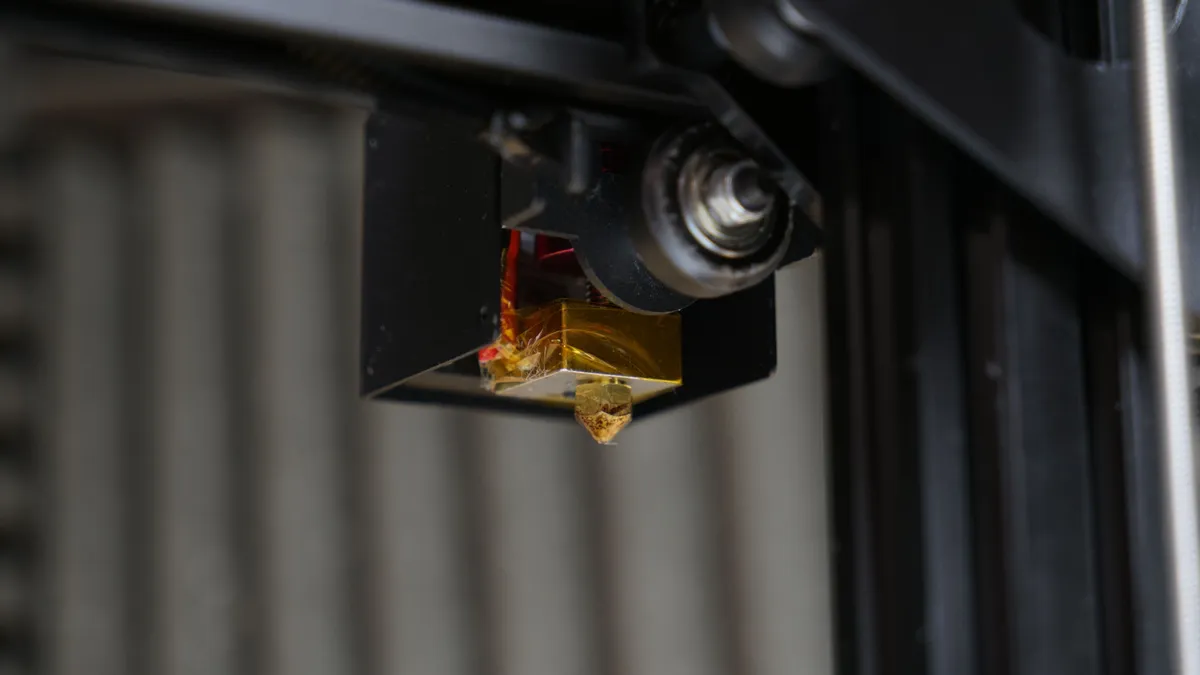
The print head is a standard single extrusion with just the hotend and fan mounted on the X-axis. The filament is fed through the extruder which is also mounted on the X-axis but inline with the Z column, presumably to provide better support and to cut down on vibration from the steppers at the printhead.
The Hotend is very simple with a single fan cooling the heatsink around the heat break, and that's it. No fan down to the print platform to cool the filament once extruded which could cause an issue with stringing.

The extruder is equally simple, and filament needs to be push loaded into the printer to get started, there's no auto-feed of any type.

On a printer this size it does have a small but respectable print platform although this is acrylic, so best suited to PLA.
The three-axis, X, Y and Z all use large wheels that clamp to the extruded Aluminium frame to move. This again offers a decent and cheap solution.
Checking over the design and the cost-cutting to get a printer in at this price is easy to see. Firstly there is no spool holder, so that will be one of your first 3D print jobs once you finish the build.
Next, the power supply and control board which are housed in an acrylic housing are separate to the printer, so while small, transporting it can be fiddly.
As a design, the Tronxy X1 looks great and appears to have everything a basic 3D printer should have.
Features
These are the full specs for the Tronxy X1:
Build Volume: 150 x 150mm x 150mm
Nozzle Quantity: Single
Nozzle diameter: 0.4mm
Memory card offline print: SD card
LCD Screen: Yes
Supporting material: PLA
Material diameter: 1.75mm
XY-axis positioning accuracy: 0.012mm
Z-axis positioning accuracy: 0.004mm
Packing Type: unassembled packing
Certificate: CE,FCC,RoHS
Layer height is always the big hitter when it comes to features, and here the Tronxy X1 supplies a layer resolution of 0.1-0.4mm.
Although small the printer has a 150x150x150mm build volume with an Acrylic bed fixed in place by bull clips. This is a non-heated bed which limits the material choices for printing, although during assembly it's possible to see a port for a heated bed on the main control board.
The hotend features a 0.4mm nozzle and is compatible with popular 1.75mm filament. As there is no heated bed, the printer is limited to use with PLA even though the Tronxy website says that it can be used with ABS and PLA. The printer is capable of printing ABS, but without a heated bed, the filament will warp.
Computer wise the Tronxy X1 is compatible with Windows and Mac OS systems and comes with the Repetier software, although the printer can be used with any 3D Slicer application you want.
As well as being able to print directly from a computer you also have the option to print from a MicroSD card, one is supplied in the box.
If printing directly from the MicroSD Card then you can navigate to your prints using the built-in LCD screen and controls.
Finally, as already covered, the printer arrives in a box, in bits and ready to assemble.
Setup overview
It's not merely a case of plug and play, as before the first print can be extruded you need to assemble the printer.
Unlike many other self-build printers, the location of the instructions showing you how to build the printer is not instantly apparent. The instructions are on the MicroSD card, once located and opened the instruction look well designed, but as the build process gets underway, you quickly realise they are a little vague in areas.
Thankfully most of the build is relatively straight forward and finding all the parts you need in the two divided foam sections is relatively easy.
While most parts are logically laid out when it comes to the nuts, bolts and fixing the various elements seem to be spread out randomly between several different bags. This is no Tamiya kit.
In the end, the best idea is to pop each bag into a larger container so you can easily see what you're doing.
You also notice that the locking nuts referred to in the instructions aren't available and only standard nuts have been supplied. A little Loctite is a worthwhile purchase; otherwise, you'll end up continually tightening bolts on the finished build.
Another small point of contention is the small T-Nuts, while for the most part they lock the Aluminium extrusion together solid, getting them into the right position can be tricky.
However, after about three hours, the printer was assembled and ready for calibration.
Setup in detail
Before switching on the printer, it's essential to check that all the end stops are in position and all click when the X, Y or Z axis reach there limit.
Once this is done, then the build platform needs to be checked. This, of course, needs to be level, but also check that the springs below the platform are tightened, so there's a bit of flexibility to raise or lower the platform to level.
As you do this, you may find that you need to adjust the height of the Z-axis end stop.
Once done manually raise the nozzle and bring it in line with the top of the print platform, it should be a paper width above the surface. Then push across the X-axis to the furthest point and adjust the platform to bring the level of the platform in line with the first point.
Once done move the print head on the Y-axis and again adjust the platform, so it's level. Then back across the X-axis, level and return to home.

One issue I found at the outset was that there was quite a bit of play in the build platform where it should be rock solid. Taking it off, tightening the bolts seemed to solve the issue.
You're now ready to switch on the printer.
It takes about 30 seconds for the printer to boot up, and the small screen shows the status. It's a pretty generic layout and easy enough to navigate, although not wholly intuitive.
The first check is to run the Auto Home feature to check all motors are working as they should. After one mishap where the Z-Axis end stop wasn't positioned quite high enough and scrapped the top of the print platform the free motion of the printhead was finally set and ready for the first model to be loaded.
The printer comes with Repetier as the suggested software, but the version included on the USB key doesn't work with the latest version of Mac OS. I downloaded the newest version of the software and tried again, but after a while, without success connecting, I tried Cura.
Again I didn't have any success connecting directly, but setting up a profile and saving the model to MicroSD worked perfectly.
I then inserted the MicroSD card into the back of the power pack and then navigated to the print file in the menu.
It was time for the first print.