12 handy OpenOffice Writer tips

If you who haven't used OpenOffice.org yet you are missing out, and so is your wallet.
It's packed with features and works well with documents created in Microsoft Office.
If you're wavering then there's one other factor to consider: OpenOffice.org is free, so just give it a try!
To help you along, we've put together 12 tips that will help you get the most from Writer, its word processor.
1. Add content to toolbar
If you're used to Microsoft Office then you might find OpenOffice.org's menu system a little unfamiliar and jarring. The experience may leave you hankering after the Ribbon, but you can make Writer much easier to use by ensuring that your favourite tools appear on the standard toolbar.
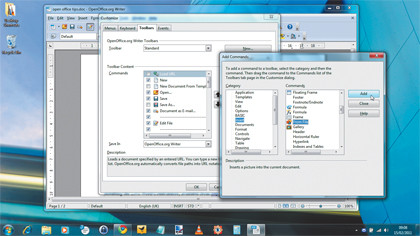
Choose 'View | Toolbars | Customize' and select the toolbar you want to modify. There's generally room for a few more functions on the standard one. You can simply tick or clear any of the boxes next to each of the commands to add or remove them.
Sign up for breaking news, reviews, opinion, top tech deals, and more.

To add one not already in the list, click 'Add'. You can now browse through all the available menus to find the command you want. Select it and click 'Add'.
2. Rearrange the toolbar
You can move items around within a toolbar to make them suit the positioning you're used to, or just to make them easier to find.
Select 'View | Toolbars | Customize' and pick the toolbar you want to work with, which in most cases will be the standard one. Highlight the item you want to move and use the up and down arrows to change its position in the toolbar.
If you don't like the name of a particular tool, select it, choose 'Modify | Rename' and enter the name you want to use. Don't like the icon? Choose 'Modify' again and select 'Change icon'. Pick from the list of icons or click 'Import' and use your own custom file.
3. Keep a running word count
Word users who are new to OpenOffice.org often miss the running word count in the status bar. This feature was present in Word 2007 onwards. You can get a word count of a highlighted section by choosing 'Tools | Word Count', but it lacks the immediacy of the Word feature.
You can fix this by installing the Live Word Count macro from www.bit.ly/h5XQZw. Download the file and move it to 'C:\Users\[username]\AppData\Roaming\OpenOffice.org\3\user\Scripts\python', making the 'python' folder if it isn't already there.
Test the macro by choosing 'Tools | Macro | Run macro'. Now expand 'My Macros' and select 'wc', followed by 'wordCount'. Click 'Run'. You'll get a floating window showing the total words, which changes to show the total for any selected area.
For easy access, add it to the toolbar. Choose 'View | Toolbars | Customize | Add'. Under 'Add commands', scroll down to 'OpenOffice.org Macros' and expand it, then go to 'My Macros | wc | wordCount'. Click 'Add' and position it in the toolbar.
4. Set default save options
OpenOffice.org is fully compatible with Microsoft Office file formats and can open any file, including those in the newer DOCX format. Two compatibility issues tend to put users off OpenOffice.org, though.

Firstly, in documents that use complex layouts in Word, some positioning of page elements can change in Writer. Secondly, the default save format is Open Document Format, which stymies some Microsoft Office users if their systems aren't up to date, including all import filters.
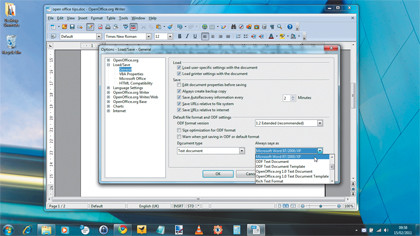
However, it's easy to fix this and ensure that Writer saves by default in the DOC format used in Word 97-XP. Just choose 'Tools | Options | Load/Save | General'. Under 'Default file format and ODF settings', select 'Microsoft Word 97/2000/XP' from the drop down list marked 'Always save as'. That's all there is to it.