How to set up your Raspberry Pi in Mac OS X
Get some Apple in your Raspberry Pi
The download is actually a 'zipped' version of the image. Zipping files in this way reduces their size by cutting out the duplication within the file.
But it also means a file needs to be unzipped before it's useful. On OS X, this should happen automatically after the download has completed, leaving you with the raw file – in our case, this is called 2014-09-09-wheezy-raspbian.img, but the date element will change depending on when the Raspbian image was constructed.
If you need to unzip the file manually, just double-click it. The zip file will be replaced with the image. Now it's time to run the RPi-sd card builder.

You should find this in your Download folder, complete with a Raspberry Pi application icon. Run the application and click through the warning/disclaimer that this file was downloaded from the dangerous wilderness that is the internet.
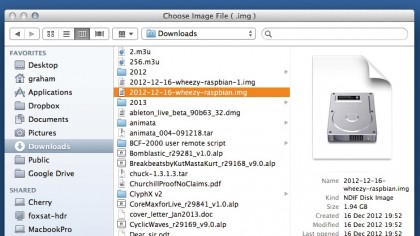
Milliseconds later, without even a splash screen, you'll be presented with a file requester asking for the location of the image file. After successfully completing the previous step, you should have no difficulty locating this file and giving it to the requester. Press the 'Choose' button with the image file selected to progress.
Choose the card
The RPi-sd card builder will now complain that it can't detect your SD card whether it's connected or not. We use a standard USB SD card reader, and with the SD card for your Raspberry Pi inserted into the reader, connect the reader to a spare USB port – make sure your SD card is write-enabled, if it has this feature.
This is usually a small sliding switch on the side of the card to protect valuable data from being overwritten. Without wanting to state the obvious, you need to make sure there's nothing on the card you want to keep, because it will all be overwritten.
Sign up to the TechRadar Pro newsletter to get all the top news, opinion, features and guidance your business needs to succeed!

With the SD card reader connected, you'll see the device automatically mounted on to your desktop. This is an opportunity to make a final check before starting the writing procedure.
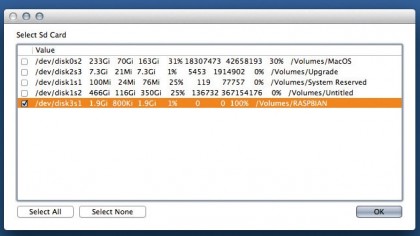
In the RPi-sd card application, click on 'Continue'. The following window lists all the storage devices connected to your system and you need to select the device that corresponds to your SD card. But first click 'Select None'.
This is important, because selecting the wrong device could be disastrous and you will lose important data. Make sure the device you choose has the same volume name (on the far right) as the name for the new removable storage on your desktop, and that the capacity column (second from the left) is the same as the capacity your card is capable of.
When you are sure, click 'OK'.