It won't hurt to check your IP. Select option '1' and a list of available network adaptors will be displayed, the device name is on the left and the MAC address on the right, using the MAC is probably the easiest way of correctly identifying the right adaptor.
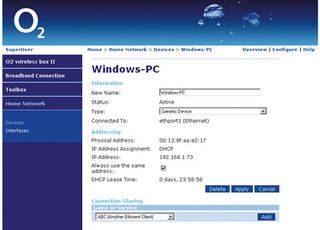
With a working adaptor selected the all important setting of the IP address can be done. Our personal preference is to allow the home router to dole out the IPs. If you select option '2' the first choice is to get the IP from the DCHP server, which is your router.
The issue here is if your router at some point assigns that IP to another device, as you're not going to be able to remotely connect to the server and that will involve all kinds of merry hell.
So there are two options, many routers enable you to lock an IP to a single device, you may have to delve around but it'll be in there somewhere. The alternative is to set FreeNAS with its own fixed IP address, if you choose not to use the DCHP option you'll be stepped through the various required settings.

First, you will need to choose an available and valid IP address for your network, typically this will be either 192.168.0.x or 192.168.1.x where 'x' can be a number from 0 to 255. If possible check your router for a list of currently allocated numbers and simply pick out a free one. It's as easy as that.
You also need to know the IP address of your DNS and Gateway plus the subnet mask. The easiest way to find these details is to jump on a Windows PC and select 'Start' > 'Run' > Type 'cmd' > Click 'OK' then type 'ipconfig /all'.
Locate the main Ethernet adaptor and note these details down. Alternatively, you can right-click the active network icon in the Notification area, choose 'Open Network' and 'Sharing Center' > click the 'Local Area Connection' link next to Connections > click Details.
Get daily insight, inspiration and deals in your inbox
Get the hottest deals available in your inbox plus news, reviews, opinion, analysis and more from the TechRadar team.
Punch these numbers into FreeNAS as it requests them, the only funny bit is how the subnet mask is specified but for most people this will be the default '24' to correspond to the standard 255.255.255.0 subnet. When asked about setting the IPv6 choose 'No'.
At this stage no matter which option you chose FreeNAS will initialise the Ethernet interface and attempt to secure an IP address. It'll display this IP and how to access its web based interface, so make a note of it.
Getting GUI
That's it. You've set up a FreeBSD operating system. It's criminally easy. Effectively you can now leave your server, disconnect the mouse, keyboard and display, as everything is remotely managed via a web browser. So break out your Ipod Touch, netbook or Wii browser and become your very own server administrator!
Into the browser's address bar you need to tap the IP address of the server, we hope you noted it down. Technically, this should also end with ':80' as this indicates you want to connect via port 80, but you can usually leave this off as by default HTTP request use port 80 anyway.
The default username and password are 'admin' and 'freenas', respectively, and with that you're in! Any connection problems at this point could be related to the router not accepting the specified IP address, it could be the IP has been altered by the DCHP. For both these check your router's list of connected devices.
It could also be the MAC is being blocked if you're going via a wireless router, or an overly aggressive firewall on your PC could be blocking either the IP or port 80 access.
Now we can get on with the good stuff. Welcome to the world of FreeNAS – it's a bit grey. An obvious point, but it is good practice to first change the username and password.

Hover the mouse over the System menu and click 'General'. You can alter the username here, click the 'Password' tab to change that. For the security conscious you can switch the protocol to HTTPS. Whatever you do make sure you don't miss-clicking the 'Save' button positioned by some usability genius out-of-sight at the bottom of the page.
Hard times
It's now time to add in the swap and data partition that you carefully made a note of earlier, right? It's actually a straightforward process, despite the scary names BSD insists on giving all of its devices. We'll go through adding the data partition, but this is a good example of how to add further drives and partitions at a later date.
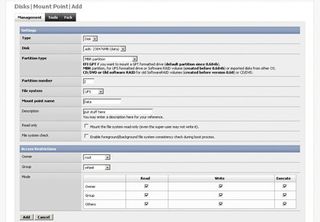
Select the 'Disks' > 'Management' menu, click the '+' symbol on the right. Now check the details you noted about the Data partition, the top Disk pull-down menu should match this; and should read something like 'ad0' ,for example, followed by the hard drive's name.
Add a description, enable the hard disk standby, plus a suitable Advanced Power Management scheme, enable S.M.A.R.T. and select 'UFS' as the preformatted file system. Click the 'Add' button and on the next page click the 'Apply changes' button. We've now added a physical partition to the operating system, but to access it, we need to add a mount point.
Select the 'Disks' > 'Mount Point' menu and click the right-hand '+'. The type is 'Disk', then select the physical drive from the Disk menu, set the partition type to MBR and, importantly, the partition number is '2'. As '1' holds the operating system and '3' is the swap partition.
The file system is 'UFS', add a friendly mount point name such as 'Files' along with a description. Click the 'Add' button at the bottom and then the 'Apply' button to complete the process.
To add the all important Swap partition select the 'System' > 'Advanced' menu, click the 'Swap' tab, click the right-hand 'Enable' tick box, change the first pull-down menu to 'Device' and enter the device name that FreeNAS mentioned earlier.
It should be the same drive name, but use partition 3, which reads as '/dev/ad0s3', the ad0 number will change depending on which SATA controller the drive is connected to. Click the Save button and that's set.
Current page: How to configure FreeNAS
Prev Page How to install FreeNAS Next Page Establish network sharesMost Popular

