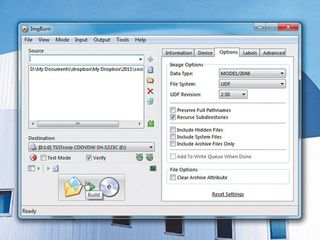
In ImgBurn, choose 'Build mode' and add the DVD video files that you need for your project. Click the 'Burn' button and provide a volume label. ImgBurn shows some suggestions for the layer break position. Select one and click 'OK' to proceed.
6. How to burn an audio CDs
CDs that play in standard CD players need to be in Compact Disc Digital Audio format. Most music files are stored on a PC in compressed forms and need to be converted. Several programs are capable of doing this, including Windows Media Player, but CD BurnerXP provides a very simple interface.
Launch the program and choose 'Audio disc'. Click 'OK'. Browse to the audio files that you want to include in your disc and drag them into the lower pane in the order you want them to appear on the CD. Insert a CD and click 'Burn' to produce the final disc.
7. How to combine VOB files
DVDs recorded on camcorders or home DVD recorders save their contents in VOB, IFO and BUP files. The files with the extension VOB that contain the video, while the other types include disc information and backups.
You can play VOB files in VLC media player, but your files won't necessarily match up with chapters.
Get daily insight, inspiration and deals in your inbox
Get the hottest deals available in your inbox plus news, reviews, opinion, analysis and more from the TechRadar team.
To get a full video, you may need to combine several VOB files. There's a simple program that will do this, called Join VOB Files Tool. Get it from here, then unzip the file and launch the executable.
Click 'Add VOB file' and browse to the files you want to join. Click 'Change file name' and supply the name and location for the joined up file, then click 'Join VOB files'.
8. How to burn a Blu-ray disc

To burn a Blu-ray disc, you'll need the disc itself and a drive capable of writing to it. ImgBurn supports Blu-ray recording. Launch it and choose Write Files/Folders to disc. For a data disc, add whatever files and folders you want to the 'Source' box.
If you have a video Blu-ray disc authored, you should have a folder labelled 'BDAV' or 'BDMV', and one labelled 'CERTIFICATE'. Browse for these and add them to your compilation.
Now select 'Options' on the right-hand side, then 'Data Type MODE1/2048'. For 'Filesystem' choose 'UDF', and for 'UDF revision' select '2.50'. Tick the box marked 'Recursive subdirectories'.
Now, on the 'Information' tab, click 'Calculate' to check you have enough space. Click 'Build' and provide a volume label when prompted.
9. How to create recovery files

Whenever you burn a data disc, you're likely to have some spare space. You could use this to store other files to ensure each disc is full up, or you could use it to better advantage by storing recovery files for the data that you've already put on your disc.
QuickPar is a data verification and recovery tool that lets you create recovery files from the originals. If anything goes missing, you can use these recovery files and what's left of the data to reconstruct the missing bits.
Launch QuickPar and click 'Add files'. Add all the files that you want included on your disc. Drag the 'Redundancy' slider until the data size matches your spare space. Click 'Create' to produce the PAR2 files. Once complete, return to your disc-burning program, add these PAR2 files and burn the disc.
10. How to restore from PAR2 files
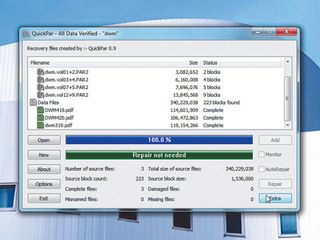
Launch QuickPar and click 'Open'. Browse to one of the PAR2 files alongside the data that you copied from your damaged disc.
The software will detect any missing or damaged files and show them as it scans the data. As long as not too much data has been damaged, QuickPar can recover what's been lost. Click 'Repair' and wait for the program to restore the damaged files to their rightful place.
11. How to read damaged discs
If you find that a CD or DVD no longer reads properly and there are no visible fingerprints or scratches, you may be able to rescue some or most of the data using the free version of ISO Buster.
Insert your damaged disc and launch ISO Buster. Click 'Refresh' if it isn't detected. You'll see each session of recording on the disc. Choose 'File' and pick a session. Choose 'Extract session | Extract user data'. Provide a location to save this to disc. You can then open the image and restore intact files.
12. How to convert to ISO

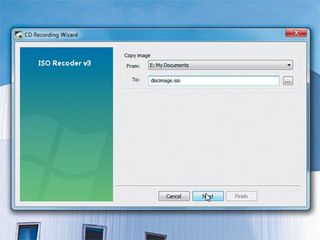
Install ISO Recorder, which is available from here. Insert the disc you want to convert, right-click it in My Computer and choose 'Create image'.
In the resulting dialog, ensure the right drive is selected and browse to the location where you want to save the image file. Provide a filename. Click 'Next' and wait as the ISO image is generated. When it's complete, click 'Finish'. You can now browse to your ISO disc image file.
Most Popular

