Memory is easy to install, but getting the best performance out of it takes a little more effort

We'd hazard a guess you know how to fit more memory to your PCs, replacing the current sticks if necessary. The mechanics of fitting a stick of memory into place haven't changed much in the last 10 years.
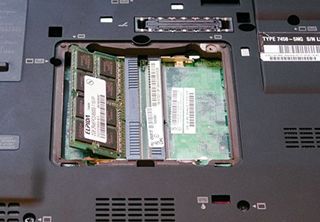
For laptops, it's simply a case of sliding the SODIMM into the slot and pushing the card into place until it clicks. There's nothing more to it from a physical perspective.
The process for desktops isn't much more taxing. Start by making sure the memory is the right way round, so that the notch lines up with the socket correctly. Then, slide the memory stick in firmly until the clips on either side flip into place, and that's it - you're done.
Installing memory is usually far more straightforward than working out what your upgrade options are, or configuring it for optimal performance.
It's taken some time, but motherboard manufacturers are finally cottoning on to the fact that graphics card slots are often in the way of memory clips, and some of them are now using clipping mechanisms that only have a clip at one side. This means that you have to slide the memory stick in and rotate it into place, but at least you don't graze your knuckles on the back of the graphics cards.
The most crucial changes have happened in the Serial Presence Detect EEPROM that resides on each memory module. The SPD contains the timing information for the module, but due to the way companies traditionally erred on the side of compatibility above all else, getting the best performance out of a module was left to overclockers.
Get daily insight, inspiration and deals in your inbox
Get the hottest deals available in your inbox plus news, reviews, opinion, analysis and more from the TechRadar team.
This changed when Nvidia and Corsair decided to use the spare capacity of the SPD to define performance at different speeds to the standard JEDEC settings. Most manufacturers now use 256-byte EEPROMs for the SPD, while the specification only defines the first 64 bytes for timing information.
Known as Enhanced Performance Profiles, or EPP for short, the extension to the SPD for DDR2 modules meant this unused space could be used to store faster memory settings than those defined by JEDEC. With a compatible motherboard, this meant the memory could be configured to run painlessly at faster speeds.
Intel followed this lead with its own profile extensions for DDR3, Extreme Memory Profiles, using the unused EEPROM space to the same effect. This is how memory brands can sell kit rated above JEDEC specifications, yet users can still exploit the faster speeds easily. To check you've got your memory configured optimally, see the walkthrough below.
Optimise your RAM
1. Check your settings

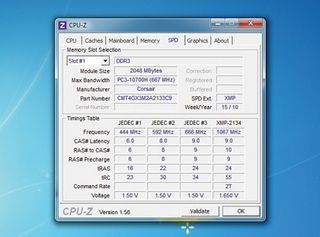
When you install memory, the BIOS should get the timing information from the SPD on the modules. The only potential problem is if you've got two types rated at diff erent speeds.
CPU-Z lets you check memory settings within Windows. You'll need to run RAM at the slowest latency settings supported by all your machine's modules or you'll have memory misses, which will slow operations down.
2. Going extreme

The JEDEC memory profiles err on the safe side, so even if your memory is sold as running at 1,600MHz, it won't operate at that speed by default.
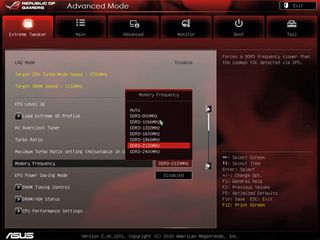
Enter your BIOS configuration screen, go to the memory settings and elect to use the XMP (or EPP) settings instead. Set the speed at which the memory should operate, and the actual timings are all done for you. Check that the changes have taken effect with CPU-Z.
3. Overclock it yourself

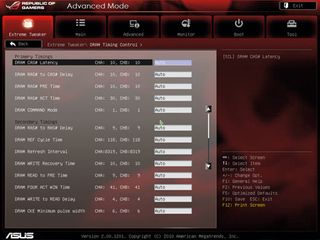
Most recent memory modules will overclock further than even the XMP defines, though you'll need to experiment a little to get the best performance.
Enter your BIOS and increase the memory speed up to the next stock frequency, checking it still boots. Rinse and repeat until the machines stops working, reset the BIOS to the frequency you know works. Benchmark the performance increase to see if it's worth it.
