Essential Nikon camera settings: 3. Exposure Compensation

Want to take more control of exposure, but don't know where to start with manual mode? Exposure compensation is much easier to use, and much more intuitive as well…
What is it in a nutshell?
Exposure compensation is essentially a way of brightening or darkening shots in aperture-priority, shutter-priority, or even program mode without having to resort to manual exposure.
This is ideal for those situations where the camera's automatic metering produces under- or over-exposed results, such as when shooting very light or very dark subjects.
Why is it so important?
Even a metering system as sophisticated as Nikon's 3D Matrix metering system can be fooled into under- or over-exposing when the subject contains a large amount of dark or light tones. Learning how and when to use exposure compensation is a vital tool in your armoury for getting spot-on exposures.
There are many situations where this can be useful, but the classic is when the background is much darker or lighter than the subject you're shooting, such as a person standing against a window. In these cases, exposure compensation is perfect for ensuring that your subject is correctly exposed, rather than the background.
How do you use it?
You apply exposure compensation by holding down the +/- button on the camera body, and then using the rear input dial to set the amount of compensation required. The settings that this affects will vary depending on which exposure mode you are using.
If you're using aperture-priority mode, for example, the aperture value will stay the same, but the shutter speed will change to let in more or less light. The opposite is true when you're shooting in shutter-priority mode; in this case, the shutter speed will remain unchanged but the aperture will vary, again to let in more or less light.
Get daily insight, inspiration and deals in your inbox
Get the hottest deals available in your inbox plus news, reviews, opinion, analysis and more from the TechRadar team.
All you need to remember is that positive exposure compensation brightens images, while negative compensation darkens them.
Exactly how much exposure compensation you need to dial in will vary depending on how much of the scene is light or dark, but a good starting point is to set + or - 1, and then take a test shot.
What you can ignore: Auto exposure lock
Exposure lock (AE-L) is another way to control the exposure in all auto exposure modes, but in order to use it you have to point the camera at a subject that contains mostly mid-tones, lock the exposure using the AE-L button, and then recompose your image. This isn't convenient in most situations, so it's usually better to use exposure compensation.
Taking it further: Exposure bracketing
Judging exactly how much exposure compensation to use can be tricky. One option is to set up your Nikon to capture a series of images, each using different amounts of compensation.
You need to select the number of shots (three is usually enough) and the amount of exposure compensation (start with +/- 1). Then press the shutter release three times, and your camera will take a series of shots at -1, 0 and +1.
- Learn more: The A to Z of Photography: Exposure compensation
Essential Nikon camera settings: 4. Histogram display

Judging the exposure from the image alone is difficult, so your Nikon has a display mode to help you get it right
What is it in a nutshell?
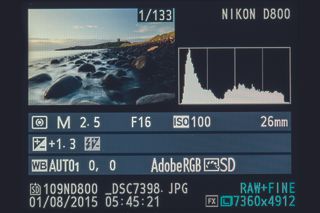
The histogram is a graph that shows you the distribution of tones within an image. The shape of this graph will vary from shot to shot, but it's the distribution of the graph, and its position along the bottom axis, that are the key elements when it comes to gauging the exposure of your shots.
Why is it so important?
Understanding the histogram will enable you to fine-tune your exposure to make sure that you capture the maximum amount of detail in the tones of your images. The horizontal axis shows you the brightness of the tones in the image, from the darkest black on the extreme left to the brightest white on the right.
The areas in between these two extremes are the tones that will be correctly displayed in your image. If the graph goes over the right-hand edge, there will be areas where the highlights will have no detail, while if it goes over the left-hand end, it will be the shadows that have no detail.

How do you use it?
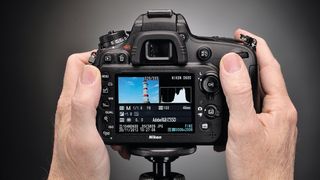
To display the histogram when you review images on your Nikon, press the Play button and then toggle the top or bottom of the rear control pad to scroll through the different display modes, until the histogram is displayed alongside the image.
If the graph is bunched to the left, with a gap to the right, then the image is under-exposed (unless the subject is very dark), so you should increase the exposure on the next shot; if it's bunched to the right, with a gap to the left, it's over-exposed, so you need to reduce the exposure.
If you're shooting a very high-contrast subject you may end up with a histogram that overlaps both ends of the graph. In these situations you can't keep detail in both the highlights and the shadows in a single shot, so you'll have to decide which is more important in your image.
It's usually best to set the exposure so that the highlights reach the right-hand end of the graph, and then 'let the shadows fall where they may'.
What you can ignore: RGB histograms
Along with the normal histogram display, there's the option to display separate histograms for the red, green and blue (RGB) colour channels.
This gives you even more information about the individual colours, but in most situations this isn't necessary for getting a correct exposure, and having to check three graphs, rather than just one, can make it more difficult to spot under- or over-exposure.
Taking it further: Highlight warning
Along with the histogram, there's another display mode available on your Nikon that can help you retain detail in your shots. The Highlights (or Clipping) warning display alerts you when the very brightest areas of the scene are over-exposed.
These areas will flash black and white, indicating that you need to reduce the exposure if you want to keep detail in these highlights.
- Learn more: The A to Z of Photography: Histogram
