Apple calls an AirPort-attached hard drive an “AirDisk,” and to make yours available to any computer on the network, first launch Applications > Utilities > AirPort Utility, select your AirPort and click Manual Setup. Select Disks from the top of the window, then the File Sharing tab. Here you’ll want to check “Enable file sharing” to make the AirPort storage visible to your computers; you’ll also find options to secure your disk with a password, if necessary. Be sure to click Update to commit these changes on your AirPort when finished.
Next, plug the hard drive into an available USB port (either directly or via hub), open a Finder window and look for your AirPort under the Shared section at left. Click on it, enter your password (if required) and your AirDisk will now appear mounted on your computer with a blue drive icon, and can be accessed from any other computers on your network the same way. As always, you’ll get the best results from a wired network (preferably Ethernet 1000baseT) or an 802.11n wireless connection.

Use an AirDisk for Time Machine Backup
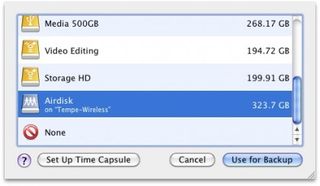
With a USB hard drive (or two) connected to your AirPort network, the door is open to new possibilities. That includes using your new AirDisk as a central Time Machine backup drive for all of the computers on your home network. With your AirDisk mounted and available on your computer, simply head to System Preferences, open Time Machine settings under System and click on Select Disk. Like magic, your AirDisk will show up in the list of available hard drives, even showing you which AirPort network the drive is connected to. Select the drive, click Use for Backup and you’re ready to go.
If you have many gigabytes of data on your computers, an 802.11n network should be considered a minimum requirement for Time Machine use. Also, the bigger the USB hard drive, the better for Time Machine use – if you’re using an AirDisk to back up more than one system, you’ll want to consider more than 1TB in order to have plenty of backup space for the future.

Extend Your Wireless Range with an AirPort Express
Now that you’ve successfully added a printer and hard drive (or two), you may want to beef up your wireless network to maximize your range, particularly in larger homes or apartments. The most effective method is to add an inexpensive AirPort Express to extend your wireless range. While a second AirPort device can pick up the signal from another device and carry it further, the best way to accomplish this is to connect the two AirPort devices using an Ethernet cable.
Assuming your current AirPort Extreme is already set up and working, you’ll want to run a Cat 5 or 6 Ethernet cable from any one of the three jacks on the back to the Ethernet port on the AirPort Express; plug the Express into an available AC power outlet to power it up.
Next, launch Applications > Utilities > AirPort Utility, select your AirPort Extreme and click Manual Setup. Select the AirPort icon, then the Wireless tab and make sure “Allow this network to be extended” is checked – it’s under Wireless Network Name. Take note of all of your settings under the Wireless tab, since you’ll want to enter most of them again for the Express. Click Update to lock in your changes.
Get daily insight, inspiration and deals in your inbox
Get the hottest deals available in your inbox plus news, reviews, opinion, analysis and more from the TechRadar team.
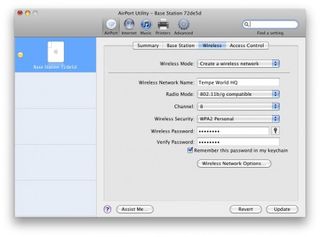
Now select the AirPort Express in AirPort Utility and click Manual Setup; you’ll be asked to switch wireless networks, so click Switch. Select the AirPort icon, then under the Wireless tab make sure Wireless Mode is “Create a wireless network” and that your “Wireless Network Name” matches that of your AirPort Extreme. Select a different channel, preferably one that’s at least two numbers above or below the one used by the Extreme; Wireless Security should match your AirPort Extreme. You may also want to visit the Base Station tab to give your Express its own unique name and password.
Finally, click on the Internet icon at the top and change Connect Using to “Ethernet” and Connection Sharing to “Off (Bridge Mode)” – this will bridge the two AirPorts to carry the connection for your Extreme to the Express over Ethernet. Click Update to commit your changes. Now your AirPort Express will seamlessly appear as an extension of the same network you already use – as you move about your house with a laptop or mobile device, it will intelligently pick up the Wi-Fi signal that’s closest, whether it comes from the Extreme or the newly-added Express.
Follow this article’s author, J.R. Bookwalter on Twitter
