98 Snow Leopard tips, tricks and tweaks
Get the most from OS X 10.6
With version 10.6, OS X has got to the point where it has so many great features that it's almost impossible to know all of them.
Steve Jobs loves to show off the latest OS X bells and whistles during his keynotes whenever a new version is released, but even he doesn't have time to share the more subtle tips and tricks.
OS X 10.6, also known as Snow Leopard, is chock-full of secrets and shortcuts that you're expected to discover by yourself. Fortunately you don't have to pick your way through the OS hunting for techie tidbits because we've gathered up 99 of the best of them for you here.
Whether you're after tips to make your backups easier, ways of working smarter in Finder or saving time when using the internet, they're all here for you over the next few pages. Each set of tips is divided into sections, so you can find the type of shortcut you're after. You'll also find an icon next to each tip for quick reference.
We're willing to bet that even the most seasoned Mac user won't have used half of these cunning techniques on their machine. With this huge selection of tips at your disposal, prepare to speed up the way you work on your Mac forever.
1. Extra menu bar info
Common items on your menu bar such as Bluetooth, AirPort and MobileMe Sync can be quickly checked on with a simple click to view a dropdown menu full of options.
Get daily insight, inspiration and deals in your inbox
Get the hottest deals available in your inbox plus news, reviews, opinion, analysis and more from the TechRadar team.
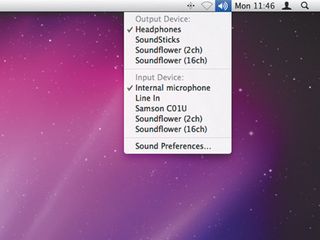
If you want a little more detail from these menus, hold down the Option key while clicking for an advanced view.
MobileMe Sync will show you the status of each sync, which includes Mail, Contacts and Calendars; AirPort will give details of your current connection, as will Bluetooth, and you can set your audio inputs from the volume control.
2. Add any folder as a Stack
Stacks are a really handy way to access files and folders from your Dock, but did you know that you're not limited to just Downloads and Documents? Try dragging any folder to the same position on your Dock and it will automatically be turned into a Stack.
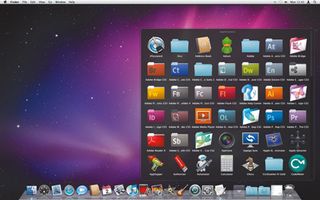
Why not try dragging your Applications folder to your Dock and using it as a handy way to access all of your applications – it's much faster then using the Finder.
If you want to remove a Stack from your Dock, simply drag it off and watch it disappear in a puff of smoke.
3. Built-in screen grabs
Capturing an image of your screen can be important for many reasons, whether you need to snap an error message for tech support, record a receipt page on the web or simply save an image.
You could use Grab in your Applications/Utilities folder, but why not just hit Shift+Command+3 for a fullscreen grab and Shift+Command+4 to select an area of the screen to grab. If you hit Shift+Command+4 and then [Space] you can grab a single window too.
Grabs taken this way will be stored on the Desktop, so keep your eyes peeled for them.
4. App switching with Exposé
Exposé offers a handy way to see all of the windows you currently have open, whether you're using Active Screen Corners or one of the keyboard commands.
When using Exposé you can also switch between individual apps by pressing the Tab key. Each time you press Tab the view switches to open windows of a particular open application, enabling you to quickly find the window you need and access the application.
5. Stationery Pad
Do you have a document that you use as a template on a regular basis? If so, why not select it and hit Command+I or choose Get Info from the File menu. Under the General section of the Get Info screen, click the Stationery Pad option to create a copy of the file every time it's launched.
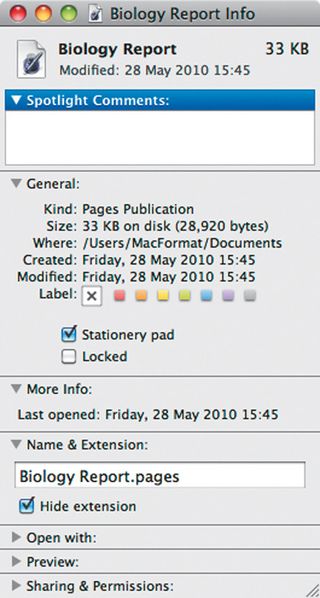
You work on the copied version so you never overwrite your original. This tip is ideal when used with text documents and can make it easier to send the same letter to a group of people.
6. Customising Dock items
Apple includes a number of applications on your Dock by default but you probably won't use all of them that often. If you would rather limit the number of items on your Dock, simply drag apps away from it to remove them.
The reverse is also true: simply drag an application onto the Dock, making sure it's between two apps, and it will happily sit there waiting for you to launch it. You can also click and drag apps to new locations on the Dock.
7. Open With…
Files on your Mac launch their default application every time you open them, such as Text Edit for TXT files. But you can change this behaviour for particular documents if you wish.
Choose a file and select Get Info from the File menu then use the Open With… drop-down menu to pick the app you want the file to open in. Here you could tell a TXT file to open in Microsoft Word rather than Text Edit if you wanted.
8. Recover ignored software updates
Sometimes the Mac's Software Update utility pops up when you don't have time to look at it. While there are some essential updates required when the app appears, it's easy to click Ignore and forget about it.
If you do this, then realise you needed the update, open Terminal from the Applications folder and type softwareupdate > reset-ignored to recover it.
9. Spotlight reveal
Searching for files in Spotlight is a handy way to access the documents you need in a flash, but it opens them by default. If you don't want to open the file hold the Command key and click on it to reveal it in the Finder.
10. Force magnify Dock
If you have Dock magnification turned off but fancy using it every now and again, hold down Ctrl and Shift while you move the cursor across it for some ad-hoc magnification.
11. Icon size slider
Try using the little slider found at the lower right corner of Finder windows in icon view. Dragging it to the right will increase the size of the icons within it, which is ideal for browsing images.
12. Resize the Dock
The quickest way to adjust the Dock's size is to click and hold your cursor on the bars between Stacks and your apps. Move the mouse up or down.
13. Show Item Info
Keep an update of your disk space on the Desktop. Right-click your Macintosh HD on the Desktop, click Show View Options and turn on Show Item Info.
14. Add an icon to Finder windows
Is there an app, file or folder you use regularly? If you want it within easy reach at all times, why not drag it onto a Finder window next to the search box so you can launch it from there?
15. Clean up Desktop icons with a click
If your Desktop begins to look a little cluttered and messy, simply right-click or Ctrl+click on it and select the Clean Up option from the menu that appears. Your icons will now move to nice orderly positions in the blink of an eye.
16. Quick Alias Access
Take some of the hassle out of connecting to a shared computer, server or folder by Ctrl-clicking it and creating an alias. Now move this alias to your Desktop or Dock and connect to it with a quick double-click.
17. Quick Look Magnify
When you're viewing an image in Quick Look you can turn your cursor into a magnifying glass by holding down the Option key. Click the image to zoom in and hold down Shift and Option when clicking to zoom out.
18. Activate fullscreen Quick Look mode
Rather than pressing [Space] to invoke Quick Look when you have a file selected, use Option+[Space] to open it in fullscreen mode. It's perfect for viewing a whole photo; Option-click on an image to zoom in, and Shift+Option-click to zoom out.
Most Popular


