Guide to Mac OS X File Sharing
Share files with other user accounts or across your network
The Users panel

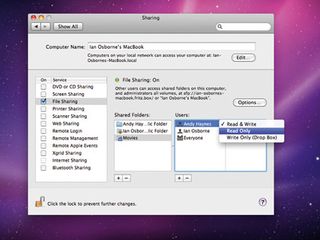
The Users panel allows you to set privileges for individuals and groups. In the Shared Folders panel, select the folder you wish to affect. The Users panel shows the access rights currently enjoyed by yourself and others.
By pressing the '+' button under the panel, you can add individual users and groups. Again, highlight and press '-' to remove them.
New user or group accounts can be created in the Accounts system preference, or you can set up a new user without creating a new account on your Mac by pressing the New Person button in the dialog window that appears when you press '+'. A password can also be set for this new person.
To add him or her to the Users panel, highlight his or her new account and press Select. By default, a new user or group added to the Users list has Read Only access. To change this, click on the words Read Only and select another option from the pull-down.
Read Only access means that a person or group can open that folder and take files, but cannot put anything in it or edit files that are already there. Write Only access is the exact opposite - the user can copy files into that folder for the account holder to use, but cannot open it or take anything from it. A person or group with Read & Write privileges has full access to that folder, and can open, edit or take files, copy data to the folder or delete items.
The group titled Everyone is a global setting, and can also be set to the self-explanatory No Access. Note that if a user account is set up for someone who's also a member of a group, personal settings override group restrictions.
Get daily insight, inspiration and deals in your inbox
Get the hottest deals available in your inbox plus news, reviews, opinion, analysis and more from the TechRadar team.
For example, if Fred Smith is given Read & Write access, but he's included in a group that has Write Only privileges, Fred can Read & Write.
An alternative way of creating and managing shared folders exists, apart from System Preferences. In Finder, highlight the folder you want to share, and press Command+i or right-click and select Get Info. This brings up that folder's Info window. At the foot of the General section is a check box entitled Shared Folder. Checking this makes it shared (if you check it with File Sharing off, you're invited to activate this feature).
At the foot of the Info window, in a section labelled Sharing & Permissions, you can set read and write privileges. If you want to share with computers running Windows or Linux, you have to activate the necessary network protocols to allow your Mac to communicate with the operating system that needs to access your files.
In the Sharing preference pane, click on Options. Apple Filing Protocol (AFP) is active by default, and allows you to share with Macs. To share with Linux and Unix systems, check the File Transfer Protocol (FTP) box. You're given a server address for Linux/Unix users to access, or they can browse for your computer by name. To share with Windows users, check the Server Message Block (SMB) box.
Check the user accounts you wish to enable for SMB, and enter the password for that account. When you're ready, click Done to finish.
MobileMe benefits

Of course, MobileMe subscribers have another option. MobileMe's iDisk feature gives you 20GB of cloud storage, and a couple of easy ways to share your files with others. By uploading a file to your iDisk's Public folder, it can be downloaded by anyone.
To upload a file to iDisk through Finder, select iDisk from a Finder window's side bar or click on Finder's Go pull-down menu, scroll down to iDisk and select My iDisk. If you're not already logged on in System Preferences, you have to enter your details when prompted. You can then transfer files to any of your iDisk folders (including Public) through the Finder.
