How to install Raspbian on Raspberry Pi from a USB stick
Install Raspbian from a USB stick for a quick and easy installation
Fixing faults

The big difference between your Raspberry Pi and your PC is that the Pi doesn't have a BIOS. It's the BIOS you see first when you turn on your computer - the retro-looking splash screen or the text detailing CPU, memory and storage, only it appears too quickly to read.
If there's a problem with your PC, the BIOS can often be used to troubleshoot the booting, and it will also create noise and flash LEDs if bad memory or a dodgy CPU is detected. But without the facilities of a BIOS, the Raspberry Pi doesn't have the same level of fallback, and while, hopefully, your Pi will boot first time without problems, the more you play with your Pi the more likely it's going to be you encounter a boot problem. Which is what these two pages are for.
What the LEDs mean
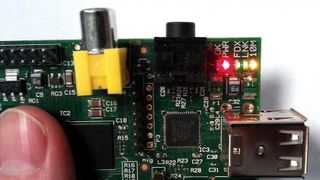
The only clues you get about how the process is doing is from the bright bank of LEDs next to the audio jack and USB ports. The Model B sports five LEDs, while the Model A has only two, although the printed labels remain.
LED1: Green, labelled ACT: SD Card Access
LED2: Red, labelled PWR: 3.3 V Power is present
LED3: Green, labelled FDX: Full Duplex (LAN) connected
LED4: Green, labelled LNK: Link/Activity (LAN)
LED5: Yellow, labelled 100: 100Mbit (LAN) connected
As the Model A has no wired networking, the last three LEDs aren't present on the PCB, and you'll find the labelling is slightly different on earlier revisions of the Model B, although their functions are identical.
When you first connect the Pi to a power source, the red LED2 should light. This indicates the device is getting the correct amount of power, and this LED should remain lit for the entire period your Raspberry Pi remains on. Even when there's no network connection, or if the SD card isn't connected, this LED should stay lit. If it flickers, or if it goes off, you've got a problem with the way your device is receiving power, and the first thing you should check is the cable and the power supply unit.
With the SD card connected, the edge-side LED should be the next to light. This is the LED that signals that data is being read from the inserted SD card.
Get daily insight, inspiration and deals in your inbox
Get the hottest deals available in your inbox plus news, reviews, opinion, analysis and more from the TechRadar team.
Boot sequence
Initially, it will flicker on then off, pause for a moment, then pulse on and off again as the Pi reads the boot code off the SD card. If it doesn't get that far, then the problem is going to be either that the boot code hasn't been correctly written to your storage card, or that your storage card isn't working with your Pi. Be sure to check the card is seated properly and that any micro SD adaptor you might be using is connected.
You can also check to make sure the connectors on the Pi are springy and look identical, as there have been a few reported problems with these connectors. It's also possible to decode which part of the boot process the Raspberry Pi is stalling at. Here's a list of what the various flashing modes from the ACT/OK LED mean - although these rely on a firmware from at least the middle of 2012, and we've taken this data from the Raspberry Pi forums.
In use, we've found it easier to ignore the flashing status unless you're prepared to delve into the complexities of the boot procedure, and while this can be fun, it's also frustrating if you just want to start playing with your new device.
3 flashes: loader.bin not found
4 flashes: loader.bin not launched
5 flashes: start.elf not found
6 flashes: start.elf not launched
