Why you can trust TechRadar
Performance
After spending a good six weeks testing the RoboxPro, it's clear that the machine is a step-up from the small RoboxDual but not in a way that I expected.
The RoboxDual is still one of the best and most convenient 3D printers I have looked at, and the RoboxPro is in many ways much the same, just on a larger scale.
As with the RoboxDual, the setup of the RoboxPro is straight forward, and the calibration process with it's simple to follow steps couldn't be easier.
Unlike other machines, the Robox printers have a set process, and this is all controlled through either the AutoMaker software or through the front panel. Following these processes ensures that everything runs and performs smoothly.
If you break from the processes, then AutoMaker or the panel will highlight your tardiness the next time you switch on the printer; for example switching off the machine before the head has cooled, not purging the system after swapping filaments.
During the test, I used a fair amount of third party filaments, including one that I should have thrown in the bin a while ago as it's caused issues with bulging in the past.
Sure enough, halfway through a five-hour print, the filament became jammed. Thankfully after running the Stuck Filament option through the AutoMaker software, the filament released and the print was restarted.
That filament has now been disposed of.
Aside from that, a couple of tangled third party reels, a print of two coming loose and one badly modelled print, the overall rate of print successes was exceptionally high.
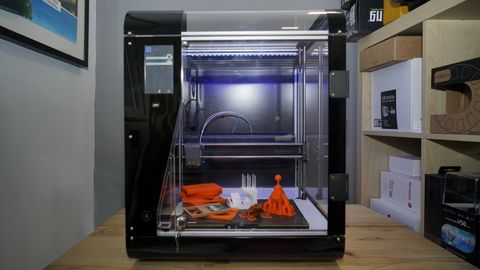
A large part of that success could be attributed to the enclosed design. Materials such as ABS and Nylon print better in a controlled environment, so having the door closed helped with the accuracy of the prints.
As well as the benefit to the print the enclosed environment features a built-in HEPA filter which means that fumes from the molten ABS filament are reduced, a good thing in smaller workshops like mine.
Switching to PLA and the door to the printer needs to be left open for a cooler environment. Although CEL-UK does sell PLA on SmartReels the Robox machines are far better suited to quality materials designed for prototyping, engineering and small product runs.
Although PLA is a popular filament, materials have come on along way in the last few years, and better quality filaments such as PETG generally give a far better print and finish than PLA. That's certainly true when you compare the results of the two materials.
Whatever the material you choose, and through this test, I ran plenty of PLA, ABS, and a fair amount of Nylon and carbon/wood fill but the results were consistent.
After swapping heads at one point, I found that one ABS filament refused to stick to the print platform. Running the height calibration and cleaning the PEI ThermoSurface with an alcohol wipe quickly rectified the issue.

Print quality
There are a variety of tests for checking out the quality of a printer; the first is 3DBenchy a small tug boat that incorporates a few tricky to print features and the more advanced AutoDesk print quality test.
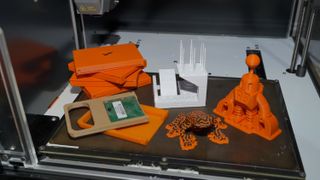
Using an ABS, I printed the 3DBenchy using the three preset quality settings, and in each case, the print produced was excellent, little to fault in the accuracy or flow of the filament in the model.
The bow from all three prints looked fine and printed well as did the cabin, really very little to report.
For no reason, other than I could, partway through one print, I paused the printer, ejected the material and swapped it for another, letting the printer pick up from where it left off. The process was quick and trouble-free.
The next test, the AutoDesk print quality test, and I used the eSUN PLA+ and ran the test with the DualMaterial and QuickFill heads.
QuickFill Head test
Dimensional accuracy - score of 5
In the model there's a stack of cylinders in decreasing diameters, each of these is measured in first the X and then Y axis. The results are then compared with the target measurement. The model produced the following average of the X and Y measurements.
- Target 25 = X: 24.90mm / 0.1mm Error | Y: 24.92mm / 0.08mm Error
- Target 20 = X: 19.93mm / 0.07mm Error | Y: 19.96mm / 0.04 Error
- Target 15 = X: 14.91mm / 0.09mm Error | Y: 14.93mm / 0.07mm Error
- Target 10 = X: 10mm / 0mm Error | Y: 9.93mm / 0.07mm Error
- Target 5 = X: 4.85mm / 0.157 mm Error | Y: 4.81mm / 0.19mm Error
- X Error Average = 0.082
- Y Error Average = 0.09
- X&Y Error Average = 0.086
Fine Flow Control - score of 5
Measuring each of the spikes and it shows a length of 40cm.
Fine Negative Features - score of 4
The negatives features test is a surprisingly difficult one to pass. Here as soon as the print was removed from the print bed, the 0.5 and 0.3 and 0.4 pegs fell directly out of print, this is good, with the second 0.3 coming away, the 0.2, however, stayed put.
Overhangs - score of 4
Overhangs have proved difficult for many 3D printers in this test, but here the RoboxPro does a surprisingly good job with only the slightest sign of issue at 15º.
Bridging - score of 3
Bridging however does prove to be troublesome with the first three being clear and then some sagging of the PLA for the final 2.
XY resonance - score of 2.5
No signs of resonance.
Z-axis alignment - score of 2.5
The final check looks at the Z-axis alignment; there are faint lines but nothing to worry about.
Adding up the totals gives a final score of 26 out of 30.

Dual Material Head test
Dimensional accuracy - score of 4
Again it's the stack of cylinders in decreasing diameters, each of these is measured in first the X and then Y axis. The results are then compared with the target measurement. The model produced the following average of the X and Y measurements.
- Target 25 = X: 24.94mm / 0.04mm Error | Y: 24.94mm / 0.04mm Error
- Target 20 = X: 19.97mm / 0.03mm Error | Y: 19.96mm / 0.004
- Target 15 = X: 14.91mm / 0.09mm Error | Y: 14.92mm / 0.08mm Error
- Target 10 = X: 9.83mm / 0.17mm Error | Y: 9.80mm / 0.20mm Error
- Target 5 = X: 4.76mm / 0.24 mm Error | Y: 4.75mm / 0.25mm Error
- X Error Average = 0.118
- Y Error Average = 0.126
- X&Y Error Average = 0.122
Fine Flow Control - score of 5
Measuring each of the spikes and it shows a length of 40cm, a solid almost string free result.
Exceptional Negative Features - score of 4
The negatives features test resulted in the 0.5 and 0.3 and 0.4 pegs falling directly out of print with the second 0.3 also coming away quickly. The 0.2, however, stayed lodged in.
Overhangs - score of 4
Overhangs are not a strong point of the 'DualMaterial' head, nor do they need to be as prints can rely on a suitable support structure if needed. Here the printer managed the 45º overhang with the others showing dropped loops.
Bridging - score of 3
Again bridging proves to be troublesome for the 'DualMaterial' Head with only the first two being clear.
XY resonance - score of 2.5
Look carefully at the markings, and there are no signs of resonance.
Z-axis alignment - score of 2.5
The final check looks at the Z-axis alignment; here, there are signs of lines on the vertical pillar.
Adding up the totals gives a final score of 25 out of 30.
After the measured test, I reran the AutoDesk 3D Print Quality test with ABS, and although the material is known to shrink slightly, I was interested to see how the results compared.
What was apparent was the increase in the quality of finish using the FormFutura TitanX. The two significant features of note from the prints were the accuracy of the bridging, which easily bridged all gaps, and there was no stringing of the filament.
After satisfying that area of curiosity, I continued with a few of my designs, still perfecting a Nvme drive for an Atomos Ninja V and redesigning a tripod for video work.
The drive caddy has proven to be tricky to print and has several parts that bolt together, there have also been issues with enabling airflow through to the drive.
The difficulty is not so much the complexity of the print but the delicacy. Utilising the TitanX ABS alongside PVOH filament, I was able to produce the print I wanted, adapted and made a model that was easier and simpler to print.
The main issue I have had with the prototypes I've printed before was the overhangs for the runners that hold the drive in position. Here the PVOH filled and supported the 5mm gap and kept the accuracy that I needed.
After the print finished a dip for a few hours in water and the support material was washed away. Assembling the caddy and everything fits neatly together. (After a good fifteen or maybe more prints and tweaks to the design of course) with a soldering iron being used to sink in M3 brass inserts to hold the board.
The larger project at the moment is the tripod, and here I used the Carbon fill to give strength to the crown. Again support material was required due to the angle I had designed the legs, the PVOH acted as a good solid support base to the prototype.
The tripod is a long way off from the design being complete, but with the RoboxPro being able to print Carbon Fill with the SingleX head and being able to print at a large scale is definitely beneficial.
Overall the performance of the RoboxPro can be best described as solid and reliable.
Final verdict
CEL-UK has been at the forefront of 3D print innovation. Their machines have had the features that many manufacturers are only now adopting and incorporating into their machines.
From the compact RoboxDual that first showcased innovations such as intelligent reels, PEI print platforms, filament sensors, self-levelling platforms and the interchangeable head system, it's great to see these on a larger scale.
Where the RoboxDual required some additions to enable networking and wifi, these are all now built into the RoboxPro, and of course, you have the benefit of the larger print area.
One aspect of innovation that really makes the RoboxPro stand out is the ease of Networking, whether that's one, two or more printers they can all be controlled easily from within the AutoMaker interface.
During my test of the RoboxPro, I also had the compact RoboxDual by its side on my desk. Using the two together was just a streamlined experience, printing prototypes on each, tweaking, reprinting and ultimately spending much of my free time absorbed in the process.
Individually they're fantastic printers, but together they're formidable.
While the RoboxDual is great for home and schools, the RoboxPro is a commercial solution. The RoboxPro is the workshop equivalent of a networked office 2D printer, on the network and ready use by anyone when needed.
The built-in HEPA filters make it possible to print ABS and other fume releasing filaments without the issue of smell in smaller workshops.
Having the ability to either print over a network or with the AutoMaker Pro software through USB is also a great addition.
The RoboxPro is a very different machine to the Ultimaker's, PRUSA's and Makerbot's; it's ultimately been designed by an engineering firm and this shows in how it can be used and integrated into a workspace.
CEL-UK create products and use their printers in their design process.
The RoboxPro builds on feedback from users who wanted the innovation and tools that the original Robox printer offered, just on a larger scale.
That feedback culminates in the Pro, a machine that fulfils the need of engineers and design studios. Like any piece of precision engineering equipment, it's designed to develop and be a substantial part of the workshop space.
At $4,500 (£3699 / £3082) before tax the price would be steep for home use, but really the RoboxPro is designed for commercial or academic use and is ideally suited and exceptionally well priced.
- We've also highlighted the best 3D printers
Ali Jennings is the imaging lab manager for Future Publishing's Photography portfolio. Using Imatest Master and DxO Analyser he produces the image quality tests for all new cameras and lenses review in TechRadar's cameras channel. Ali has been shooting digital since the early nineties and joined Future's Photography portfolio back in 2003.

I'm off to France this summer, and this app could make me très fluent

Intel unveils flurry of new Arc GPUs — however serious graphics users will have to wait for more powerful models, as these focus on a completely different and more lucrative market

We just got another hint that the Samsung Galaxy Watch 7 is almost here
