The beginner's guide to Linux Mint
Dive into Linux Mint's brand new desktop interface
Overview mode

Phew! Our tour is nearing its end. The final thing we need to show you is the Overview mode.
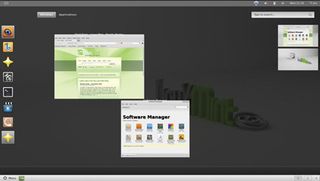
Although Mint hasn't made any changes to the Overview mode, which is a key component of standard Gnome Shell, if you've never used it you'll be grateful for a quick introduction.
To access the Overview mode, you need to click the infinity icon in the top panel, or quickly through your mouse in the top-right corner; you can also use the Windows key to access it. As soon as you do this, you'll see the desktop turn grey and some new elements overlaid on it.
The large space in the centre of this screen has two functions. By default, it will display thumbnails of all your open windows. This is a convenient way to find that window you know is somewhere amongst all the clutter, but keeps evading you.
It can also be used as an application launcher, however, by clicking the Applications button above it. You can then browse applications by scrolling through the icons with your mouse. You can narrow the selection by choosing one of the categories to the right, or by typing its name or function with your keyboard.
To the right of the Overview mode is the Favourites bar. This is exactly the same as what's in the Mint menu, only from here you can adjust its contents. Right-clicking on any of the icons will give you the opportunity to remove it from the Favourites bar. To add anything to it, switch to the Applications view and then drag the application you want on to the Favourites bar.
Oddly, this Favourites bar also doubles as a dock and stores the icons of open applications as well – something the Mint menu doesn't do.
Get daily insight, inspiration and deals in your inbox
Get the hottest deals available in your inbox plus news, reviews, opinion, analysis and more from the TechRadar team.
Finally, there's also a desktop switcher built in to the Overview mode. It's hidden by default, but if you move your mouse to the far right of the screen while in the Windows mode, it will appear. You can use this to drag open windows between desktops, and to switch to different desktops.
Now that you know where everything is by default, let's take a look at how you can customise it to your liking, beginning with extensions.
Installing new extensions

The Gnome team are trying to encourage the creation of an entire ecosystem of extensions for users of the Shell to enjoy. As a user of Linux Mint 12, you'll be able to install and enjoy these as developers create them.
Installation used to be a bit tricky. It involved either downloading a file archive and unzipping it to a specific directory in your home folder, or using Gnome Tweak Tool to automate some of this process. In the past month, however, the Gnome team has launched a new website, extensions.gnome.org, that lets you easily browse and install new extensions directly from within your web browser.
To install extensions using this website, launch Firefox and visit extensions.gnome.org. Once there, you can browse through the extensions displayed.
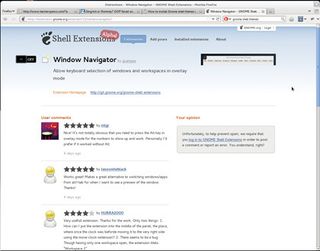
After spotting one you like the sound off, click its name. This will take you to that extension's information page, at the top of which will be an on-off toggle button. Toggling this to on will then install the extension; toggling it back to off will remove it.
We think that the Pomodoro timer extension is a great way to avoid procrastination, and the Window Navigator extension makes the window section of the Overview mode much more convenient.
Theming Gnome Shell
Most people aren't content with tweaking the way their desktop works; lots of us also want to customise the way it looks. It's not yet as easy to install new themes as it is extensions, but there are plenty of nice themes for the Shell that you can install with a bit of effort.
The first thing to do is download some new themes for the Shell. We've discovered that a great place to find them is gnome-shell.deviantart.com, so go ahead and browse their selection of shell themes and then choose one to download as a zip file. We like Faience.
Once it's downloaded and saved in your Downloads folder, open up Gnome Tweak Tool. This is available on the Favourites bar as the square icon with cogs inside – it will display Advanced Settings when you click it.
After it has launched, click the Theme entry on the left-hand side, and then click the box that says (None) next to Shell Theme. In the file browser that opens, head to the zip file of the theme you downloaded, and then select and open it. This will install the theme, and you can then select it in the drop-down menu next to (None). And that's all there is to it.
In this tutorial, we've focused on Mint's implementation of Gnome Shell, but as we've alluded to through our references to Mate and the default applications, there's a lot more to Mint than just this desktop.
Be sure to investigate the Linux Mint website and forums, where you can find lots of other avenues for exploration, including different desktops (KDE, Xfce and LXDE are all supported) and even different base distributions (the rolling release Debian edition is particularly interesting).
Most importantly, experiment and have fun.
--------------------------------------------------------------------------------------------------
First published in Linux Format Issue 154
Most Popular


