80 handy iPhoto tips and tricks
iPhoto hints: organise, improve, manipulate and share
Organise your images in iPhoto
41. Use Descriptions
Keywords are good for categorising photos and descriptive titles can help you identify pictures quickly, but you might want to add more info about the subject or the ways in which the picture has been modified. Do this using the Description field in the Info panel.
42. Keyword shortcuts
There's a quick way to add keywords you use often. First, open the Keywords window (Command+k), then drag the keyword(s) you want from the bottom to the top area – iPhoto will assign a single-letter shortcut. To apply this keyword, select an image thumbnail and type the shortcut letter (the Keywords window must be open for this to work).
43. Keyword searches
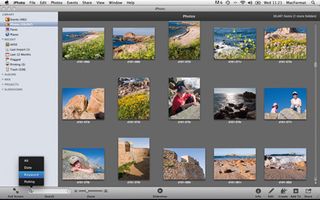
You can search for keywords just by typing them straight into the Search field, but this is pretty indiscriminate and only lets you search for one keyword at a time. But if you choose Keywords from the Search field's pop-up menu, it displays a full list, and each extra keyword you click on narrows the search down further still.
44. Adding Places
Get daily insight, inspiration and deals in your inbox
Get the hottest deals available in your inbox plus news, reviews, opinion, analysis and more from the TechRadar team.
The Places feature is really useful even if you don't have a GPS-enabled camera. It means you don't need to use Keywords for place information, and it lets you browse photo locations on the Places map. To speed things up, you can select multiple photos or even entire Events and assign a Place to many photos at once.
45. Set key photos for Events
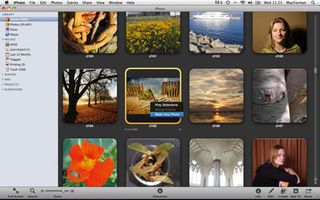
You can 'skim' through all the pictures in an Event by moving the pointer across the Event's thumbnail from left to right, and once you've found the one that sums up the Event the best, right-click and choose 'Make Key Photo'. This now becomes the thumbnail image for the Event.
46. Faces or photos
If you use your mouse to double-click a face on the corkboard to view that person's photos, you'll notice at the top-right is a switch to display Photos or Faces. By default, it just shows faces, cropping off the rest of the picture, but selecting Photos will display the whole picture, and this can be useful when you're trying to identify people in group shots.
47. Merging Events
You can merge Events simply by dragging one Event thumbnail onto another. Or, if you simply want to move photos from one Event to another, select both Events and then double-click either. Both Events are opened and their pictures displayed, and you can now drag photos between these Events.
48. Autosplit Events
When you import photos from your camera they'll be stored as a single Event. Manually splitting them would be tiresome and slow, so select the Event and use the Events > Autosplit Selected Events command instead. The photos will be split up automatically, with one Event for each day you took pictures.
49. Sorting photos into Events
Photos can exist in various albums at the same time, but they can only ever be in one Event. Use this when organising your photos. For example, you can separate personal and work photos in different Events or, if you take pictures for a living, separate photos by client.
50. Hide poor photos
Not every photograph you take will be a masterpiece, yet at the same time you don't necessarily want to throw away pictures with some historical or sentimental value. The solution is to use the Hide Photo command (Command+L). Your substandard photos are now hidden from view unless you use the View > Hidden Photos command.
51. Use ratings and smart albums
The bigger your library gets, the harder it is to sort the wheat from the chaff, which is where ratings come in handy. You can sort photos by rating so that the best ones are at the top, and you can create smart albums that display only your best photos.
52. Multiple iPhoto libraries
You don't have to restrict yourself to one iPhoto library. If you hold down Option as you start iPhoto, you're prompted to choose which library you want to open or where to save a new one.
53. Referencing versus importing
By default, iPhoto imports copies of your photos into its own internal library, but this duplication means you've now got two lots of pictures taking up twice the disk space. But you can set iPhoto up to behave like professional image-cataloguing programs, which 'reference' photos in their existing locations – open the iPhoto preferences, select the Advanced tab and deselect the 'Copy Items to the iPhoto Library' box.
54. Show photos in the Finder
The iPhoto library is displayed as a single file but you can right-click the library icon in the Finder and choose Show Package Contents to see how the files are organised.
55. Use folders for organising
Albums are easy to create and useful for keeping photos together, but you can quickly end up with a lot of them. Organise them into folders (File > New > Folder). These work like the folders in the Finder, and you can also 'nest' folders within folders.
56. Filenames and titles
When you import pictures, the filenames are displayed below the thumbnails. However, what you're seeing is just a photo 'Title'. iPhoto uses the filename initially, but you can type in any titles you like and they don't have to be unique. The photos retain their original filenames in the Finder, though.
57. Batch change titles
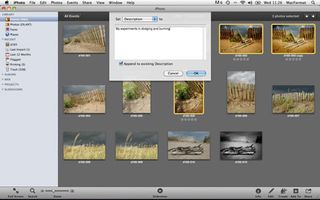
Typing in titles and descriptions for every photo in your collection could become a real bore, but there's a much quicker solution. First, select the photos you want to modify, then use the Photos > Batch Change command. You can set the titles to any text you like, even adding an index number to make them unique. And you can also set the description for all the selected photos, replacing the existing Descriptions or adding (appending) new text to the existing ones.
58. Quickly compare photos
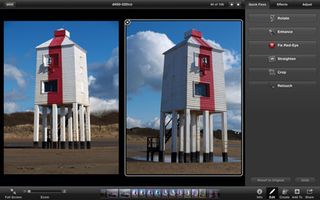
Digital photos cost nothing to take, so it's tempting to shoot half a dozen variants of the same picture to be sure of getting a good one. As good as it is to have this option, it can give you a headache later because you need to work out which to keep and which to delete. But you can compare them directly by selecting them and clicking the Edit button – you can zoom in to check the fine detail, too.
59. Resetting dates and times
iPhoto retrieves its date and time information from the EXIF data embedded in each image by the camera. However, if you haven't set the camera's clock correctly, the pictures will be wrongly dated. You can fix this easily by selected the problem photos and using the Photos > Adjust Date and Time command. And if you wish, you also have the option to apply the changes to the master files themselves.
60. Smart albums really are smart!
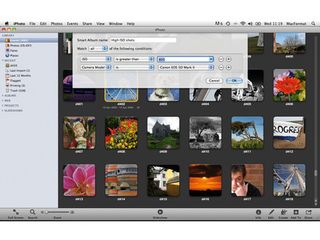
Do you want to see all the photos taken with a particular camera, or at a particular ISO, shutter speed or lens aperture? You can do this by creating a smart album and then choosing shooting settings from the drop-down menu. You can add 'conditions', so you could look for all shots taken at ISO 1600 on a Canon EOS 5D, for example.
Other 'conditions' include album names, faces, dates, keywords, descriptions, edited/unedited files and more. Smart Albums really are an incredibly powerful tool for finding, organising and displaying your photos.
Current page: iPhoto tips 41-60: Organise your photos
Prev Page iPhoto tips 21-40: Tweak your images Next Page iPhoto tips 61-80: Show and share your photos