
Windows 7 has reached End of Life (EOL), which means it's not going to receive any more security updates from Microsoft. You really can't put off upgrading to Windows 10 any longer, but it looks so different to Windows 7 that making the change might be a daunting prospect.
Thankfully, you can make the change less jarring by using free software to bring back the look of the operating system you know and love. All of these tips are easy to try, and can make Windows 10 far easier to get to grips with.
Before you get started, we recommend making a folder where you'll store all the wallpapers, icons and other files you'll be downloading along the way. This will make them easier to find, and if you decide you want to switch to Windows 10's standard look, you can easily erase them all in one go.
1. Get the wallpaper
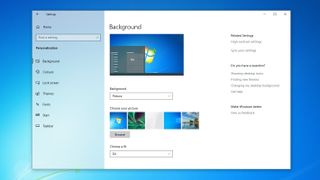
The easiest way to get WIndows 10 looking more familiar is to grab one of the classic wallpapers, and WPArena has compiled a list of all the official Windows 7 backgrounds for you to download. Just save your chosen design somewhere convenient, right-click it and select 'Set as desktop background'.
Can't settle on just one design? Right-click an empty space on your desktop and select 'Personalize', select 'Background' from the menu on the left and choose 'Slideshow' from the drop-down menu. You can now choose a set of different wallpapers to rotate at regular intervals.
2. Restore the Start Menu
Microsoft tried getting rid of the Start menu altogether in Windows 8, replacing it with a colorful screen of rectangular tiles much like your phone's app selector. The Start Menu returned in Windows 10, to the relief of many, but it still looks quite different to the one you know and love from Windows 7.
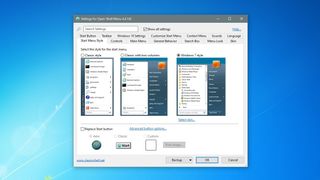
Thankfully, you restore the menu to its former glory using a free tool called Open-Shell-Menu (formerly known as Classic Shell). To try it, download the latest release and run through the installer as directed. There are no potentially unwanted programs to worry about.
Get daily insight, inspiration and deals in your inbox
Get the hottest deals available in your inbox plus news, reviews, opinion, analysis and more from the TechRadar team.
Launch the program, click the 'Start menu style' tab and select 'Windows 7 Style'. Click 'OK', then open the Start menu to see the change.
You can also right-click on the taskbar and uncheck 'Show task view' and 'Show Cortana button' to hide two tools that weren't present in Windows 7. You can also change the 'Search' option to 'Hidden' (the Search bar will still appear in the Start menu).
3. Get the Start button
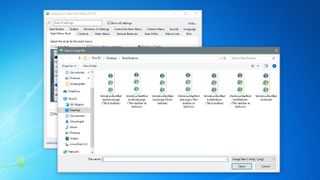
Open-Shell-Menu doesn't include the classic Windows 7 start button, but you can download a copy from the old Classic Shell forums. Download the file BtartButtons.zip from the top post and extract the contents somewhere convenient.
In Open-Shell-Menu, select the 'Start button' tab and check 'Replace Start button'. Click 'Custom button' then select 'Button image' and browse to the location where you saved the icons and experiment with the different options to find one you like.
4. Recreate the Aero theme
One of Windows 7's most attractive features was its Aero Glass theme, which gave windows and toolbars a soft, translucent appearance. Yes, it was more resource-intensive that Windows 10's plain design, but it looked great and modern PCs should have no trouble handing the effect.
Open-Shell-Menu can help recreate this look for the Start menu. Select the 'Skin' tab and choose 'Windows Aero' from the drop-down list to apply the effect.
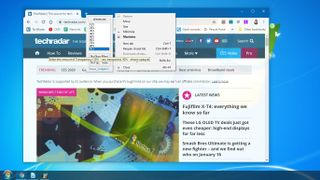
For the Taskbar and other windows, a little program called Glass2K can help. Download and run the software, and use the slider at the bottom of the window to adjust the transparency of the Taskbar. You can also right-click on any window to change its opacity, but bear in mind that this will affect the entire window, not just its title bar.
5. Restore the startup sound
This final tip is far from essential, but it's fun. Download the cheery Windows 7 startup sound as an MP3 (the different download options are on the right) then use Online Audio Converter to convert it to WAV format.
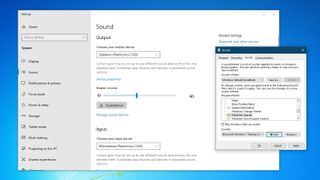
Now type 'regedit' into Windows 10's search box to open the Registry Editor. Navigate to HKEY_CURRENT_USER > AppEvents > EventLabels > WindowsLogon. Double-click 'ExcludeFromCPL' and change the value data from '1' to '0'. Close the Registry Editor.
Search for 'Sound' to open Windows' audio options, and select 'Sound control panel' from the right-hand side. Click the 'Sounds' tab and check the box marked 'Play Windows start-up sound'. Select 'Windows log on' from the list of sounds above, then click 'Browse' and navigate to the Windows 7 startup sound you downloaded.
Click 'Test' to check that it works and click 'Apply', then restart your PC and bask in the nostalgia.
Cat is the editor of TechRadar's sister site Advnture. She’s a UK Athletics qualified run leader, and in her spare time enjoys nothing more than lacing up her shoes and hitting the roads and trails (the muddier, the better)

