How to install Kodi on Android and Android TV
Get Kodi up and running with this easy guide
Setting up Kodi with add-ons
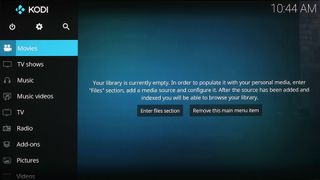
Now we have Kodi installed: that wasn’t so hard. The issue is that Kodi doesn’t offer you any content when it’s first run. It’s a blank canvas.

To add content you either have to either insert a memory card, USB stick or hard drive containing the files, or install things called 'add-ons' that stream content over your internet connection.
If you want to play your own files, plug in your storage of choice and then navigate to the USB drive after selecting 'Enter files section' on the Movies tab.
To add files to the front-end of Kodi, you have to long-press the select button on a folder (not a file) and click Set Content. This is where Kodi scans through your files to find videos and music. You have to choose whether they go into the Movies, TV Shows or Music section, though. It’s best not to simply make Kodi scan through a whole hard drive. Get those folders organised. At least a bit.
Kodi looks up any videos it finds on IMDb, to supply the right cover image. Post-scan they should appear on Kodi’s front page.
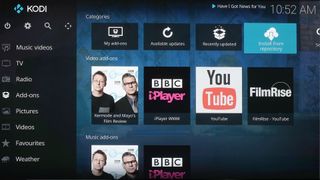
Most people use Kodi for its add-ons, though. To get some of these, go to the Add-ons tab and select Install from Repository. You’ll see a giant list of channels you can add to your Kodi build. It’s intimidating at first.
Get daily insight, inspiration and deals in your inbox
Get the hottest deals available in your inbox plus news, reviews, opinion, analysis and more from the TechRadar team.
Add-ons we keep coming back to include iPlayer WWW, a stripped-back version of the BBC iPlayer catch-up service, and YouTube. You can find more about other recommended Kodi add-ons in our feature dedicated to the subject.
These add-ons will then appear in the Add-ons section of the Kodi front-page.

Have no intention of using anything else? You can remove some of the home screen tabs to pare back the interface, which makes it seem like less of a half-used shell.
Getting a custom look
You can also give Kodi a completely different look with a custom skin. Once again, many of these are included but Kodi doesn’t offer them on a plate with a setup wizard.
You can also give Kodi a completely different look with a custom skin.
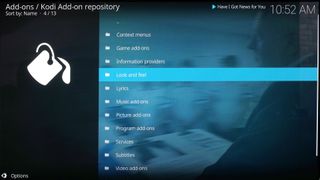
Instead, we have to go to the Add-ons browser again and head to the Look and Feel section. You can fine tune how Kodi looks, but for the beginner we recommend sticking to Skins, which gives the app a one-click overhaul. Skins have a section of their own in the Look and Feel part.

We tried out a skin called Aeon Nox, which has a much slimmer interface bar than the standard look. You’ll also find others that look closer to the PS4 and Apple TV software designs.

To return to the original Kodi flavour, go to the Add-on Browser and select the My Add-ons folder. Here you’ll find the Look and Feel modules you have installed. The vanilla Kodi interface is called Estuary. You should find it in here.
Andrew is a freelance journalist and has been writing and editing for some of the UK's top tech and lifestyle publications including TrustedReviews, Stuff, T3, TechRadar, Lifehacker and others.

