Guide to iWeb: tips and tricks you need to know
Design an entire website in a matter of minutes
iWeb makes it easy to organise and update multiple websites
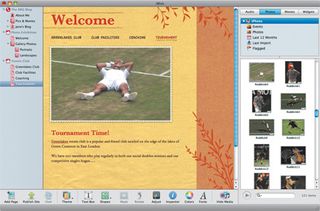
Adding new pages to your website in iWeb is easy– just press the Add Page button in the toolbar or use the New command (Command+N) and up pops the list of available templates for you to choose from.
However, iWeb also enables you to create and manage multiple websites just as easily. You could have your own website sitting alongside another site for a local sports club or a business project that you have going on the side.
Go to the File menu and select New Site (or use the Command+Shift+N keyboard shortcut) and the list of templates will appear once more. But this time, the template you select will be used to create the first page of a completely new website.
Take a look at the Site panel on the left-hand side of the screen and you'll see Site 2 added to the list, immediately beneath your other website. The name of each website has a little triangular arrow beside it to help you tell them apart. You can also rename each website just by double-clicking on it with your mouse.
The ins and outs
That little arrow serves another purpose, though, as clicking on it causes the pages within that particular website to 'collapse' so they're hidden out of sight. This makes it easy to focus on your websites – rather than individual pages – when you're performing site-wide administrative tasks, such as uploading files to the internet or setting passwords.
Get daily insight, inspiration and deals in your inbox
Get the hottest deals available in your inbox plus news, reviews, opinion, analysis and more from the TechRadar team.
When you need to go in and make changes to individual pages, just click on the little arrow again and all the pages will expand downwards, being shown as a list beneath the name of that website (with the page names being indented slightly to indicate that they are subsidiary elements within the main website).
As you'd expect, the files for your websites are all stored on your Mac's hard disk (see box, below left), but at some point you also need to put all those files up on the internet so that other people can admire your handywork.
This process is referred to as 'publishing', and involves uploading a copy of your website onto a web server computer, which is permanently connected to the internet, and which acts as the host for your website. Just click on the name of your website in the main Site panel, and you'll see the Site Publishing window. This includes a simple pulldown menu with three different options for publishing your website.
The simplest option is to use Apple's MobileMe service, which costs £59 per year. Apple has made sure iWeb can automatically link up with your MobileMe account, allowing you to publish your website and get it online with a single click of the Publish Site button.
Make it your own
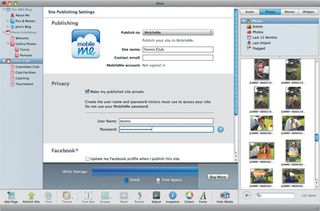
The one tricky thing with MobileMe is if you want to use your own personal domain name with your website. If you have a MobileMe account under the name of John Smith then your published website would normally have a web address along the lines of web.me.com/john.smith/sitename ('web.me.com' is the main web address that Apple uses for hosting the sites of MobileMe users).
However, if you've bought a personal domain name – such as www.macformat.co.uk – you'll want to use that instead. There is an option within the main File menu in iWeb labelled Set Up Personal Domain on MobileMe that connects to your MobileMe account and allows you to enter your personal domain name.
Unfortunately, before you can use this you need to contact your domain name registrar – the company from which you bought your domain name in the first place – and find out how to link your personal domain name to the web.me.com address used by the MobileMe web servers.
There's no simple solution to this, as different registrar companies handle this process in different ways, so you'll have to contact your domain name registrar and ask for their advice. Upload options The second option for publishing your website is to use FTP – file transfer protocol – to upload the site files onto a web server run by a separate hosting company (some of these advertise in MacFormat each month).
Using a personal domain name is much simpler in this case, as you can simply enter the domain name along with the other FTP details that will be provided by your hosting company when you sign up for your account. There's one other option worth knowing about, which is the ability to Publish To Local Folder.
This option puts all your website files into a folder that can be stored anywhere on your Mac's hard disk. This is useful as it allows you to check your website for problems using Safari – or any other web browser – while it's still on your computer.
Once you've checked that everything works properly, you can go ahead and publish the site onto the internet using either the MobileMe or FTP options. You'll still want to update your web pages, adding new photos or blog entries.
There are two options for updating a website once it's published. Look in the main File menu in iWeb and you'll see two options labelled Publish Site Changes and Publish Entire Site. If you've just made some small changes to one or two pages – such as a change of address or adding some new photos – then you can use Publish Site Changes to quickly upload just the pages that have changed.
However, if you've added some entirely new pages, changed the links between pages, or made changes to widgets or other advanced features then it's best to Publish Entire Site. This takes a bit longer, but avoids any potential problems as it ensures the entire site has been fully updated.
How to publish your website via FTP
1. Transfer window
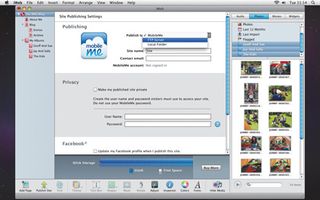
When you're ready to publish your site, click on the name of it in the Site panel. You will see the Site Publishing Settings window, which contains three options for publishing. You can use a MobileMe account, FTP upload or publish the files to a folder on your computer.
2. Protocol 'droid
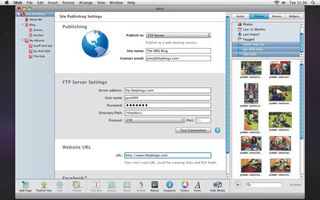
We'll select FTP, which stands for 'file transfer protocol'. That refers to the process of transferring your website files from your Mac to the web server that will host your site. Your hosting company will give you the details you need when you sign up for your account.
3. The visitors
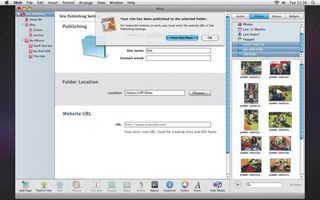
Once the site has been published, you will be asked if you want to visit the site. This will launch Safari and enable you to check the site and make sure everything works. It's worth using the Publish to folder option first, to test the site while it's stored on your Mac.
Current page: Managing your website
Prev Page Building your iWeb site Next Page Add podcasts, newsfeeds and moreCliff Joseph is a former Editor of MacUser magazine, and a freelance technology writer with 30 year’s experience in the industry (and old enough to remember when Apple was close to going bust…).
His first job involved using Macs for magazine sub-editing and typesetting, which led to the realisation that these computer-thingies might actually turn out to be useful after all. After a few years specialising in the Mac side of the market, he went freelance and embraced the wide world of digital technology, including Windows PCs, digital audio and hi-fi, and networking. Somewhere along the line he also developed a bit of a gaming habit and has stubbornly waved the flag for Mac gaming for far too many years.
