Honeybot is a 'low interaction' honeypot. That is, it's designed to be left to defend the network on its own without needing much human help.
Before you install it, however, explicitly run an update to your antivirus system. Now run Windows Update and install all the patches you've been putting off installing. Finally, ensure that Windows Firewall is running.
Honeybot emulates open ports to mimic services that are traditionally exploited by malware and hackers and then captures all the traffic and logs the results. Should someone or something try to inject an exploit via an open port, Honeybot safely stores the file for later inspection. Atomic Software Solutions says its own Honeybot server has captured thousands of exploits.
To install Honeybot, run the executable. At the resultant dialog, click 'Next', accept the agreement and press 'Next' again. When prompted, leave the installation location and Start menu folder as they are. You can create a desktop icon and autostart the honeypot by selecting the two checkboxes on the resulting screen. To finish, click 'Next', and finally 'Install'.

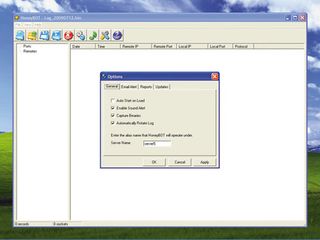
HONEYPOT: You can configure Honeybot to sound an alert when it detects incoming connections
Once installed, start Honeybot and the user interface will appear. A pop-up box will ask if you want to configure it now. Press 'Yes' and the Configuration window will open. This has four tabs. The first, General, lets you define whether Honeybot starts at system boot-up.
You can also define whether you receive an audible warning of incoming connection requests, whether to capture any binaries injected into the honeypot and whether you want the log to rotate.
Get daily insight, inspiration and deals in your inbox
Get the hottest deals available in your inbox plus news, reviews, opinion, analysis and more from the TechRadar team.
Rotation is a technique that limits the log's size by overwriting older entries with new ones, thereby saving disk space. You can also enter a descriptive name for the server on this tab, which will be seen by hackers and malware connecting to some faked services such as telnet and FTP.
The second tab, Email Alert, allows you to have Honeybot send you an email when it detects an attack. Simply enter the name of the mail server it should use (your ISP's SMTP server, for example) and the recipient's email address. You should leave the port number at 25, as this is the standard port for outgoing mail.
If you'd like to help Atomic Software Solutions track attacks as they happen, the third tab, Reports, is for you. Simply tick the 'Upload Logs' box and, if you have chosen to rotate your logs, they'll be uploaded anonymously to a central server.
Finally, the Updates tab enables you to automatically install Honeybot's updates. This is very important, as honeypots need to be as secure as possible and any vulnerability needs patching as it appears. Finally, click 'OK' and then press the blue 'Start' button on the main user interface.
If you hover the mouse over these buttons, a tool tip will tell you what they all do. If you have multiple network adaptors on the machine (which will be the case if your machine is connected both to your home's internal network and to an internet modem), Honeybot will present a pop-up box asking which networks it should monitor. Select 'All' for the moment and press 'OK' to continue.
At this point, Windows Firewall should leap into action and ask if you want to keep on blocking Honeybot or if you'd rather let it through. Select the 'Unblock' option and Honeybot will create its fake ports and the services behind them.
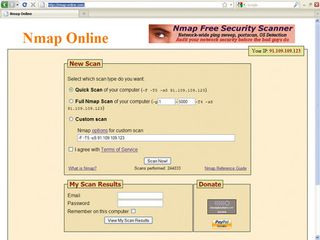
After a few minutes, Honeybot may start alerting you to incoming traffic, but we can also explicitly test its responses. To do so, open a web browser and go to www.nmap-online.com. Select 'Quick Scan', click to say that you agree to the terms and conditions and press the 'Scan Now!' button.

QUICK SCAN: The online Nmap port scanner will soon tell you if Honeybot is doing its job
After a few seconds, traffic should begin to be visible in Honeybot. When Nmap has finished its scan, it should report that lots of (thankfully fake) ports are open.
To turn the source IP addresses of incoming traffic into more meaningful names, go to http://remote.12dt.com, enter the IP address and hit [Enter]. This free service looks through DNS registries to find information about the domain that owns the IP address in question.
Current page: Creating a honeypot
Prev Page How the darknet works Next Page Inside darknets, the darker networks
Scientists inch closer to holy grail of memory breakthrough — producing tech that combines NAND and RAM features could be much cheaper to produce and consume far less power

Google adds biometric verification to Play Store to keep your in-store wallet safe

Quordle today – hints and answers for Wednesday, April 17 (game #814)