50 really useful OS X timesaving tips
Quicker ways to find files, launch apps, and more
33. Use Documents in the Cloud
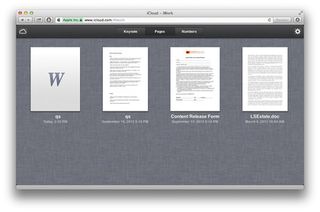
You can sync documents across your devices by making sure Documents and Data is enabled in your iCloud preferences. If you use a browser on a Mac or PC to log in to icloud.com you will see an iWork section and inside this, sections for Keynote, Pages or Numbers documents.
Documents can be deleted, duplicated or downloaded from here and you can also upload from your Mac. Although the sections are named after Apple's iWork suite, you can also upload Microsoft Office formatted files and text documents.
34. Take advantage of automatic downloads
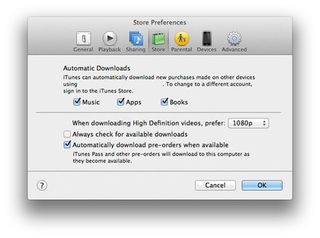
You can set iTunes on your Mac to automatically download content purchased on other devices using your Apple ID. Go into iTunes' Preferences > Store section and switch it on for music, apps or books or all three. So if you buy an album from iTunes while you're out, when you come home it will have downloaded to your Mac automatically. Conversely you can activate the same option on your iOS device so that a book you buy on your Mac from iBooks for example is also available to read on your iPad.
35. Use iCloud like Dropbox
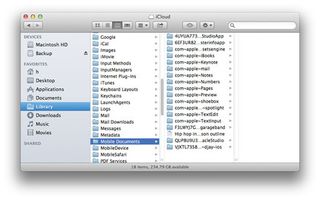
There's an interesting way to fool iCloud into sharing files with your other Macs that are signed in with the same Apple ID. Ensure that in the System Preferences > iCloud section, Documents and Data is switched on. Then go to your User Library folder by choosing Go > Go To Folder and navigating to /Users/username/Library.
Inside that folder, locate a folder called Mobile Documents. If you drop additional files and folders into this folder, they will be pushed to iCloud and also appear in the same location on all other Macs that have been set up using the same Apple ID. It's worth creating an alias to the folder on your desktop for easier access.
36. Share pictures with Photo Stream
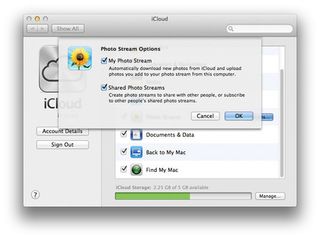
You can activate Photo Stream from any iOS device in the Settings > Photos and Camera section. When switched on, new photos will be uploaded over Wi-Fi and available across all your iOS devices signed in with your Apple ID, and in the Photo Stream tab in iPhoto on your Mac. Individual photos can also be shared directly from your iOS device or from iPhoto, and as well as inviting specific people to be able to view the stream you have the option of making it public, so that anyone can view it on iCloud.com.
37. Share Safari bookmarks
Ever been reading a long-form article or watching a YouTube video in Safari on your Mac, then later gone out and struggled to find the correct page again on your iPhone or iPad? Fortunately there's a solution that's built in to iCloud.
Get daily insight, inspiration and deals in your inbox
Get the hottest deals available in your inbox plus news, reviews, opinion, analysis and more from the TechRadar team.
On your various devices, make sure iCloud Safari syncing is switched on and as long as you were not in Private Browsing mode you will be able to see all the tabs currently open on each device that has this feature enabled. Just make sure the devices in question are signed in with your Apple ID.
In addition, items that you add to your Reading List on one device will also show up in the Reading List section of the other devices. That way you'll never forget a link again!
38. Access your music anywhere
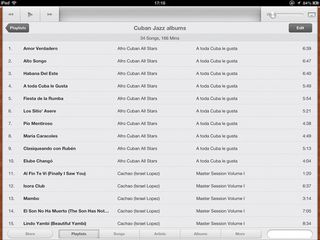
If you sign up for Apple's iTunes Match service, your iTunes library is analysed and all your playlists uploaded to the cloud. Any content that is already in the iTunes Store - and that tends to be most of it - is matched and anything not in the Store is uploaded to the cloud.
By activating iTunes Match on any of your iOS devices you will be able to stream or download any of the music in your account, effectively giving you access to far more music than could physically fit on an iPod or iPhone.
Even better, you can use AirPlay to stream this to any compatible device. So imagine you're at a party where they have an Airport Express connected to their stereo. Using Wi-Fi you could access your whole music library and play it. There's full search capability of course, and the ability to build playlists on the fly, though your Mac remains the master when it comes to the main library.
39. Manage your iCloud storage
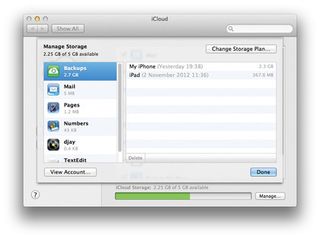
Every iOS user gets 5GB of iCloud storage for free. More accurately, every Apple ID has 5GB of free storage associated with it and you can view and manage this using the iCloud > Manage button in System Preferences or inside Settings on your iOS device.
From any device or Mac running OS X 10.7 you can delete documents or backups stored in iCloud to free up space, or click on Change Storage Plan to upgrade. If you have sold a device and no longer need its backup, delete it.
40. The Apple TV loves iCloud
The Apple TV may be small but its capabilities are not. Sign in with your Apple ID and you are able to stream and buy movies and TV shows online as well as from iTunes on your Mac or PC.
Although they do download to your Mac, these do not actually download to the Apple TV since it has only a small amount of local storage. What happens is that content streams from the cloud and is stored temporarily. So when you buy a movie, each time you watch it you're actually streaming it.
You can also access your Photo Stream and iTunes Match libraries on the Apple TV, all streamed from the Internet. It's not possible - yet - to access your own movies from the cloud like you can with music.
41. Download purchases as often as you like
One of the clever things about tying everything to your Apple ID is that your various devices always know your purchase history. On your Mac, open iTunes and sign in to the Store then go to the Purchased tab under your account. You'll see a list of everything you have ever bought and this can be searched or filtered by music, films, TV shows, apps or books.
What's advantageous is that any of these can be downloaded again for free, even if you have previously deleted them from your Mac. The same purchase history access is possible on an iOS device using the iTunes > Purchased tab on the device.
42. Use cellular data with iTunes Match
If you have iTunes Match set up and switched on, you might find yourself on the move and wanting to listen to a specific song that hasn't been downloaded to your device. There's a solution: go into Settings > iTunes and App Stores and switch on Use Cellular Data. Now when you load a track in iTunes on your iPhone or 3G-equipped iPad, it will stream and be stored on the device.
Switch cellular data off afterwards to prevent any unnecessary data usage. You may also want to leave Automatic Downloads switched off when using cellular data, as these can quickly burn through your data allowance.
43. Share calendars with iCloud
With iCloud set up on your Mac and iOS devices, open up a browser and navigate to icloud.com on your Mac and sign in, then click on Calendar. You will see a list of your calendars along the left side of the window and if you click on the Edit button next to any one you will see the option to make the Calendar private or public.
To share it with selected people, choose Private then add the names of select iCloud members to invite. To make it public, click Public and you are provided with a link that other users can open in iCal, Calendar, or Microsoft Outlook. A useful function, especially for planning collaborative projects.
Current page: iCloud tips
Prev Page Backing up Next Page Stay in touch with your Mac and iOS devices