How to manage disk sets and RAID arrays in macOS Sierra
Make and manage disk sets

Disk Utility in macOS Sierra adds the ability to create and manage disk sets. Strictly speaking, you could also manage disk sets in OS X 10.11 El Capitan, but you had to do so in Terminal, using the diskutil command.
So, an immediate benefit of Sierra is that it’s more comfortable to work with disk sets, whether a prebuilt one that depends on this macOS feature or a set you assemble from separate drives.
A disk set takes multiple disks – a minimum of two – and pools their resources in one of three ways. The first is a striped disk set, or RAID (Redundant Array of Independent Disks) level 0.
This type of set has the cumulative capacity of all its disks. It may spread chunks of data, even if part of the same file, across its disks to distribute the burden of read and write operations, improving the set’s overall throughput.
However, the risk here is that if one disk fails, the whole set’s data is lost. The second is a mirrored disk set, also known as RAID level 1, and for many people it’s the most compelling of the three options available in Disk Utility due to the additional protection it affords to your files; whatever you copy to a mirrored set is stored multiple times – once on each of the disks in the set.
Fighting disk failure
The advantage of this is that as long as one disk does not fail, you can rebuild the array by replacing those that have become faulty.
The worst cases here are if data on every disk becomes corrupted or all of the disks fail at the same time. The former situation can be addressed by creating one or more periodic backups of the mirrored set and storing that separately, in the hope of limiting propagation of any damage.
Get daily insight, inspiration and deals in your inbox
Get the hottest deals available in your inbox plus news, reviews, opinion, analysis and more from the TechRadar team.
The latter situation can be dealt with by adding one or more extra disks to the set, either as additional slices (live copies of all the data stored by the set) or as spares, which are ordinarily idle and only called into action when a slice fails, in order to rebuild the set so that you have your desired minimum number of copies.
A mirrored disk set’s capacity is the same as the lowest capacity disk that’s part of it, so you’ll want them to match in order to make the most efficient use of all of them.
The third kind of disk set is JBOD, meaning just a bunch of disks. This simply concatenates the capacity of multiple disks – which can be different – into a single volume.
This kind of disk enables several small disks to work like they are one, which you can then use as part of a striped or mirrored array in which other disks match the capacity of the concatenated set. However, this means there are more potential points of failure in the resulting set.
Performance considerations
With a striped disk set in particular, try to connect the disks to different ports on your Mac, rather than through a USB hub, which can detrimentally affect the performance of speedy storage devices, notably SSDs.
In the walkthrough below, you’ll learn how to safely set up RAID 0 and RAID 1 disk sets in macOS Sierra. Before you begin, gather at least two drives that are blank or whose contents you don’t need; they will be erased, so make sure you have a backup of anything on them that you want to keep.
1. Create a disk set
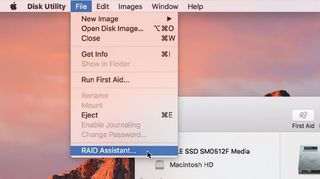
Connect to your Mac all of the disks you want to be part of the disk set. For safety, disconnect other disks that won’t be part of the set to ensure you don’t accidentally erase their contents in this process. Choose File > RAID Assistant.
2. Choose a set type
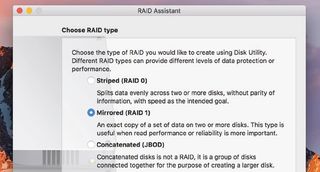
You’ll be shown three descriptions, corresponding to those on the facing page, of the three types of disk set you can create and manage using Disk Utility.
Select the type you want to create, then click the Next button.
3. Review available disks
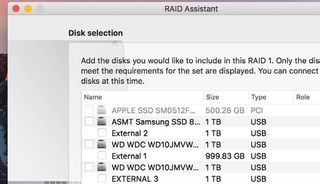
You’ll be presented with a list of all the disks connected to your Mac, and the volumes on them. Your startup disk will be dimmed as it can’t be used.
To aid in their identification, each one’s connection type and capacity are also listed.
4. Choose disks for the set
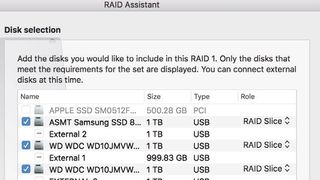
Disks and volumes are organised much like they are in the left pane of Disk Utility’s main window, with volumes indented slightly under the disk they are on.
Click the checkboxes next to each disk you want to include in the set.
5. Set each disk’s role
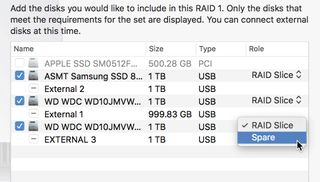
Each disk in a mirrored set must be designated as a RAID slice, to contain your data (two minimum), or a spare.
Spares are optional but offer some extra protection; they are used to rebuild a set if a slice becomes inaccessible. Click Next.
6. Set disk set properties
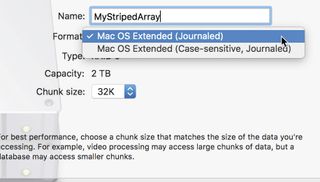
You need assign a name to your disk set, which is what will be shown in Finder. Of the two choices offered for the set’s format, the most common one to choose is Mac OS Extended (Journaled) – that is, the one that isn’t case-sensitive.
7. Chunk size (striped sets)

With a striped set, chunks of data that make up each file are spread across the disks.
If you chose this type for faster transfers, a smaller chunk size is more efficient; one disk can read a small chunk while another looks for the next one.
8. Chunk size (mirrored)
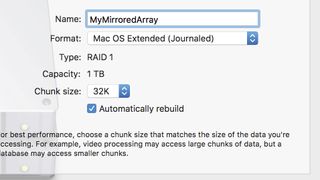
In a mirrored set, pick a large chunk size if it’ll store videos or other big files, or a smaller one for simpler files .
With ‘Automatically rebuild’ on, if a disk fails or is removed, the set is rebuilt using a spare; a reconnected disk then becomes a spare.
9. Finish creating the set
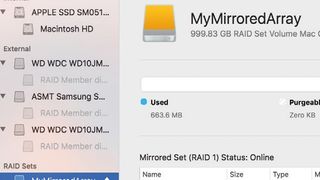
Click Create, then Done. In Finder, the set acts like a regular disk.
To check its status, such as during rebuilding of a mirrored set, select it under RAID Sets in Disk Utility’s left pane. You can later add more slices or spares to a mirrored set.
- Enjoyed this article? Get more tutorials, guides, and tips on how to get the most from your Apple devices inside MacFormat. Take advantage of an exclusive offer in our sampler today.
