How to set up a Raspberry Pi-powered cloud service
Your very own cloud
6. Upload and share files
You're now all set to upload data into your OwnCloud server. After you've logged in, you are in the 'Files' section. To upload a file, click the arrow button.
To organise files into folders, click the button labelled 'New', and select the 'Folder' option from the drop-down menu to create a new folder.
If you've uploaded a file in a format that OwnCloud understands, you can click its name to view and edit the file.
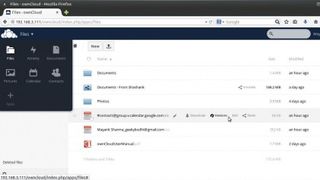
OwnCloud can visualise the data it houses in different views. For example, click the 'Files' pull-down menu in the top-left corner of the interface, and select 'Pictures'. This helps you view images in your cloud by filtering out all other types of content.
Another way to upload files to the server is by using the WebDAV protocol, with which you can access your cloud server from your file manager. For example, in the 'Files' file manager, press [Ctrl]–[L] to enable the location area. Here you can point to your OwnCloud server, such as 'dav://192.168.3.111/owncloud/remote.php/webdav'.
Once authenticated, the OwnCloud storage is mounted and you can interact with it just like a regular folder.
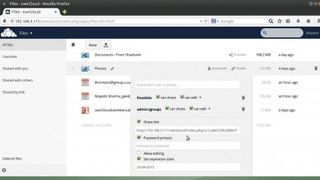
To share uploaded files, simply go to the 'Files' section in the web interface and hover over the file or folder you wish to share. This displays several options, including 'Share', which enables you to select which users or groups you want to share the item with and whether you want to give them permission to edit and delete the files.
Get daily insight, inspiration and deals in your inbox
Get the hottest deals available in your inbox plus news, reviews, opinion, analysis and more from the TechRadar team.
You can also share with someone who isn't registered with your OwnCloud server. Click on 'Share with Link', and OwnCloud displays a link to the item that you can share with anybody on the internet. You can also password-protect the link and set an expiration date too.
While you can interact with the cloud using the web interface, it's far easier to use one of its official clients. OwnCloud has clients for all the major desktop and mobile platforms. These clients also help you synchronise folders from the desktop to your OwnCloud server with ease.
7. Set up clients
Most desktop distributions host the Linux client in their official repos. You can also grab the latest version by adding the corresponding repo for your distro. The page has instructions for popular distros including Debian, Fedora, Ubuntu, OpenSUSE and more.
Head to the downloads page on OwnCloud's website to download clients for other platforms. Mobile clients are best fetched from either Apple's App Store or Google's Play Store.
Once the client is installed, it prompts you for your login credentials in order to connect to the OwnCloud installation. Once connected, the Linux clients create a local sync folder named 'owncloud' under the home directory, such as '/home/bodhi/owncloud'.
Any files you move into this directory are automatically synced to the server. You can also specify one or more directories on a local machine to sync with the OwnCloud server.
If a directory is shared with several users, when anyone makes a change to a file on one computer, it automatically flows across to the others. When collaborating with other users, you'll appreciate OwnCloud's version control system, which creates backups of files before modifying them.
These backups are accessible via the Versions pull-down option corresponding to each file, along with a Restore button to revert to an older version.
In addition to files and folders, you can also get your calendar and address book synced with your OwnCloud server.
8. Install and enable apps
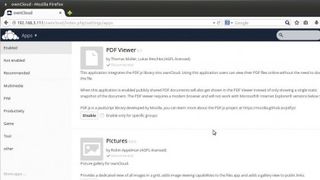
You can extend your default OwnCloud installation by adding (or removing) a bunch of apps. Bring up the pull-down menu in the top-left of the interface and click 'Apps'.
By default, you're shown a list of apps that are already enabled on your installation. You can browse through this list and read their descriptions to understand them better. You can also disable any enabled app from this section.
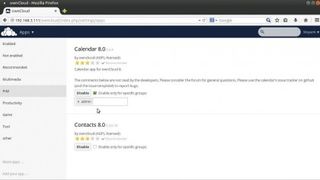
Scroll down and click the 'PIM' tab on the left. This section lists two apps. You can enable either or both the Calendar and Contacts apps. Once you've enabled both, the top-left pull-down menu now includes the Calendar and Contacts option.
Now you need to import your contacts and calendar from your existing apps into your cloud server. OwnCloud supports the popular vCard file format (which has the .vcf file extension) and almost every popular email app, including online ones such as Gmail, export their address books in this format.
Similarly, calendars can be imported in the iCal format. Before proceeding further, make sure you download both the .vcf and .ical files from your existing contacts and calendar apps.
Now, head to Contacts in OwnCloud and click 'Import Contacts'. In the pop-up window, click 'Upload File' and point it to the .vcf file. Once the contacts have been imported, you can sync them with your email clients using CardDAV links. Head to the 'Contacts' section in OwnCloud, click the gears icon at the bottom, hover over the name of the address book you imported and click the 'Chain' icon.
This spits out a CardDAV link for this address book that you can feed to your desktop or mobile address book client.
9. Sync and share your calendar
Similarly, you can use OwnCloud to manage your calendar and tasks. To create an event in your calendar, head over to the Calendar app. You can view the calendar for the entire month or for the current week.
To add a new event, click the appropriate date in the calendar. This brings up a window, which gives you several options to configure the event. To import an existing client, simply upload the .ical file to your cloud server. When you click the file in OwnCloud's web interface, the server recognises the file and offers to import it into an existing calendar or into a new one. Select the option that best suits you.
After you've imported the calendar, you can use OwnCloud to share it with other users. Click the 'Share Calendar' icon corresponding to the calendar you wish to share. This brings up a pull-down menu, which enables you to select the users or the group of users you wish to share the calendar with.
Furthermore, just like address books, OwnCloud can also sync your calendars with desktop and mobile apps that can read this information from CalDAV links. To get the CalDAV link for your calendar, click the 'Gears' button and then the 'Chain' icon corresponding to the calendar you wish to sync.
This displays the link that you can pass on to the clients to keep them in sync with the OwnCloud calendar.
There's a lot more you can do with OwnCloud. Explore the 'Apps' menus to find other ways to flesh out the default installation and extend the functionality of your cloud. In addition to the apps listed in the Apps section on your OwnCloud installation, there are others that you can install from the OwnCloud website.
Scroll down the Apps section and click the 'More Apps…' link. This takes you to the OwnCloud store. You can download any app from here and extract it under the '/var/www/owncloud/apps' folder inside the Raspberry Pi.
10. Universal access
The real advantage of commercial cloud services such as Dropbox is that you can access data stored within them from any computer connected to the internet.
However, by default, a self-hosted OwnCloud installation is only accessible from computers and devices that are within the local network.
That's not to say that you can't access your private cloud from the internet. The trickier and expensive solution is to get a static IP address from your ISP and then poke holes in your router's firewall.
Or, you can set up Dynamic DNS in your router or local machine. The smarter way, however, is to use a tunnelling service, such as PageKite. The service uses a pay-what-you-want model. As a non-commercial user, you can use the service for free by filling out a form once a month, telling PageKite how you use the service.
But if that sounds like too much hassle, it's definitely worth the $3 per month minimum it requests from individuals.
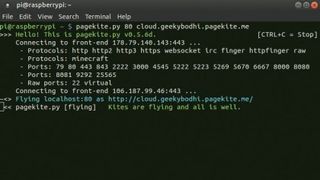
First, you need to install PageKite. Launch a terminal and enter:
$ curl -s https://pagekite.net/pk/ | sudo
bash
When it's done, make your local web server public by entering the following command:
$ pagekite.py 80 mycloudserver.
pagekite.me
Also, remember to replace 'mycloudserver' with the name you want for your OwnCloud server. Now you can access your own personal OwnCloud instance by heading over to http://mycloudserver.pagekite.me from any computer, anywhere in the world.
The first time you run this command, PageKite runs you through its brief signup process and will ask you for your email address.
- Enjoyed this article? Expand your knowledge of Linux, get more from your code, and discover the latest open source developments inside Linux Format. Read our sampler today and take advantage of the offer inside.
With almost two decades of writing and reporting on Linux, Mayank Sharma would like everyone to think he’s TechRadar Pro’s expert on the topic. Of course, he’s just as interested in other computing topics, particularly cybersecurity, cloud, containers, and coding.

My haunted Roomba S9+ kept me up all night and iRobot says there’s no way to fix it

HP launched a very promising ultra portable XPS13 killer laptop — the 1kg EliteBook 635 Aero G11 is only available in Japan with seemingly no plans for a global launch, but why?

Is this the best time ever for iPhone deals at Verizon? Multiple devices are free without the need for an annoying trade
