How to build automatic entry lights with a Raspberry Pi
Light up your home

Returning home to a dark house can be depressing so let's use a few off-the-shelf components to build a bright welcome home project using the Raspberry Pi.
You will need:
- Any Raspberry Pi Zero, A+, B+, Raspberry Pi 2 or Raspberry Pi 3
- The latest Raspbian OS
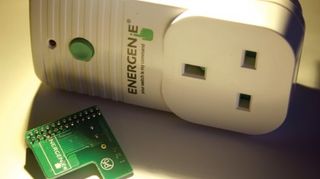
- Energenie power sockets and Pi Remote
- A reed switch
- Jumper wires
- Magnets
- All of the code can be found here
The project
First, we need to attach the Energenie to the first 26 pins of the GPIO on your powered-down Raspberry Pi. (For reference, pin 1 is the pin nearest the SD card slot.) The board will fit neatly over the Raspberry Pi with no parts hanging over.
Now attach a female-to-female jumper cable to GPIO20 and GND through the unused GPIO pins. (If you want to extend the jumper cables simply use male-to-female cables until the desired length is reached.) On one end of the female jumper cable attach the reed switch and then the other.

Using sticky backed plastic attach the switch to a door frame and attach magnets level to the switch but on the door itself so that the switch is closed when the door is closed.
Boot your Raspberry Pi and open a terminal. To install the Energenie library for Python 3 use $ sudo pip-3.2 install energenie.
Once installed open a new Python 3 session via the Programming menu. To pair our Energenie units with our Raspberry Pi open the IDLE shell and type from energenie import switch_on, switch_off. Now plug in your Energenie and press the Green button for six seconds.

This forces it to look for a new transmitter. Back in your IDLE shell, type switch_on(1). This will pair your Raspberry Pi to the unit and designate it '1' and the process can be repeated for four units. With IDLE open click on File > New Window and save your work as entrylight.py.
Get daily insight, inspiration and deals in your inbox
Get the hottest deals available in your inbox plus news, reviews, opinion, analysis and more from the TechRadar team.
We'll start by importing the libraries for this project:
from energenie import switch_on, switch_off
import time
import RPi.GPIO as GPIO
The energenie library controls the units for our lights, and time is used to control how long the units are powered for and RPi.GPIO is the library used for working with the GPIO.
GPIO.setmode(GPIO.BCM)
GPIO.setup(20, GPIO.IN, GPIO.PUD_UP)
switch_off()
Next, we set the GPIO to use the Broadcom pin mapping and set GPIO20 to be an input with its internal resistor pulled high, turning the current on to that pin. Finally, we turn off the Energenie units to make sure they are ready.
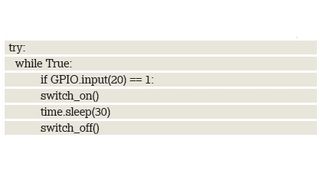
The main code uses a try…except structure to wrap around an infinite loop. This part of the code requires you to place indents accurately for each line, so make sure it looks like the following image.

Inside the loop we use a conditional statement to check if the input has been triggered, ie the door has been opened. If true then the units are switched on for 30 seconds and turned off again.

We finish the conditional statement with an else condition. This will turn the units off and loop continually. We close the try…except structure with a method to close the project, pressing CTRL+C will end the project and switch off the units should the need arise.
With the code complete, save your work and click on Run > Run Module to test the code.
Energenie
Controlling high voltage devices is a project for those that know their stuff but with Energenie we can significantly reduce the risk.
Energenie units at their core are simply 433MHz receivers that control a relay; a component that uses a low voltage to control a magnetic switch in a high voltage circuit. On the Raspberry Pi we have a transmitter which can instruct the receivers to turn on and off.
Energenie units are a safe way to control mains electricity. The standard Python library for Energenie is rather cumbersome, requiring the user to control the GPIO pins used by the transmitter in order to connect to each device and issue the correct instruction.
This library has been made a lot simpler thanks to Ben Nuttal, a member of the Raspberry Pi Foundation's Education team, and Amy Mather, known to many as Mini Girl Geek, a teenage hacker and maker. This improved library, which we've used in this tutorial, requires that we know the number of each unit and can issue an instruction to one or all units at once.
The library can be found on GitHub, should you wish to inspect the code and learn more about how it works.
- Enjoyed this article? Expand your knowledge of Linux, get more from your code, and discover the latest open source developments inside Linux Format. Read our sampler today and take advantage of the offer inside.
