Guide to Mac OS X File Sharing
Share files with other user accounts or across your network

You're sat in the lounge with your family, and you want to show them your holiday videos on the Mac mini you use as a media centre. But the videos are on your iMac. How do you transfer them?
Or maybe you've just finished a Keynote presentation, and need to share it with a colleague who has his own user account on your Mac. It's too big to email, so how do you get it to him?
You could use a USB stick, or email smaller files to yourself. Or for your home network, you could invest in a network attached storage (NAS) drive, accessible to everyone. But there's another way.
Using OS X's file-sharing abilities, you can define a folder as 'shared', enabling other computers on your network - and other user accounts on your Mac - to access them. Privileges can be set to give different access rights to different accounts, allowing people or groups to read, write or both.
Every OS X user account has a Public folder, which is used to share files with other people. It's always accessible to other user accounts on the same machine, and if File Sharing is enabled, it can be used to share files over a network too.
Your Public folder is found in Hard Drive/Users/[username]. Inside is another folder called Drop Box. By default, anyone connected to your Mac can read from (and copy files from) your Public folder, and write to (but not open) the Drop Box, though this can be configured if you wish. File Sharing also lets you define other folders as publicly accessible.
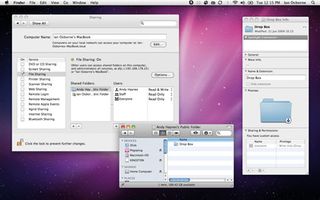
To activate and configure your Mac's File Sharing function, you must be logged on as an administrator, or at least know an administrator's username and password. Under the Apple menu, choose System Preferences. Open the Sharing pane - the one that looks like a folder with a figure in a yellow diamond on it.
Get daily insight, inspiration and deals in your inbox
Get the hottest deals available in your inbox plus news, reviews, opinion, analysis and more from the TechRadar team.
If you're logged into an account that doesn't have administrator privileges, click on the lock in the bottom-left corner of the window, and enter the name and password of an administrator. If you're using an admin account, it should already be open.
File-sharing function

Click on the check box labelled File Sharing to enable this feature. Your public folder is now accessible to other users on the network, and can be accessed by clicking on your computer in the Shared column in a Finder window's side bar (if the side bar is missing, toggle it on or off by pressing the pill-shaped button in the top-right corner).
You can now make files accessible to others by moving or copying them to your Public folder, and they can give files to you by putting them in your Drop Box folder, which everyone can see, but only you can open.
Once again, these are default settings, and can be configured to behave differently, as we'll cover in more depth later. But what if you want to share other folders?
For example, to give everyone in your house access to your Movies folder, without moving it into your Public folder? To do this, we must define Movies (or indeed any folder) as 'shared'. With File Sharing highlighted, two panels appear to the right, one titled Shared Folders and one called Users. Both have little boxes underneath labelled '+' and '-'.
To share a folder with everyone on your network, press the '+' button under the Shared Folders panel and navigate to the folder to share. To remove a folder from this list, highlight it and press the '-' button.
Most Popular

